
How to Build Multi-Step Drupal Forms That Adapt to The User’s Choices

Companies and organizations rely on a wide variety of online forms for communication with their audiences. In one of our latest articles, we explored the basics of creating essential types of forms every Drupal site needs.
Often, forms need to be a little more complicated. To keep user experience effortless and the interface clean, you might consider splitting long forms into multiple pages and dynamically showing or hiding questions based on a user’s choices.
That’s exactly what we’re going to demonstrate in this article. To continue our series exploring the endless capabilities of Drupal’s Webform module, we’ll build a multi-step form equipped with smart conditional logic.
A glimpse of multi-step forms with conditional logic
What is a multi-step form and why is it useful?
A multi-step form is a long form broken down into shorter, bite-sized pages or steps. Instead of forcing users to look at a massive wall of fields all at once, a multi-step form uses a progress bar or step indicator to guide them through logical categories (such as “About You,” “Your Options,” and “Logistics”) one screen at a time.
Benefits:
- Reducing form abandonment. Long forms cause immediate visual fatigue, making users close the tab. Multi-step forms hide the complexity, making the initial step look effortless to start.
Creating a narrative flow. It chunks information logically, so moving from general identification to specific choices feels like a natural conversation rather than an interrogation.
What is conditional logic in forms and why is it useful?
Conditional logic (also known as progressive disclosure) is a set of rules that dynamically changes a form based on the user’s answers. It is based on the famous “If/Then” statement: IF a user selects Option A, THEN show Question B. If they don’t select Option A, Question B stays completely invisible.
Benefits:
- Personalizing the experience. Conditional logic ensures every user only sees fields that are 100% relevant to them.
- Keeping forms clean. By hiding advanced or optional follow-up questions, the page remains cleaner, more compact, and completely uncluttered.
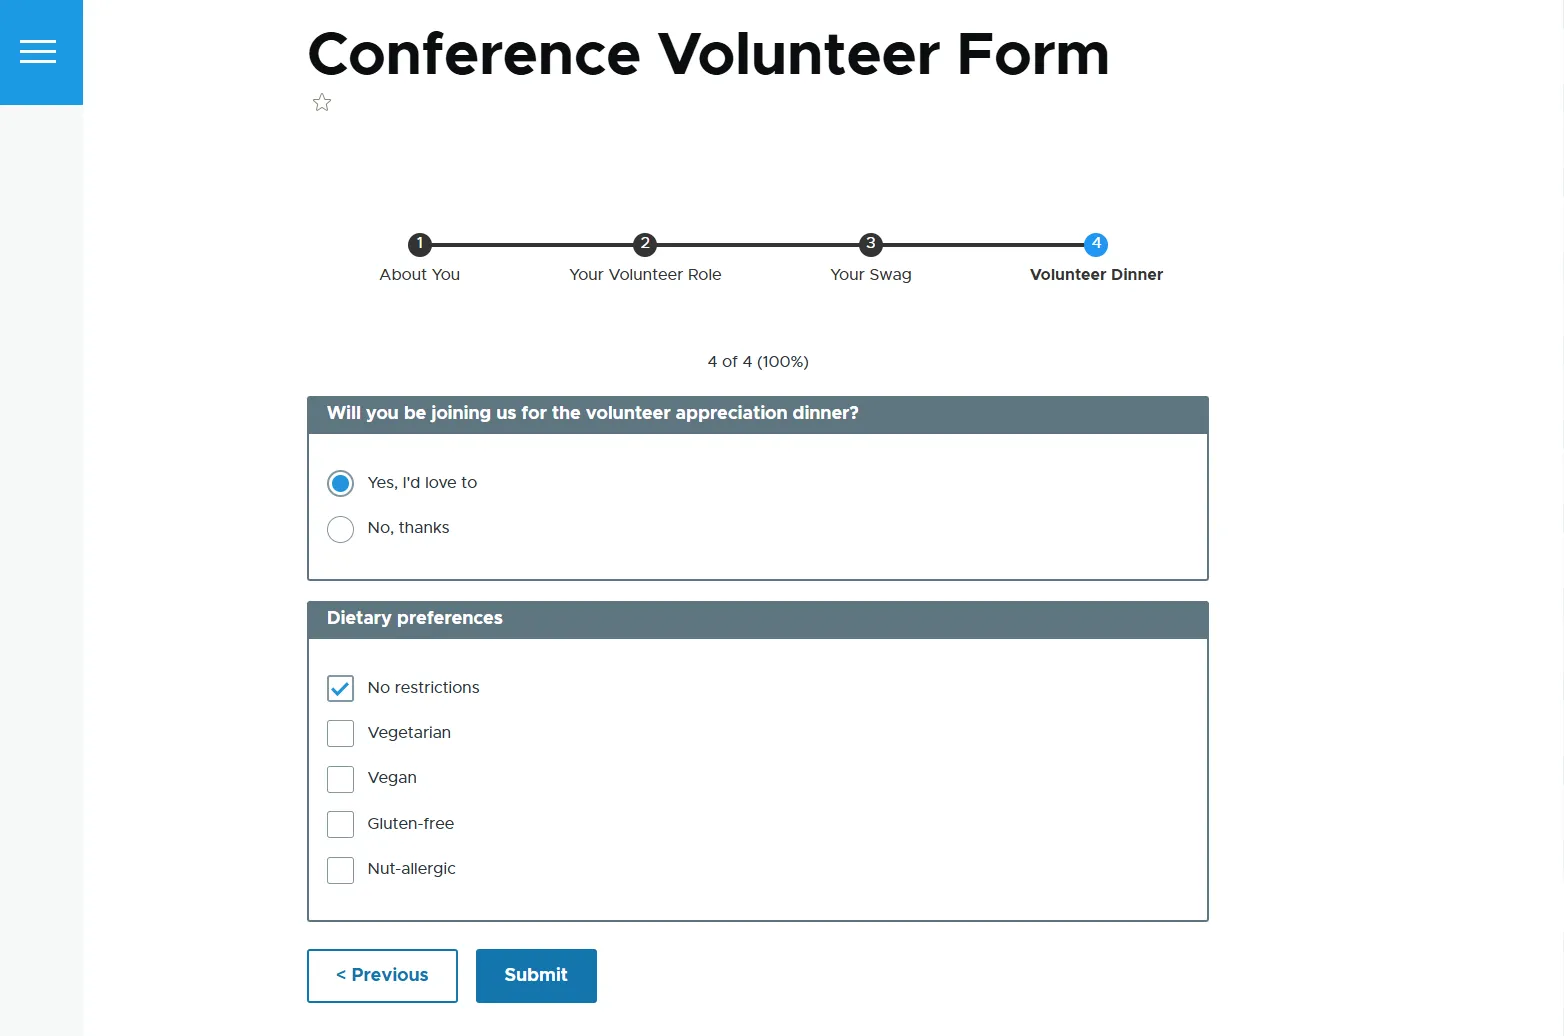
How to create a Drupal multi-step form with conditional logic
Let’s move on to our step-by-step guide. In this example, we will create a conference volunteer registration form with multiple clear steps where additional options will be displayed based on the volunteers’ initial choices.
Step 1: Create the form
With the Webform module installed on your Drupal website, Navigate to Structure > Webforms and click the “Add webform” button. Name your webform “Conference Volunteer Form” and save it.
Step 2: Add elements with conditional logic
Now it’s time to create the actual form pages, or steps. You can do it by clicking the “Add page” button once you are on the “Build” tab of your form.
Page 1: “About You”
The first step of this example form will be collecting volunteer names and contact information. Let’s create a page named “About You” and then populate it with elements by clicking “Add element.” A sidebar with the element’s settings opens, where you need to choose the element type for a start. For this example form, you’d need to:
- add an element of “Text field” type and name it “Your Name”
- add an element of “Email” type and name it “Your Email”
- add an element of “Telephone” type and name it “Your Telephone Number”
It is best practice to make all fields in this step required. You can do it by scrolling down the element’s settings and checking the “Required” checkbox. Save each element.
All elements that belong to a specific page are displayed with a corresponding indent under this tab in the form’s settings. The order of pages and elements can be re-arranged by drag-and-dropping.
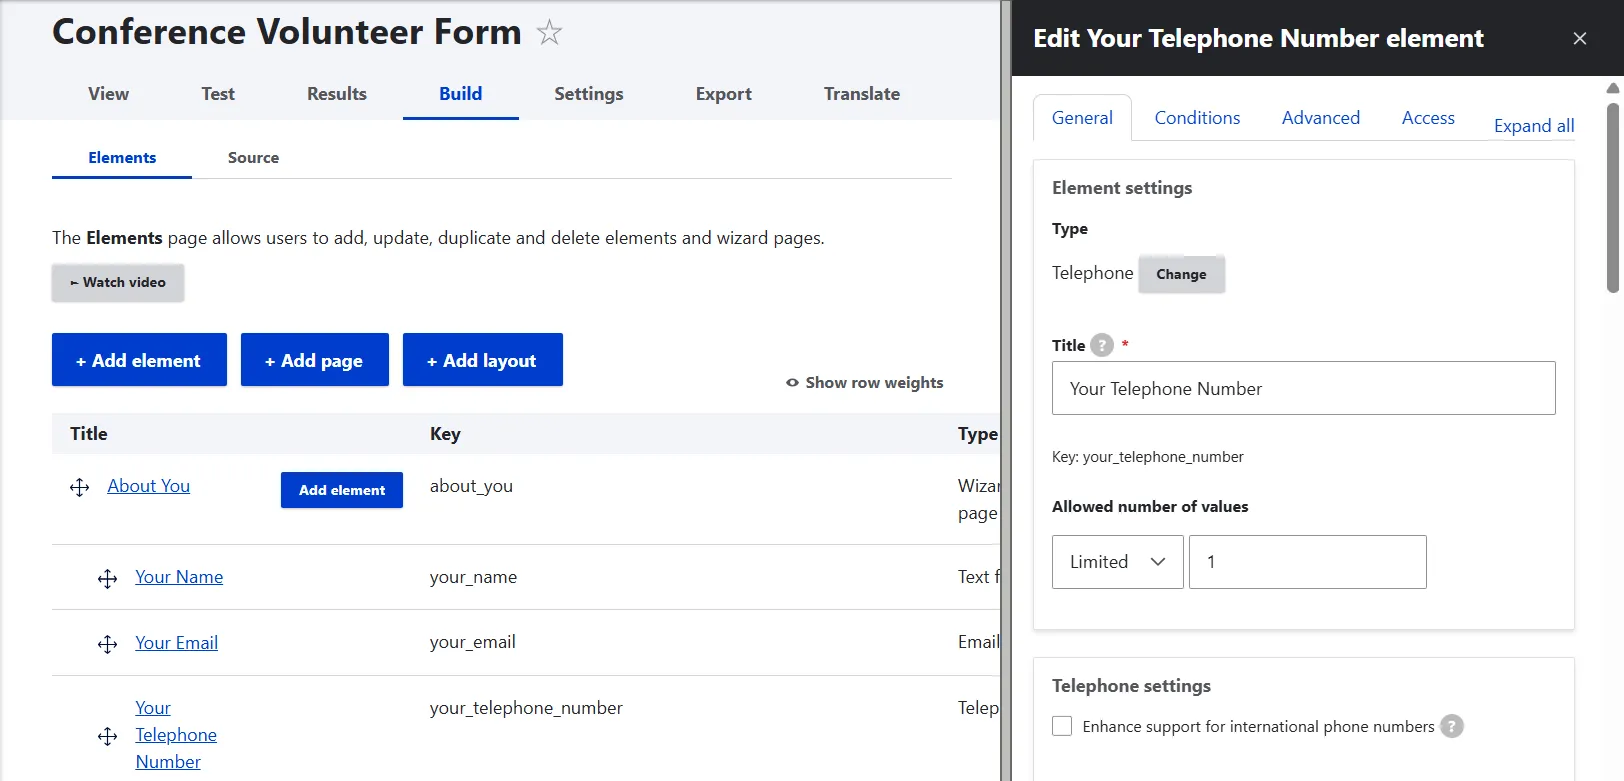
Page 2: “Your Volunteer Role”
The next page will ask volunteers about the main areas of their potential engagement: Technical Assistance or Attendee Support. Here is where conditional logic comes into play:
- Users who have chosen “Technical Assistance” will be asked about the specific areas for technical assistance.
- Users who have chosen “Attendee Support” will be asked about the languages they speak.
Add a “Your Volunteer Role” page. Then add an element of “Radios” or “Select” type named “How would you like to get involved?”. The “Select” element is basically a dropdown menu.
Scroll to the “Element options” and add the options:
- “Technical Assistance”
- “Attendee Support”
When adding options, it’s important to fill out both the “Option value” (the unique machine name) and “Option text” (how the option will be displayed to users). In many cases, Webform autopopulates the option text based on the option value for you. The “Option description” field is optional and can be useful when longer text is needed.
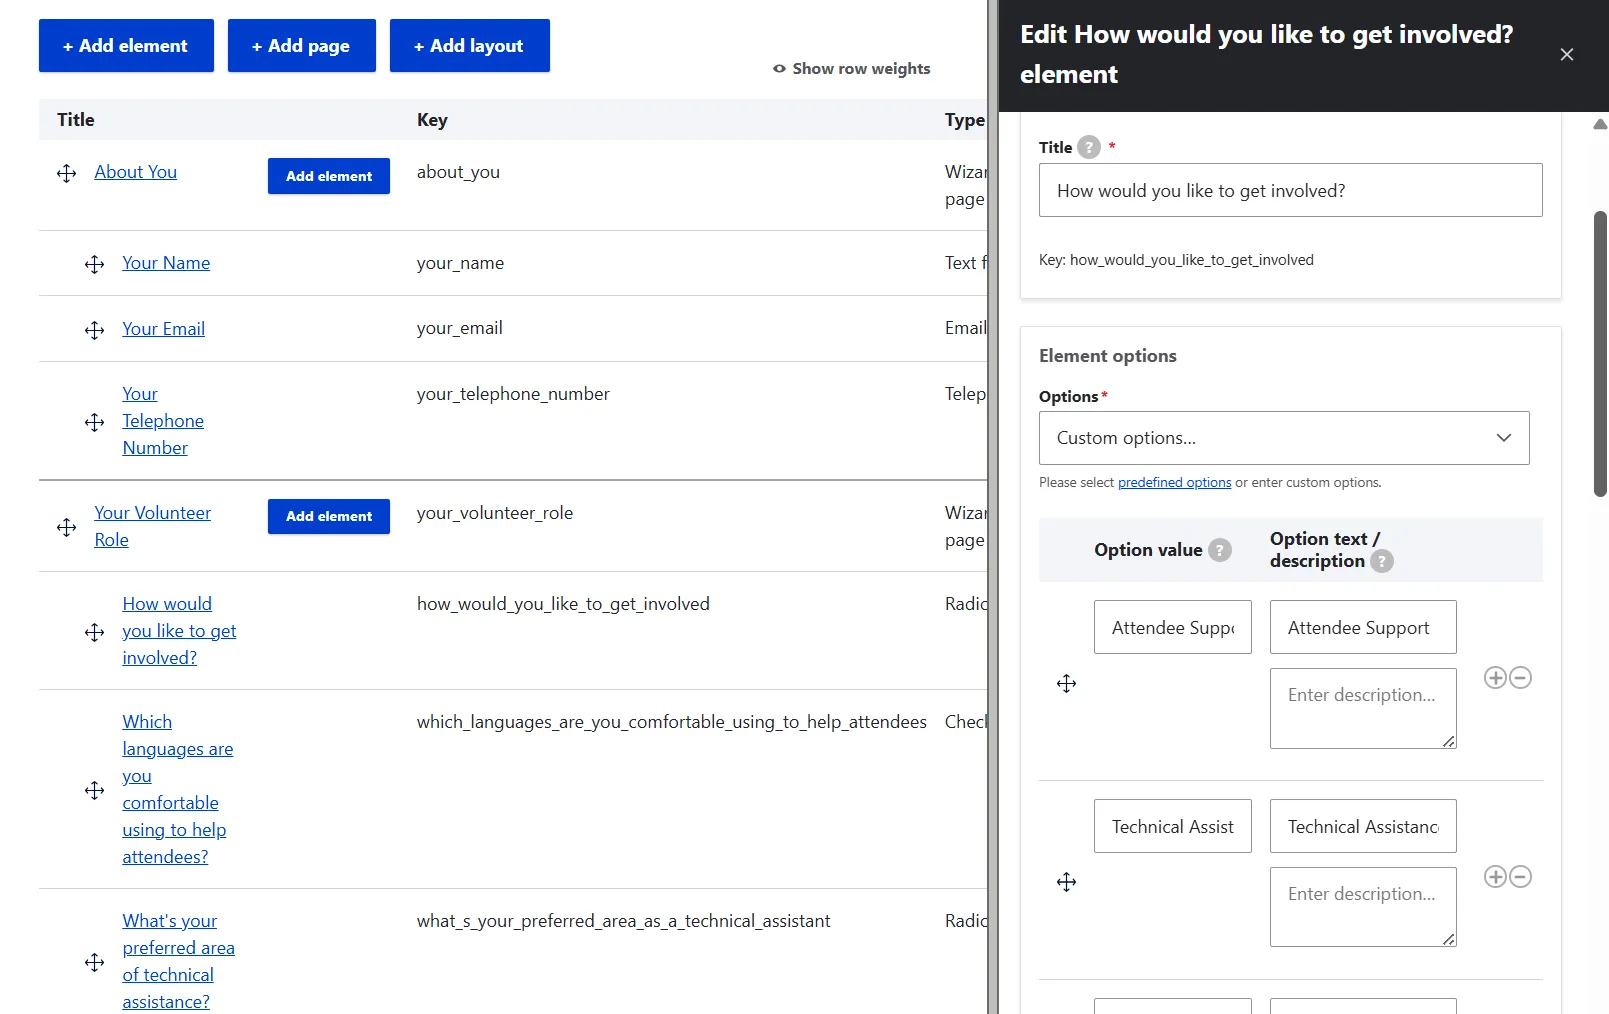
It’s a good idea to make this field required as well, as the choice of volunteering activity is essential in this example. Overall, marking specific elements required depends on your workflow preferences.
Next, add an element of “Radios” type named “What’s your preferred area of technical assistance?”
The options:
- Option value and text: “Behind-the-scenes tech.” Option description: “I prefer focusing purely on the equipment, adjusting audio, and managing the stream/camera.”
- Option value and text: “Front-of-house co-host.” Option description: “I prefer being near the stage, helping speakers, keeping time, and interacting with the live or virtual audience.”
- Option value and text: “Floater / Help desk.” Option description: “I have advanced troubleshooting skills and can jump between rooms to fix emergency tech issues.”
To make the technical options visible only to those who have chosen to be technical assistants, click the “Conditions” tab. Set “State” to “Visible” and “Element” to “All” so it looks like this: “Visible if all of the following is met.” Then find the “How would you like to get involved?” element in the dropdown, select “Value is” in the next dropdown, and then choose “Technical Assistance” as the needed value. Save the element.
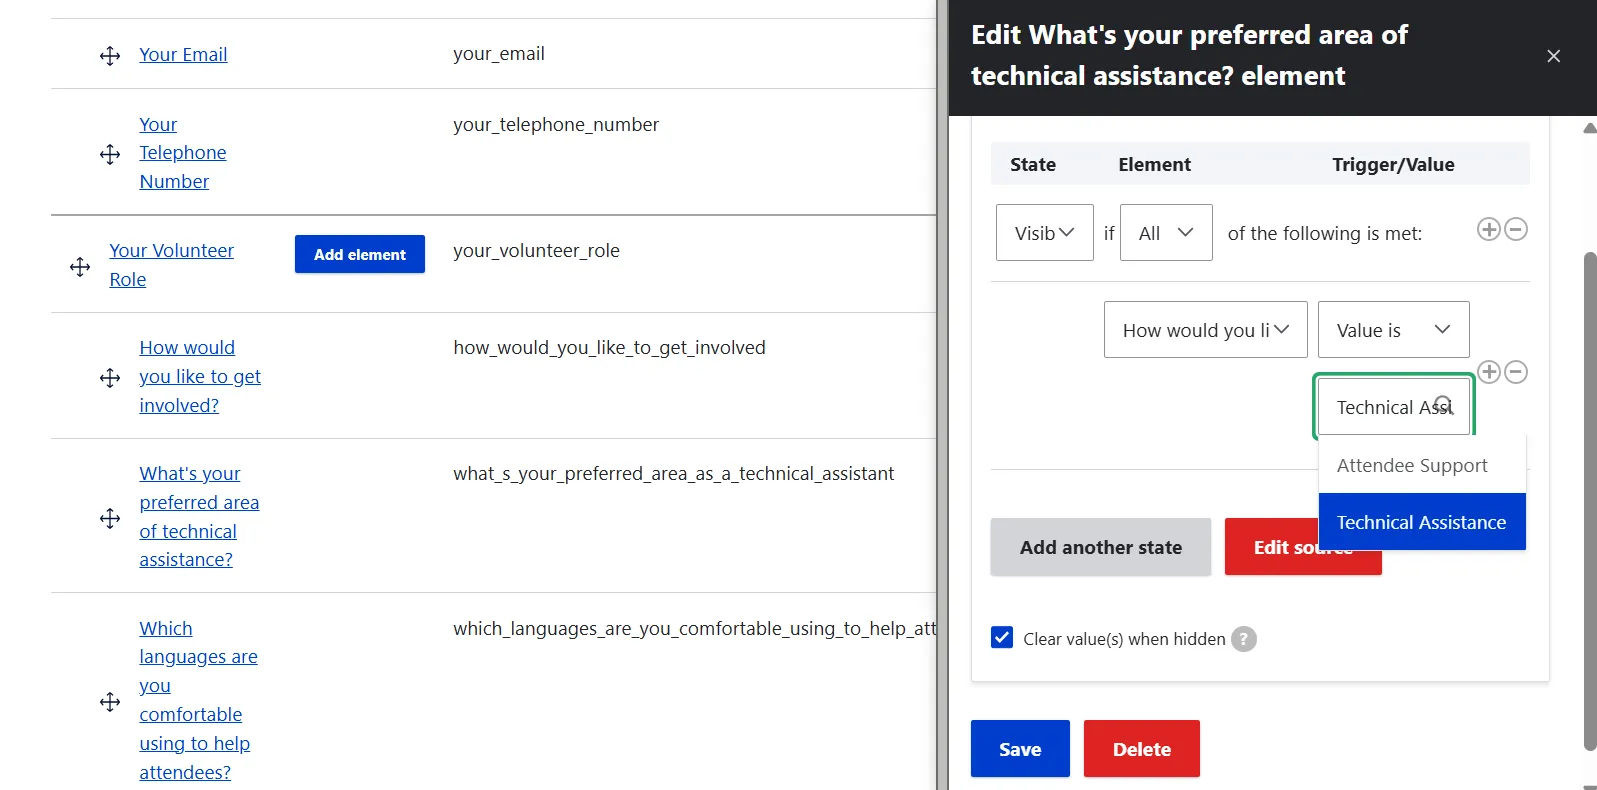
Similarly, add an element of “Checkboxes” type named “Which languages are you comfortable using to help attendees?”
The options:
- English
- French
- Spanish
- Sign language
It’s important that checkboxes, unlike select dropdowns or radios, make it possible to select multiple options. This is very helpful if volunteers speak more than one language.
To make this element visible to users who have chosen to provide attendee support, the setup is absolutely similar to what we did with the previous element. Under the “Conditions” tab, make it “Visible if all of the following is met”: “How would you like to get involved?” > “Value is” > “Attendee Support.”
When configuring these conditional elements, please note that when an element is hidden, it will not be required.
Page 3: “Your Swag”
The next page will ask whether the volunteers would like a complimentary T-shirt and if they would, open a size dropdown.
Add a page named “Your Swag” and an element of “Radios” type to it, named “Would you like a complimentary volunteer T-shirt?”
The options:
- Yes, please
- No, thanks
Next, add an element of “Select” type named “Your T-shirt size.” The options to choose from: S, M, L, XL, XXL.
Let’s make this question displayed only to those who chose to get a T-shirt. Under “Conditions,” make it “Visible if all of the following is met”: “Would you like a complimentary volunteer T-shirt?” > “Value is” > “Yes, please.”
Page 4: “Volunteer Dinner”
The next page will ask if volunteers are planning to join the dinner and, if they are, open the dietary choices.
Add a page named “Volunteer Dinner” and then add an element of “Radios” type to it. Name the element “Will you be joining us for the volunteer appreciation dinner?”
The options to choose from:
- “Yes, I’d love to”
- “No, thanks”
Next, add an element of “Checkboxes” type named “Do you have any dietary restrictions or preferences?”
The options to choose from:
- No restrictions
- Vegetarian
- Vegan
- Gluten-free
- Nut-allergic
Similarly to the question about spoken languages, we’ll use checkboxes as the element type here, because a user may have multiple dietary preferences.
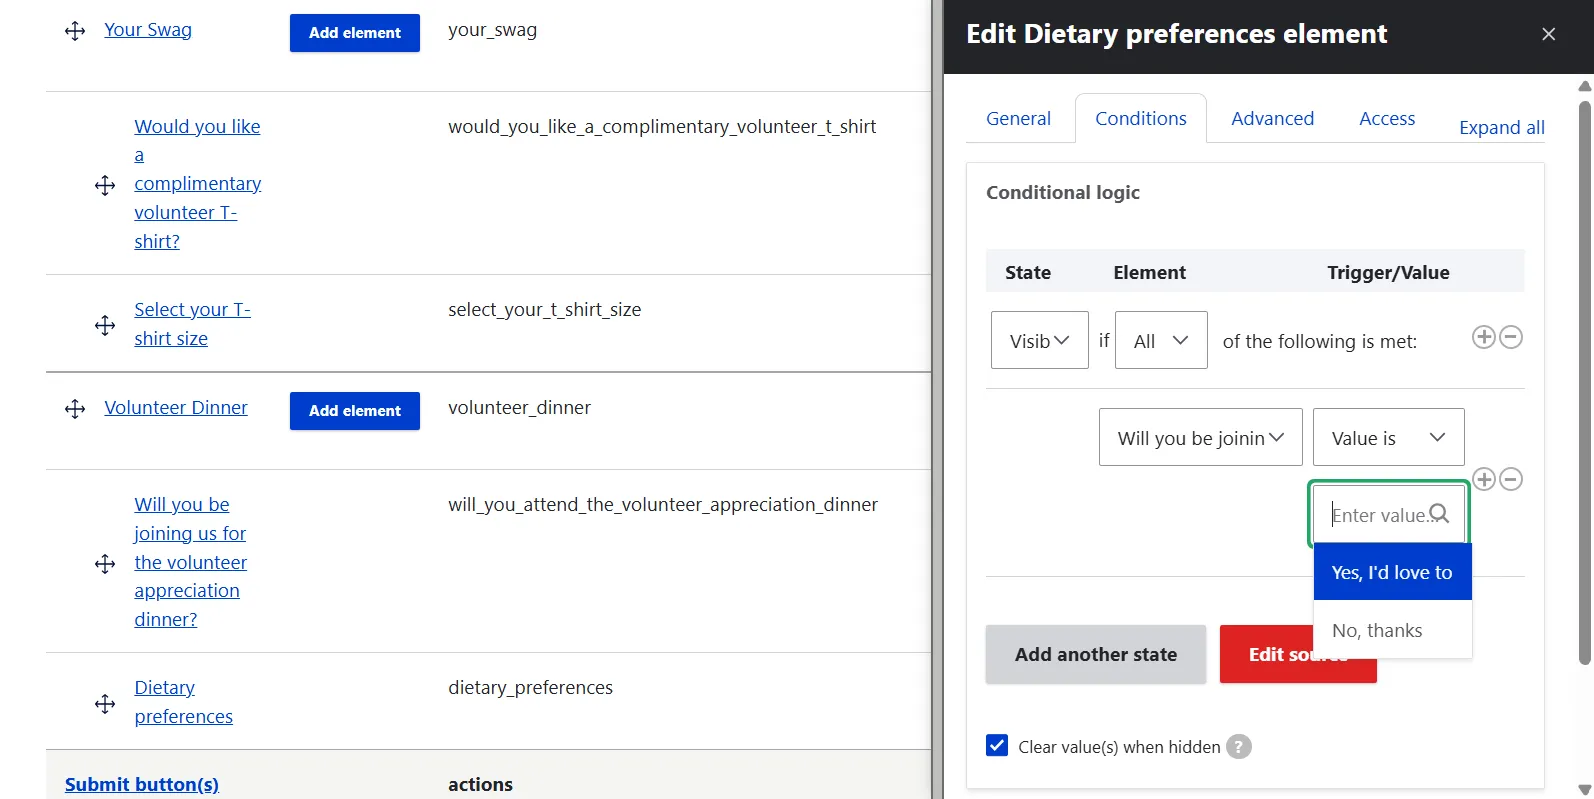
Next, let’s make this question displayed only to those who plan to attend the dinner. Under “Conditions,” make it “Visible if all of the following is met”: “Will you be joining us for the volunteer dinner?” > “Value is” > “Yes, I’d love to.”
Step 3: Configure the form wizard
Go to the form’s Settings > Form tab. Scroll to the “Form wizard settings” section. For our multi-step form example, we checked several checkboxes that are responsible for the form completion progress:
- “Show wizard progress bar”: to display a progress bar for the form’s completion process
- “Show wizard progress pages”: to display the current page number and total remaining pages (like Page 1 of 10)
- “Show wizard progress percentage”: to display the percentage of completed pages (like 10%)
- “Update wizard progress bar’s pages based on conditions”: to hide or show the wizard’s progress bar’s pages based on the user’s choices.
The option to “Include confirmation page in progress steps” can be unchecked. This ensures your wizard shows a clean, stable step count rather than overwhelming the user with an extra “step” that is in fact just a thank-you message.

4. Customize the confirmation message (optional)
By going to Build > Settings > Confirmation, you can customize the form submission confirmation message.
5. Check the results
As a result, there is a form that shows steps to be completed, the current page the user is on, and the percentage of progress. Additional options open to users depending on their choices.
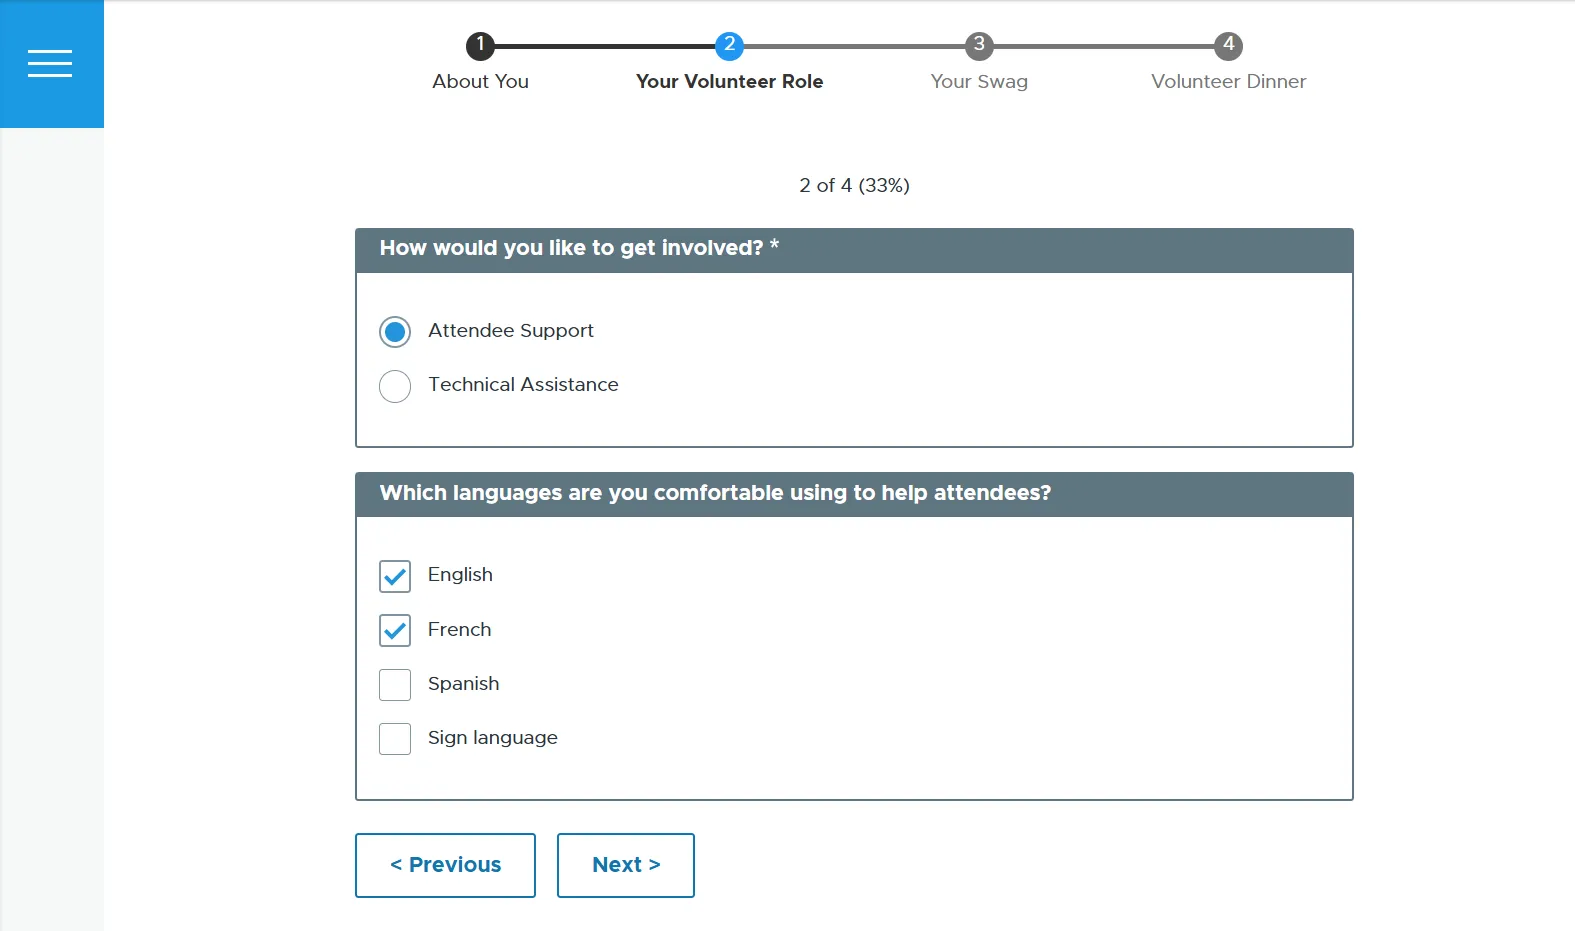
Upon completion, the form displays a customized confirmation message.

Final thoughts
By combining multi-step forms with conditional logic, you hit the gold standard of website user experience. Splitting the form into steps reduces psychological friction, and applying conditional logic creates a dynamic, living interface that adapts on the fly. The result is a highly engaging user experience that respects the user’s time, increases conversion rates, and captures perfectly organized data.
Even so, the example setup in this article only scratches the surface of what’s possible with Drupal’s Webform. When a project demands advanced integrations, complex business workflows, or a highly bespoke brand identity, the full depth of the module’s capabilities, together with expert customization, make all the difference.