
A Glimpse at Content Editing Experiences with CKEditor 5 in Drupal
CKEditor definitely deserves to be ranked MVP to everyone who creates or edits content on a Drupal website. It is a rich and versatile text editing tool built on the WYSIWYG (“What You See Is What You Get”) principle, which means you can immediately see how the content you are creating will look to your readers. Non-technical users don’t have to learn HTML tags to format the content. Instead, CKEditor provides an intuitively understandable user interface that enables them to easily change fonts, add images, insert links, create subheadings, and so on.
Being the default text editor in Drupal, CKEditor is available to all Drupal users out of the box. It is a third-party open-source tool that was integrated with the Drupal core in Drupal 8.0. Today, Drupal ships with CKEditor 5 — a new, totally revamped version of the software. CKEditor 5 became the default text editor in Drupal 9.5 core and the only text editor in the newly released Drupal 10 core. Let’s take a closer look at editing experiences with CKEditor 5 on Drupal 9.5 and Drupal 10 websites.
Using CKEditor 5 in Drupal 9.5/10
Rewritten from the ground up, CKEditor 5 uses a different architecture and different APIs. But what content editors directly interact with is a new and modern UI, which enables them to create great content faster. Its new goodies include a dedicated toolbar for multimedia, an attached panel for links, bulk uploading images, easy creation of tables, revamped special characters, and much more.
Adding an ALT text for images
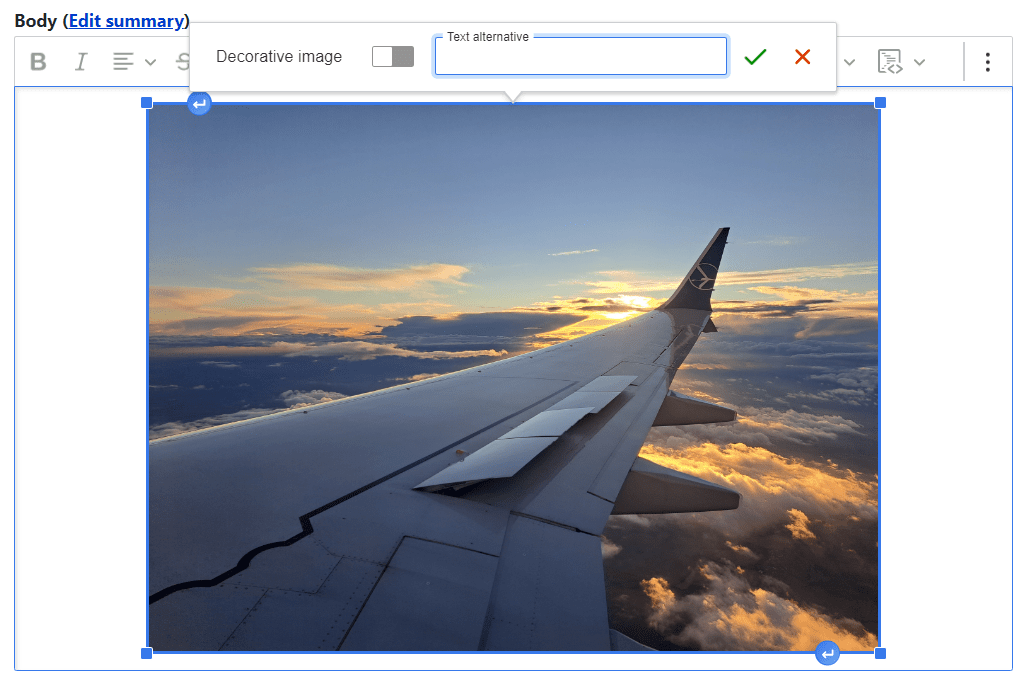
Providing a text alternative (ALT attribute) that describes an image is vital for web accessibility, and CKEditor knows that. If you are adding an image that has been previously saved in the Media Library, it may already have a text alternative. However, if you are adding an image from your computer, the first thing CKEditor 5 will ask you for is to provide the ALT text in a simple balloon panel.
The green checkmark is meant for adding the text you have pasted into the field, and the red cross mark is meant for canceling the process. If you cancel, you will keep seeing an “Add missing alternative text” reminder. However, if you toggle the “Decorative image” option on, it’s ok to leave the ALT text out.
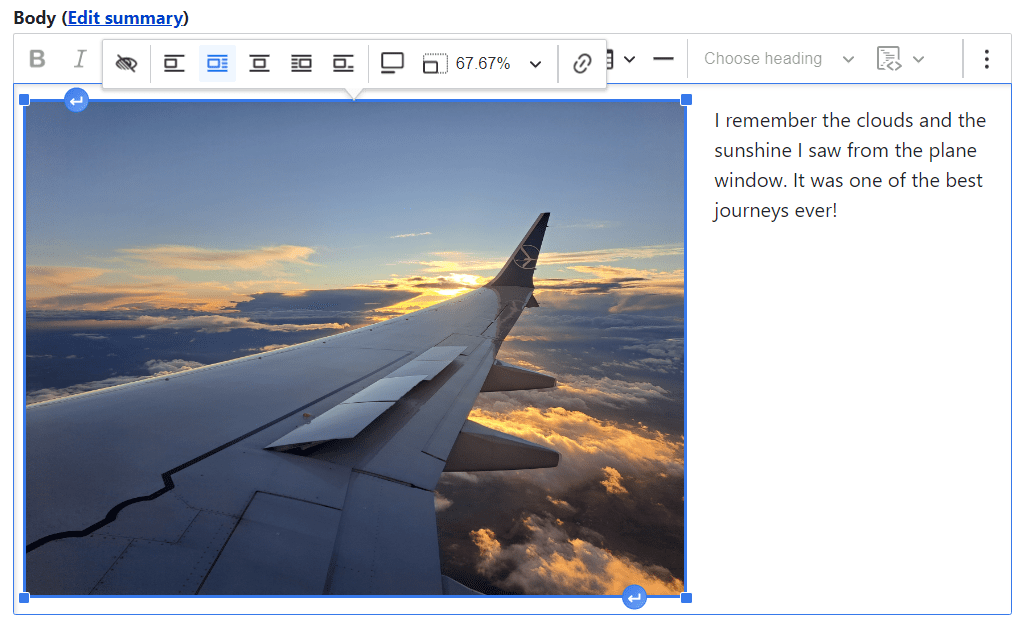
Every time you click on the added image in CKEditor 5, a dedicated balloon toolbar is opened, which is designed for editing and formatting the embedded multimedia. You can use it to change the ALT text, align the image left, right, or center, wrap text or break text with the image, position the image inline, add a caption, resize the image, and add a link to it.
Uploading images in bulk
Content creators will appreciate the exciting new feature of bulk image upload from the PC. This functionality was not available in CKEditor 4 — the only option was to upload one image at a time without installing and configuring several other modules.

Adding links
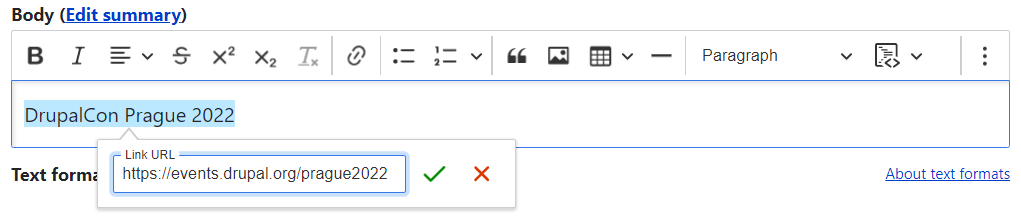
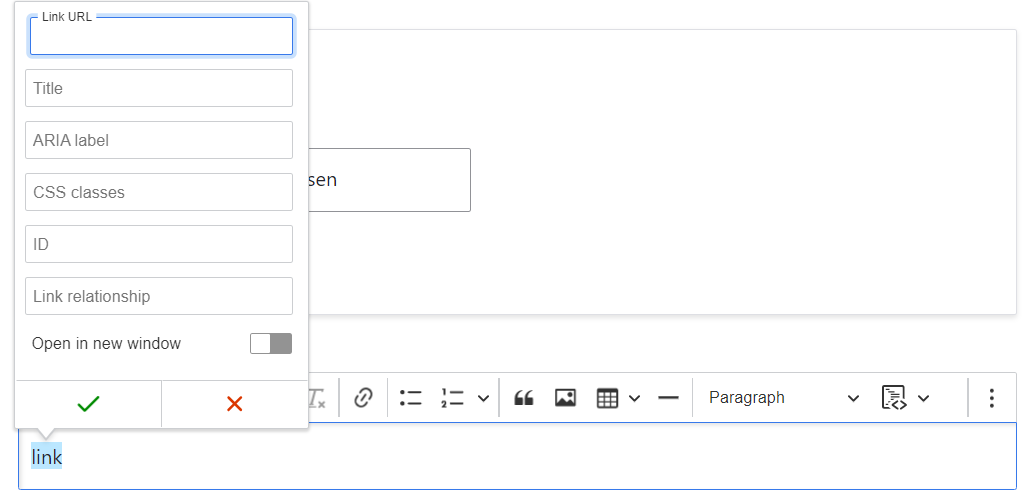
Once you click the “link” button on the toolbar, you will see a balloon panel for inserting links, which is very similar to that for adding alternative text. The panel has a simple and modern look, with a green checkmark for adding the link you have pasted into the “Link URL” field and a red cross mark for canceling the process.
Creating tables
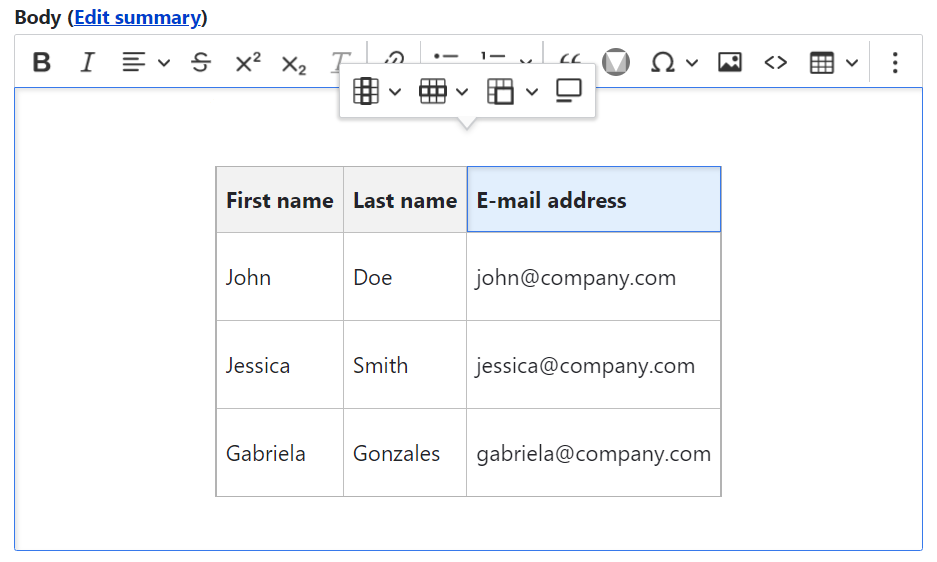
Finally, content creators can create and edit tables as easily as they can in Google Docs. The “table” button on the CKEditor 5 toolbar enables you to quickly hover over the required number of rows and columns, then make one click and the table is ready.
Plenty of formatting options are available on the dedicated toolbar for tables. They include inserting columns or rows, deleting columns or rows, specifying a header column or row, merging cells, adding a caption, and more.
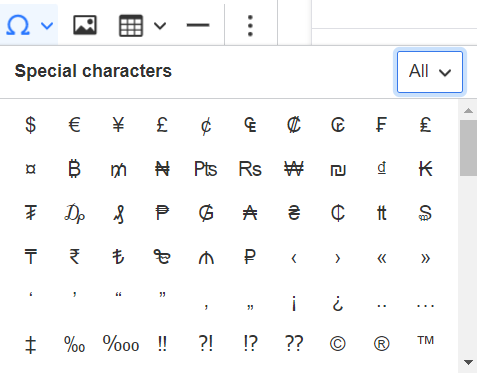
Adding special characters
The revamped dropdown with special characters enables content editors to insert special letters, math symbols, the signs of various currencies, the copyright sign, the trademark sign, and so on.
Adding buttons to the CKEditor 5 toolbar
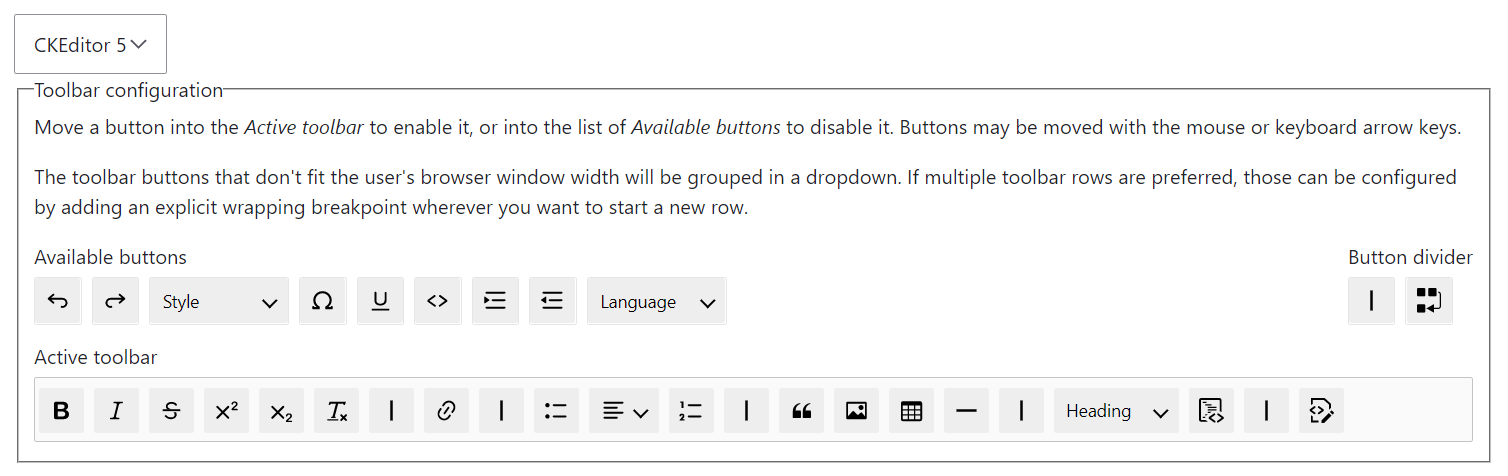
Not all the buttons you may need are included in the default set of buttons on the CKEditor 5 toolbar. Among the popular buttons that are not active by default are Text Alignment, Indent, Undo, and Underline, as well as the above-described Special Characters.
You can add these and other buttons to the toolbar by going to Configuration > Content authoring > Text formats and editors, selecting the input format you would like to configure (e.g. “Full HTML”), and dragging the buttons from “Available” to “Active.”
Extending CKEditor 5 with other features
If more special features are needed for a website’s content editing workflows, it’s possible to expand the CKEditor 5’s out-of-the-box functionalities. Having a plugin-based architecture, CKEditor 5 is actually a collection of plugins, some of which are included in Drupal core. Still, there are tons of other CKEditor plugins for any purpose. They are mostly free but there also are premium ones, such as a plugin for real-time collaboration.
Drupal, in turn, offers lots of contributed modules that integrate CKEditor plugins and provide an easy way to add them to your Drupal website. With these modules, you can enrich your content editing experiences with a wide range of features such as a word count, abbreviations with explanations, emojis, icons of all kinds, and so on.
The maintainers of these Drupal modules are now working on making them ready for CKEditor 5. However, it’s not a simple thing to do because the underlying architecture of CKEditor 5 is completely different from that of its predecessor. Here are some great contributed Drupal modules that support CKEditor 5 at the time of writing.
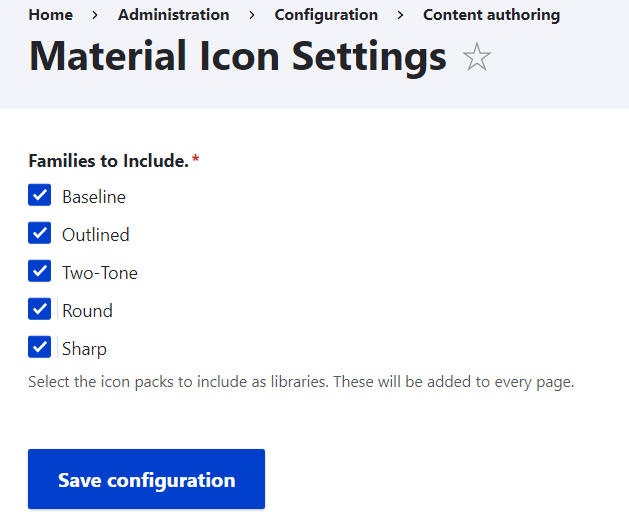
The Material Icons module
Google created a huge collection of simple, modern icons — Material Icons. You can use them inline in CKEditor thanks to the Material Icons contributed module. Its 2.0.1 release is compatible with CKEditor 5.
The module enables you to select the style families for the icons such as Baseline, Outlined, Two-Tone, Round, and Sharp. The Baseline is enabled by default, and if you want to make the others available in CKEditor 5 as well, you can enable them in the module’s settings at Configuration > Content Authoring > Material Icons.
You will also need to add the Material Icons button to the CKEditor 5 toolbar. As usual with adding CKEditor buttons, you can do it by going to Configuration > Content authoring > Text formats and editors, selecting the needed format to configure (e.g. “Full HTML”), and dragging the Material Icons button from “Available” to “Active.”
As soon as the button is available on the CKEditor 5 toolbar, you can search for icons by name, as well as select the style family from the dropdown, and optionally provide additional classes. An autocomplete feature and a link to the complete list of icons are very helpful in finding the icons you are looking for.
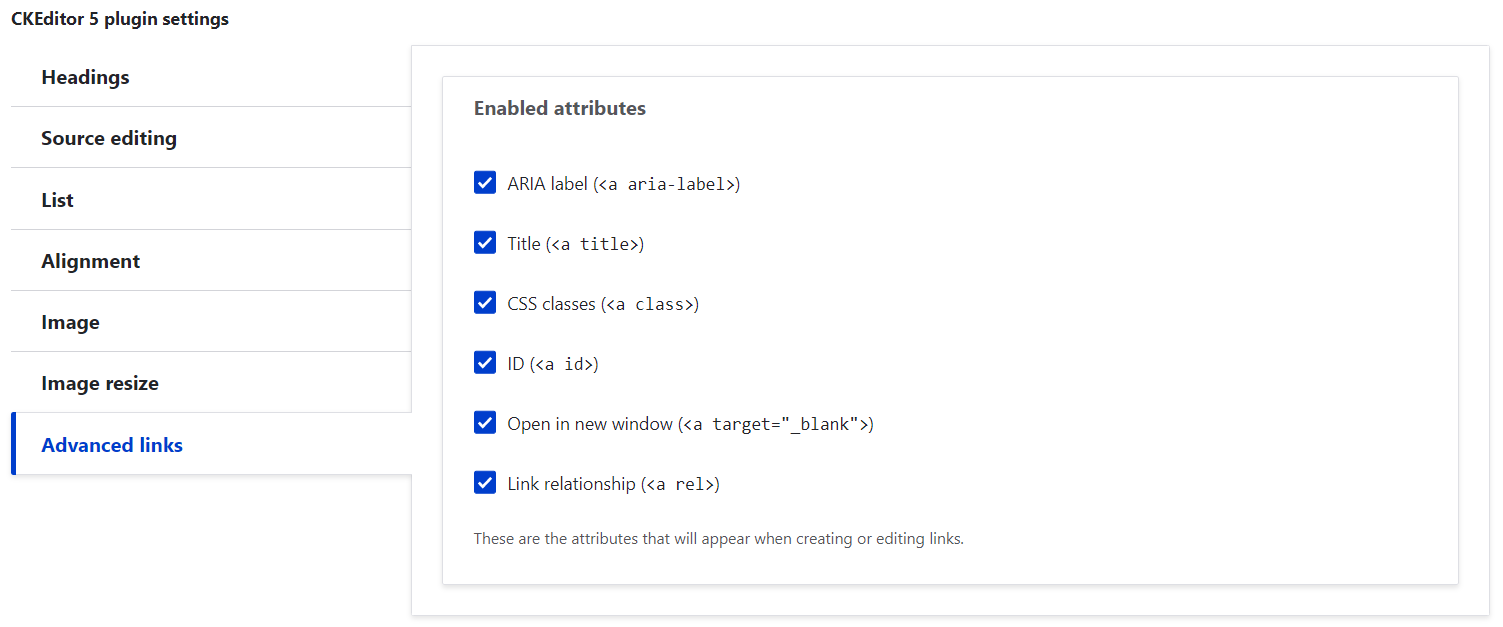
The Editor Advanced link module
You can enhance the dialog box for creating links in CKEditor 5 with extra options to add link attributes by using the Editor Advanced link module. The module’s version 2.1.1 supports CKEditor 5.
After installing the module, go to Configuration > Content authoring > Text formats and editors, select the input format you would like to configure (e.g. “Full HTML”) and scroll to the list of CKEditor 5 plugins. You will see the “Advanced links” plugin with the list of available attributes:
- ARIA label
- Title
- CSS classes
- ID
- Open in a new window (the target attribute)
- Link relationship
By checking the boxes for the attributes, you are enabling them. Complete this process by clicking “Save configuration” at the bottom of the page.
The enabled attributes will then become available on the content editing form as you start creating or editing links.
Hopefully, more content creators and website administrators will soon have a chance to enjoy working with the revamped user interface of CKEditor 5 as more websites get upgraded to Drupal 9.5 or Drupal 10. With CKeditor 5, a new chapter in Drupal content editing experiences has officially been started!