One Module, Many Layers of Defense: How to Protect Your Drupal Site with Security Kit

When you manage a website, one of your biggest priorities is keeping it safe. The challenge is that the web is full of tricks that attackers use every day. Cross-site scripting (XSS), clickjacking, and cross-site request forgery (CSRF) are just some examples of the creepy terms you wish you’d never have to hear. This may result in lost data, malicious links, stolen login sessions, the unfortunate list could go on.
But the good news is, there are tools to prevent that. The Security Kit (SecKit) module can help protect your site from these and many other dangers. As the name suggests, it bundles proven Drupal website security practices into one neat package. The module works quietly in the background, making it significantly harder for attackers to succeed.
The real beauty of SecKit is that it turns complex security options into simple checkboxes. Still, those settings deserve a closer look. First, we’ll walk through the main threats SecKit helps defend against, and then explore the module’s admin interface to see how each option works in practice.
SecKit: a glimpse of how it protects your Drupal website
Protection against common attacks
SecKit focuses on a very specific category of threats: they are not related to bugs in Drupal code itself, but attacks that exploit how browsers handle web pages. More formally, these are called client-side or browser-based attacks, and they usually happen because a site doesn’t send the right security instructions along with its pages (but SecKit helps make sure it does). Here are the most common ones.
Cross-site scripting (XSS)
One of the biggest risks for any website is cross-site scripting (XSS), where attackers try to sneak malicious code into your pages and make it run in the visitor’s browser. Security Kit helps defend against this by letting Drupal send strict rules to the browser, specifying which web page elements and sources to trust, and which to block.
MIME sniffing
Another danger comes from browsers trying to “guess” what kind of file they’re dealing with. For example, a browser might treat a simple text file or image as something executable, and suddenly, unsafe code is running. To prevent it, SecKit tells browsers to stick to the declared type and not improvise.
Cross-site request forgery (CSRF)
Cross-site request forgery is an attack where logged-in users can be manipulated into making unwanted actions without realizing it. Being logged in with your website, they are tricked into visiting a malicious website, maybe by clicking a link in an email, ad, etc. The malicious website has hidden instructions that tell the user’s browser to send a request to your site (for example: “Change the user’s password” or “Make a purchase”). Because they are logged in, the browser automatically includes the login cookie, so your website thinks their request is legitimate. SecKit uses browser headers to catch and block these suspicious requests.
Clickjacking
Clickjacking is yet another trick that makes visitors click on things they never intended. An attacker loads your site inside an invisible frame on their own malicious page and places misleading elements on top. For example, a hidden button could cause sensitive information to be revealed, money to be transferred, or malware to be triggered, all without the visitor realizing it. SecKit protects your site by stopping other websites from embedding your pages in the first place.
Enforcing safe connections (SSL/TLS and Expect-CT)
Visitors expect the padlock icon in the browser bar to mean their connection is private and safe. SecKit reinforces that by enabling the Strict Transport Security (HSTS) standard, which tells browsers to always use HTTPS when connecting to your site.
It can also check that your SSL/TLS certificates are valid and publicly logged (using the Expect-CT HTTP header), which stops attackers from impersonating your site with fake certificates.
Controlling what the browser shares
Modern browsers come with a surprising number of powerful features, from using the camera or microphone to reporting where a visitor is located. The catch is that when people are on your website, anything running there — including third-party embeds or ads — can try to use those features. If something malicious sneaks in, it could request access to a visitor’s camera, location, or other sensitive data, and the blame still falls on your site. SecKit helps you stay in control with the Feature-Policy (Permissions-Policy) header: you can simply switch off the features your site doesn’t need.
Equally important is controlling what information leaks when visitors follow links from your site to other sites. By setting a Referrer Policy, SecKit ensures that sensitive details in your site’s URLs, such as IDs or query strings, aren’t automatically passed along to third parties.
That has been a brief overview of some of the main shields SecKit provides for your Drupal website, and now let’s review these and other security measures in more detail as we show the module’s settings.
How to use the Security Kit (SecKit) module on your Drupal website
Installing SecKit
Install the module in your preferred way, the recommended one being via Composer:
composer require drupal/seckit
Enable the module on the Extend tab of your Drupal admin dashboard.
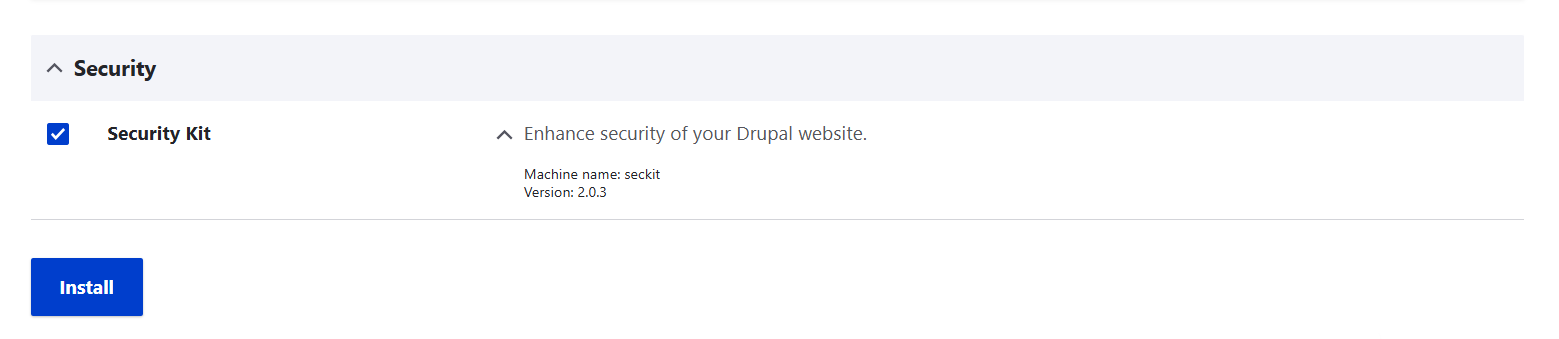
Configuring SecKit
Either click “Configure” next to the module on the Extend tab or go to Configuration > System > Security Kit settings. The admin page includes several sections with subsections.
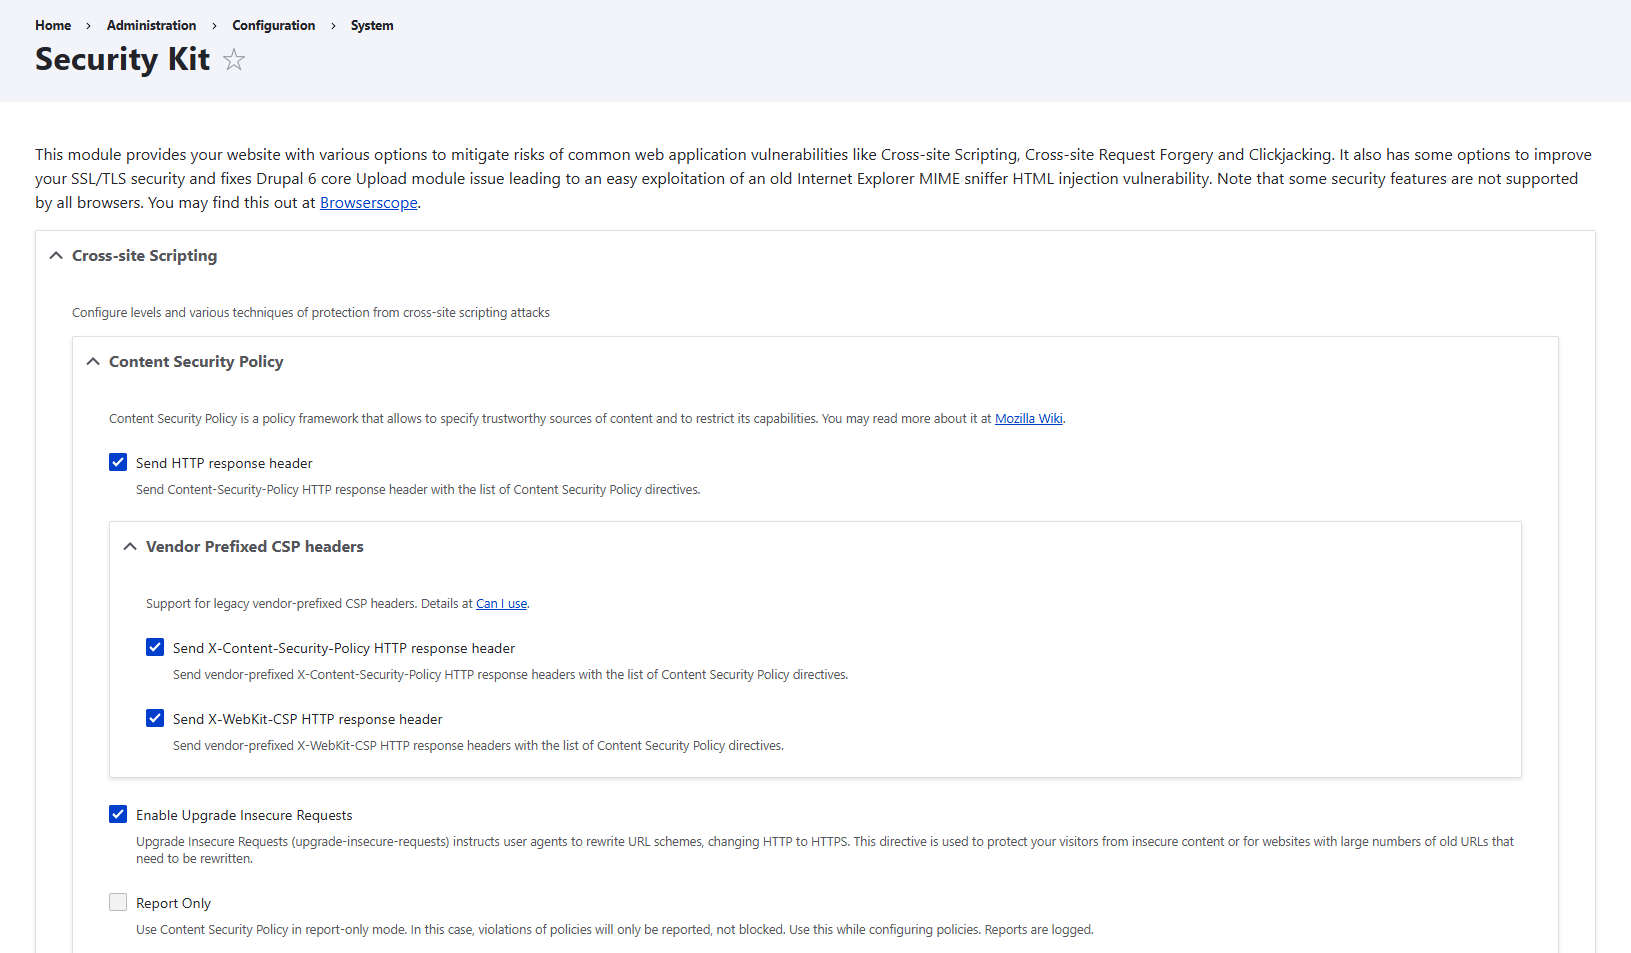
Section 1. Cross-Site Scripting (XSS)
1.1. Content Security Policy (CSP)
Content Security Policy (CSP) is your main ally in making sure hackers don’t inject malicious code into your pages during their XSS attacks. Here’s how it works. When someone visits your site, their browser asks: “What should I load to show this page?”. This may include:
- HTML (the page itself)
- JavaScript (scripts that make it interactive)
- CSS (styles)
- images, fonts, videos
- and more
Without a Content Security Policy (CSP), users’ browsers will happily load anything from anywhere, even if a hacker sneaks something in. But with CSP, your site sends an extra set of safety instructions to the browsers along with the page.
Enabling the main CSP header also gives you MIME sniffing protection, forbidding browsers to misinterpret files and accidentally run them as something unsafe.
Settings in SecKit:
- “Send HTTP response header”: by checking this checkbox, you enable Content Security Policy.
- “Vendor-prefixed CSP headers”: some older browsers, like early versions of Firefox, Chrome, Safari, or Internet Explorer, used slightly different names for the Content Security Policy (CSP) headers, vendor-prefixed headers. There are two checkboxes you can check in “Vendor-prefixed CSP headers” to extend protection to legacy browsers.
- “Enable Upgrade Insecure Requests”: this checkbox converts old HTTP links to HTTPS automatically. It’s useful if your site has older URLs.
- “Report Only”: this only logs violations without blocking them. It’s good for beginners if you want to start by checking what gets blocked on your website.
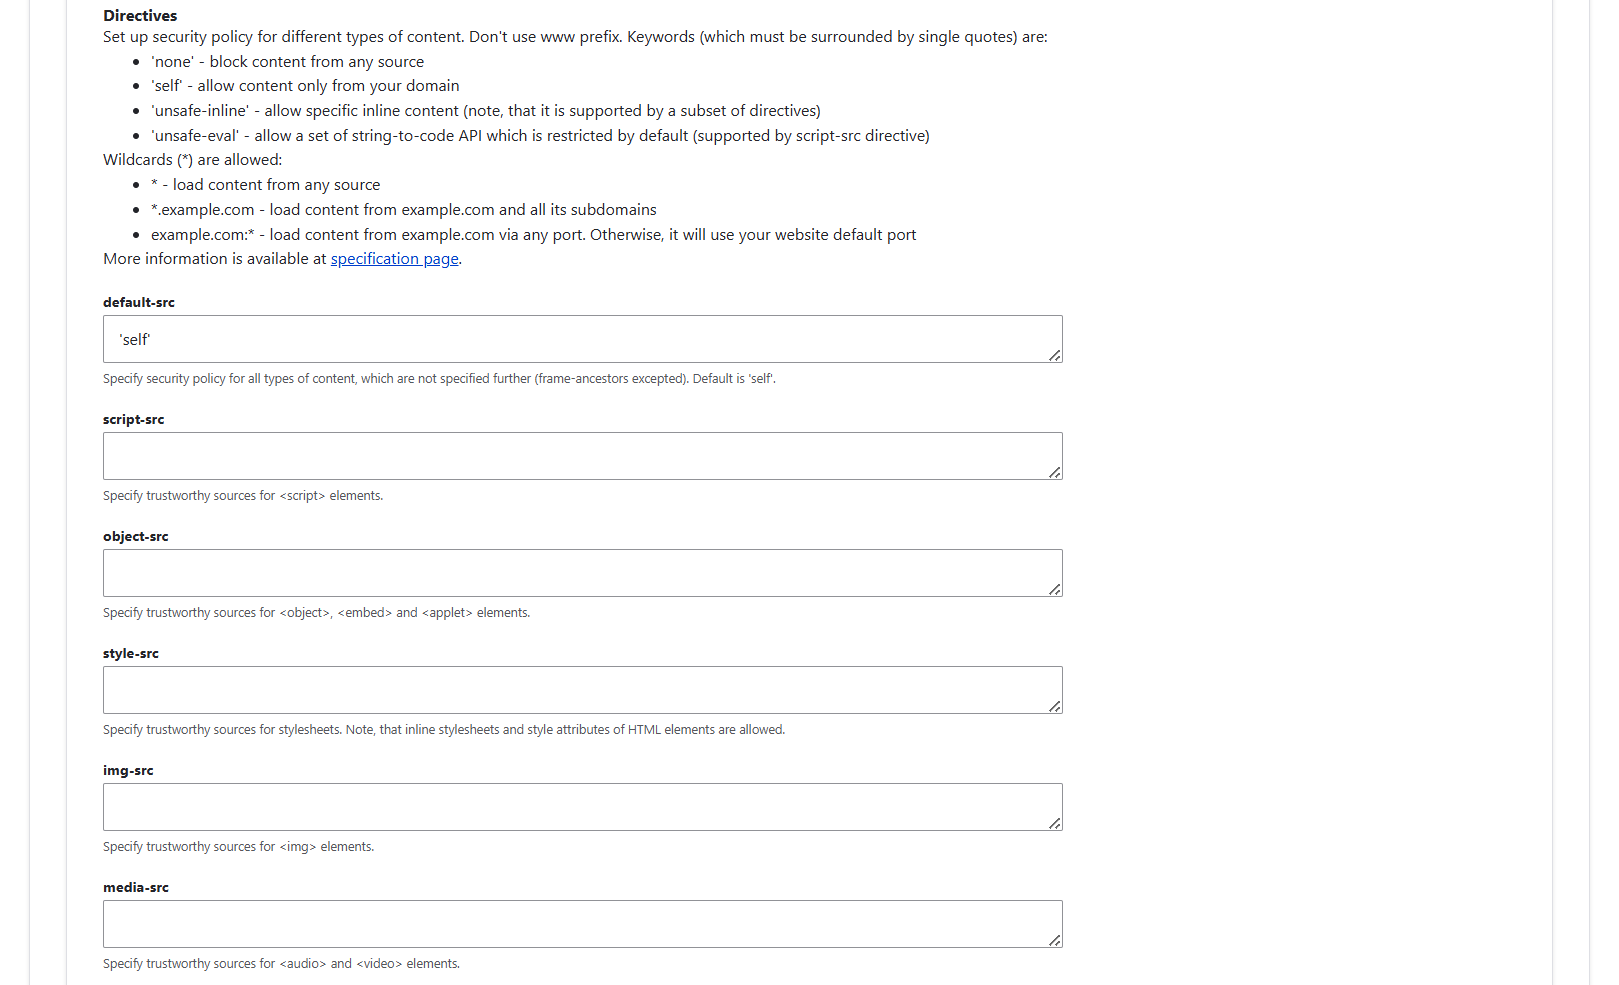
The “Directives” subsection will help you specify the trustworthy sources for different types of web page elements on your Drupal site. There are a bunch of special keywords that you can use, such as ‘none’ (to block content from any site), ‘self’ (to allow content only from your domain), and others.
Here are the main settings you’ll find in this subsection:
- default-src
Always set this one, it’s the baseline. A common and safe choice is to write ‘self’ there. This means all web page elements (scripts, styles, images, media, frames, fonts, and so on) can only load from your own domain unless you override it.
- script-src / style-src / img-src / media-src / font-src
These let you override the defaults for specific elements. If left blank, they inherit the choice from default-src.
- connect-src
This setting defines which servers your site’s scripts can talk to (APIs, WebSockets, fetch requests). Choosing ‘self’ is safe, plus any trusted APIs your site needs. If you have ‘self’ in “default-src” and leave “connect-src” blank, it should inherit the setting.
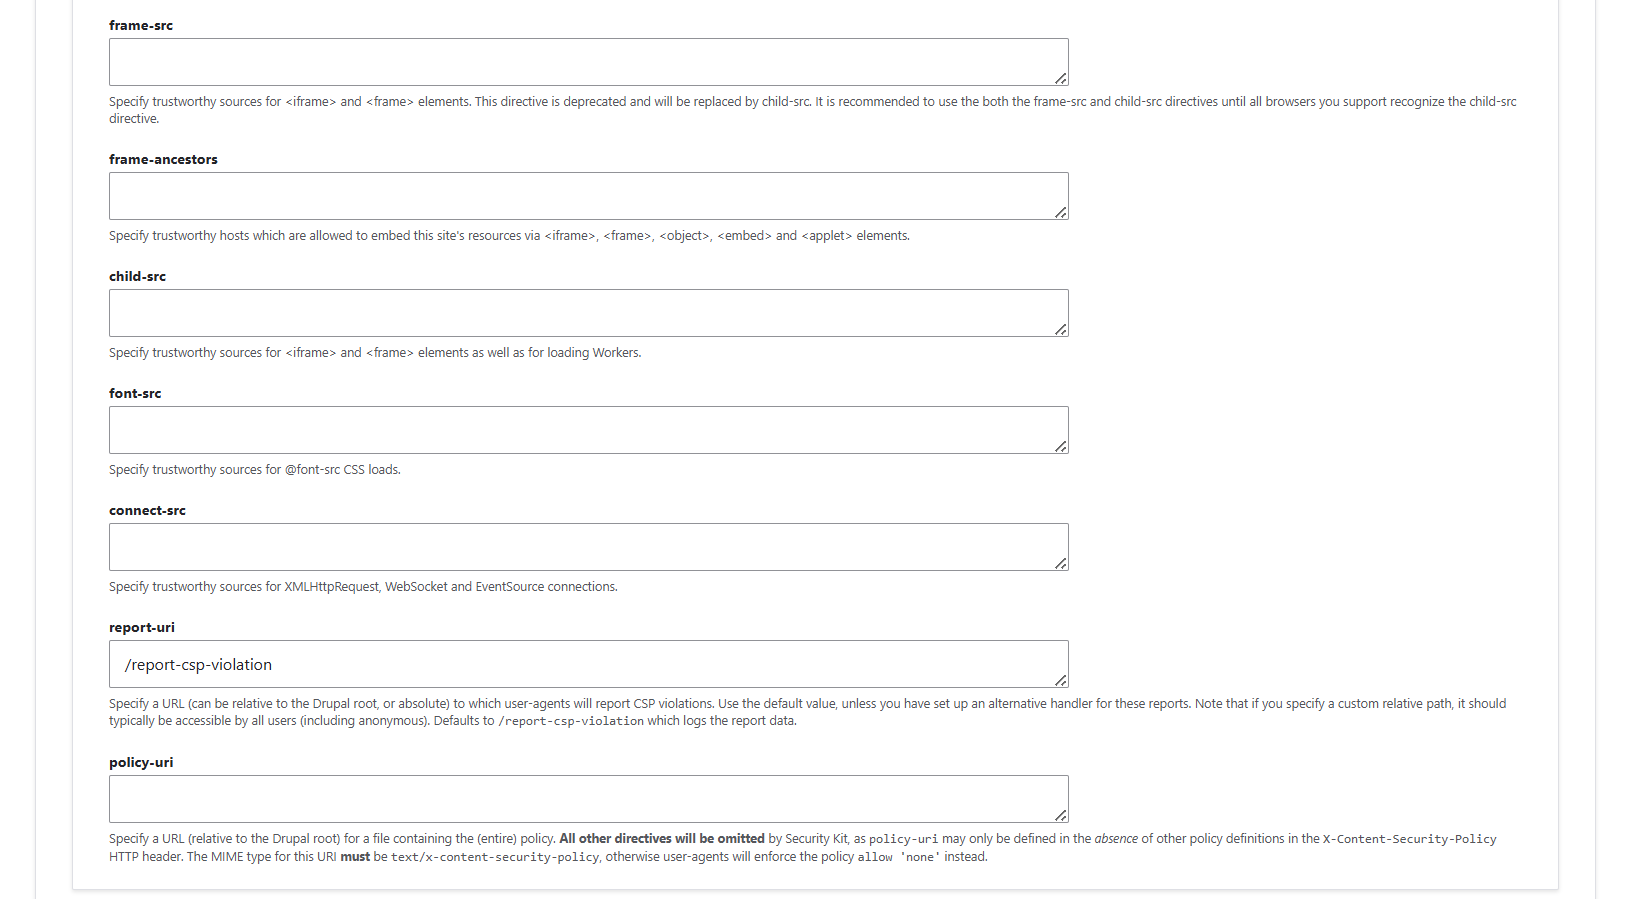
- frame-ancestors
This setting controls which sites can embed your pages in an iframe. The safest choice is to write ‘self’ in this field, since it prevents clickjacking by blocking other sites from embedding yours. Note: “child-src” is deprecated, use “frame-ancestors” (and frame-src if you need to allow embedding specific iframes).
- report-uri / report-to
This setting lets you define how to collect violation reports. “Report-uri” is the older directive (still widely supported), while “report-to” is the modern version. The SecKit default “/report-csp-violation” is fine unless you want to send reports to an external service.
- policy-uri
Instead of defining each CSP directive (like default-src, script-src, and so on) directly in SecKit, you could choose to point the browsers to a separate file that contains your full CSP rules. It will override all the other directives.
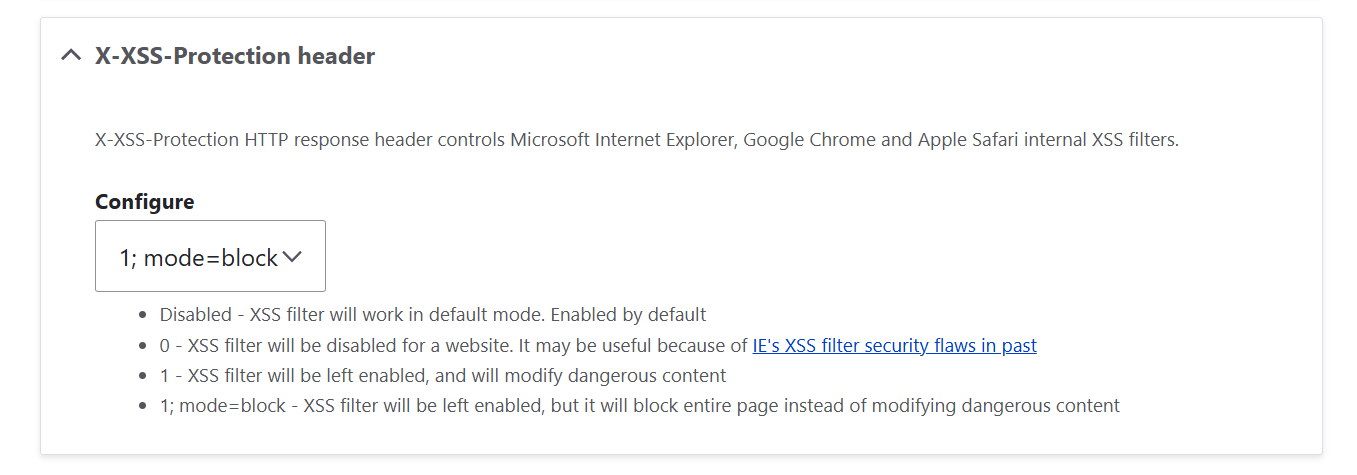
1.2. X-XSS-Protection header
The X-XSS-Protection HTTP response header controls the built-in XSS filters in some browsers, like Internet Explorer, Chrome, and Safari. Think of it as a little security guard inside the browser: it watches for suspicious scripts that could run on your page and tries to stop them.
SecKit gives you a few options:
- “Disabled”: the browser uses its own default XSS filtering behavior. Some protection may happen, but it’s inconsistent and depends on the visitor’s browser.
- “0”: completely turns off the browser’s filter. Rarely needed, only for very old Internet Explorer quirks.
- “1”: keeps the filter on and automatically modifies or sanitizes dangerous content if it’s detected.
- “1; mode=block”: keeps the filter on and blocks the entire page if suspicious code is found. This is the strictest and safest option.
In short: leave the browser defaults alone only if you’re okay with inconsistent protection. For maximum safety, choose “1; mode=block.”
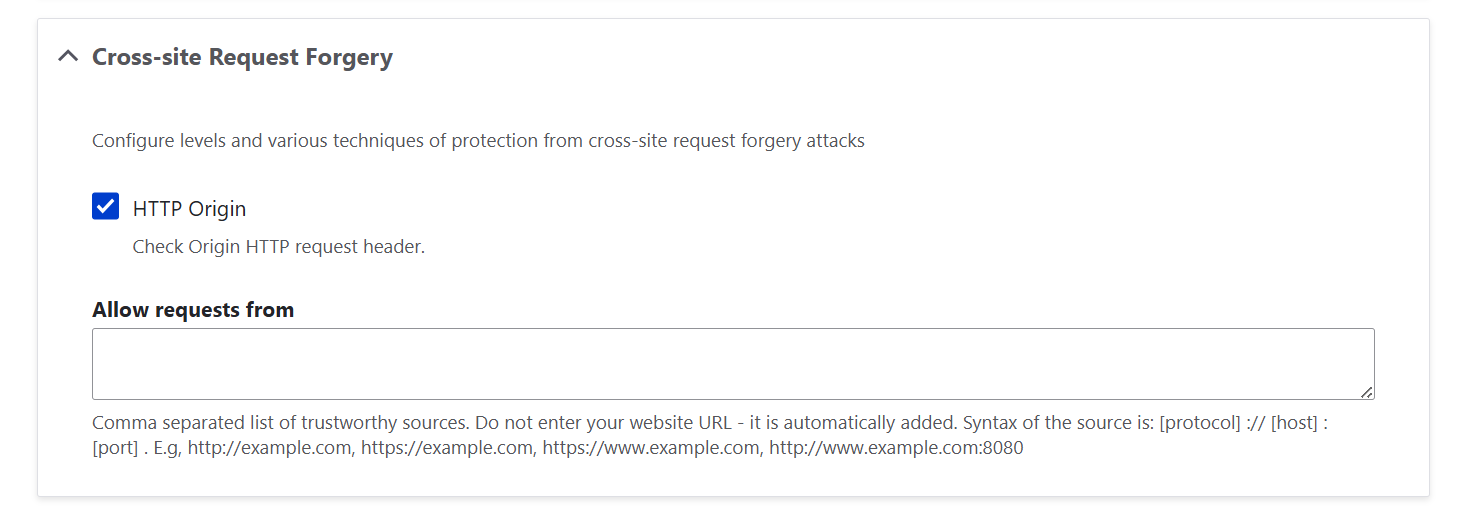
2. Cross-site Request Forgery
Let’s see exactly how SecKit helps make sure that actions that users can perform on your site are coming from your site or other trusted sources and not from somewhere else on the internet. When a browser sends a request, it includes the Origin header to indicate where the request came from. Thanks to SecKit, you can make sure the Origin header in the incoming requests gets checked.
Settings in SecKit:
- “HTTP Origin”: this checkbox enables the Origin header checking.
- “Allow requests from”: here, you can list any additional trusted domains that may legitimately send requests to your site. Your own website is automatically allowed, so you don’t need to enter it here. Enter only other trusted domains if needed (for example, a subdomain or an external service).
3. Clickjacking
Here is how SecKit helps you control how your site can be framed to prevent the embedding of your pages in hidden frames or overlays from other sites.
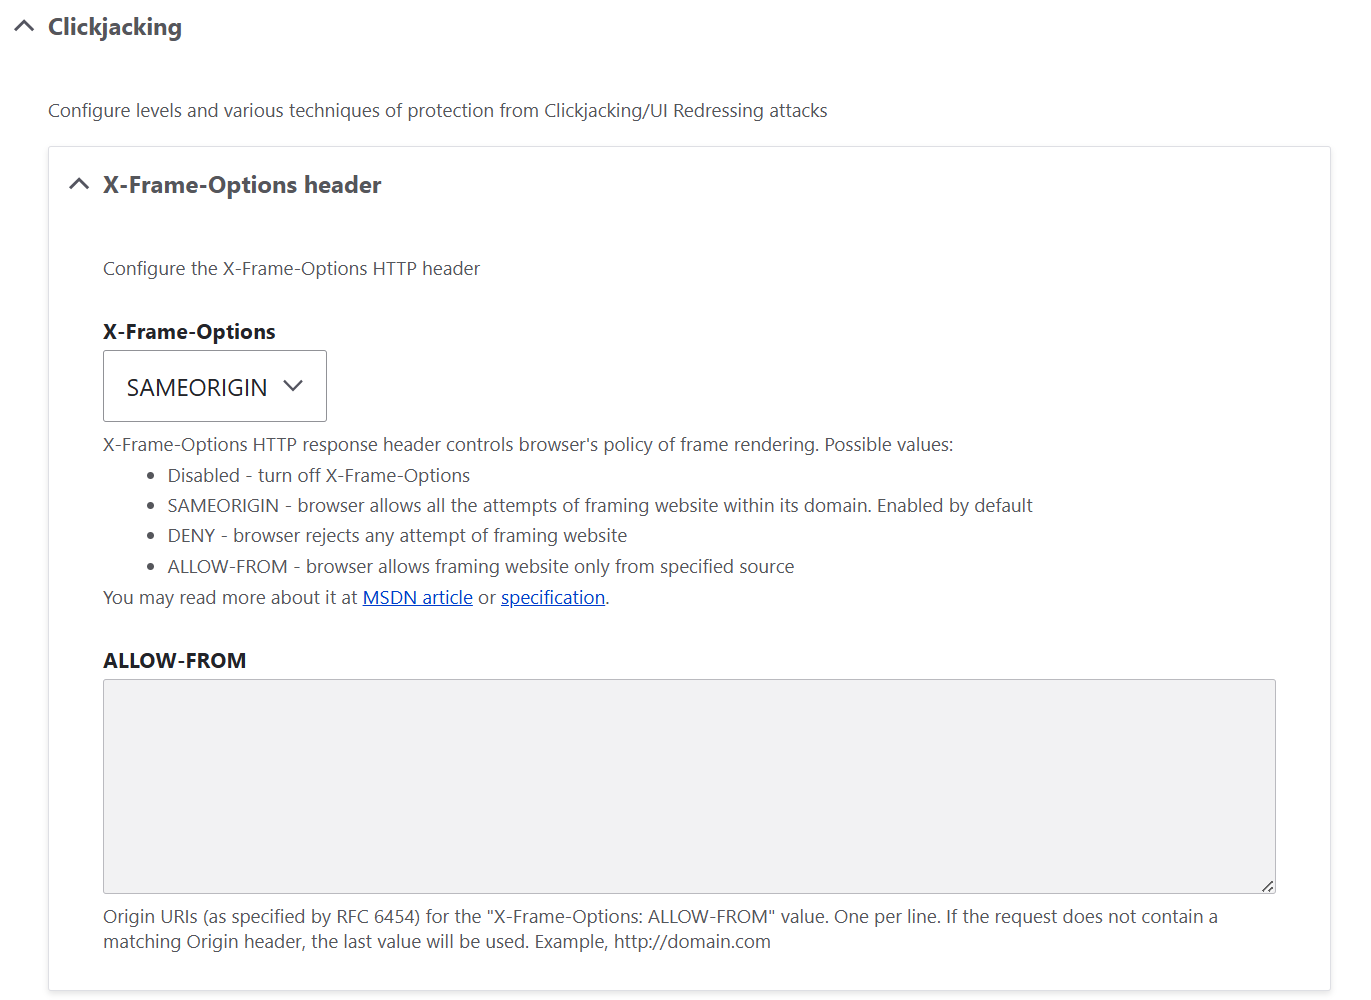
3.1. X-Frame-Options header
This header tells browsers whether your site is allowed to be displayed inside <iframe> or <frame> tags.
You have a few options:
- “Disabled”: no restrictions; other sites can frame your pages. Not recommended.
- “SAMEORIGIN”: this option only allows your pages to be framed by pages from your own domain. This is safe and works for most sites.
- “DENY”: this setting blocks all framing attempts, even from your own domain. Very strict, useful if you never embed pages internally.
- “ALLOW-FROM”: this option allows framing only from specified trusted domains. Rarely needed (mostly for special integrations).
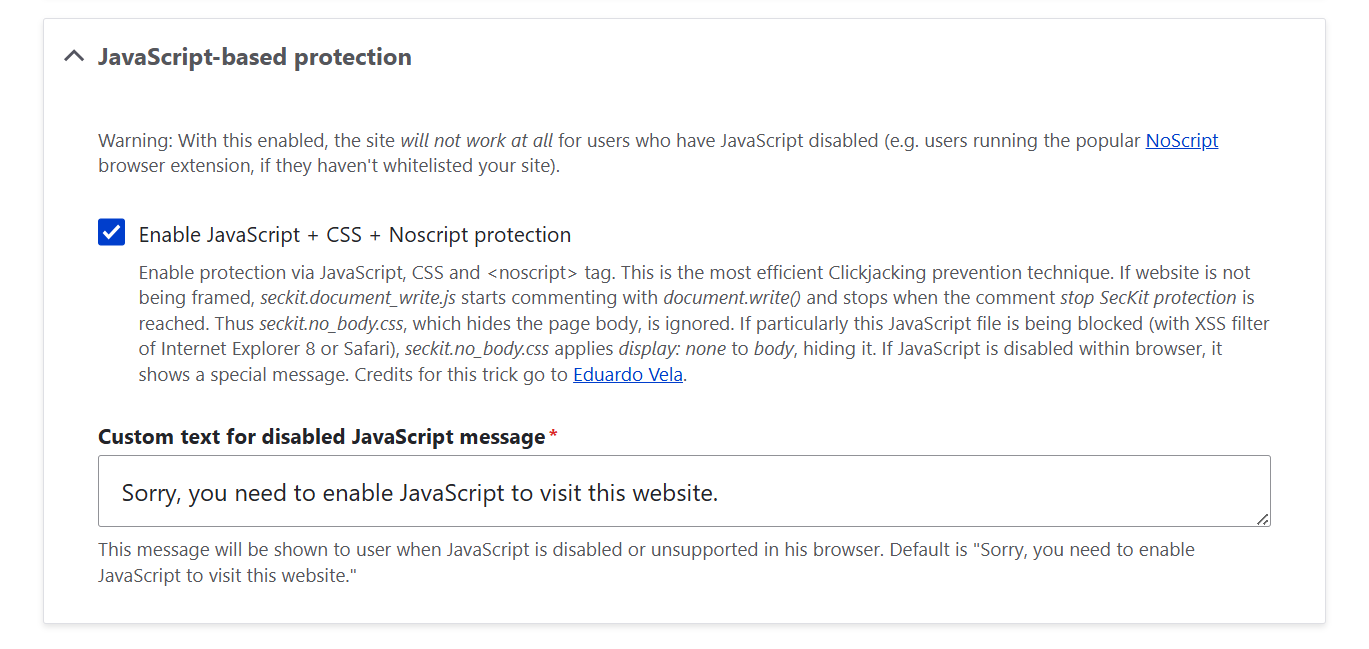
3.2. JavaScript + CSS + Noscript protection
JavaScript-based protection adds an extra layer of defense by hiding the page if someone tries to frame it in an unsafe way. If a visitor has JavaScript disabled, SecKit can display a customizable message like:
Sorry, you need to enable JavaScript to visit this website.
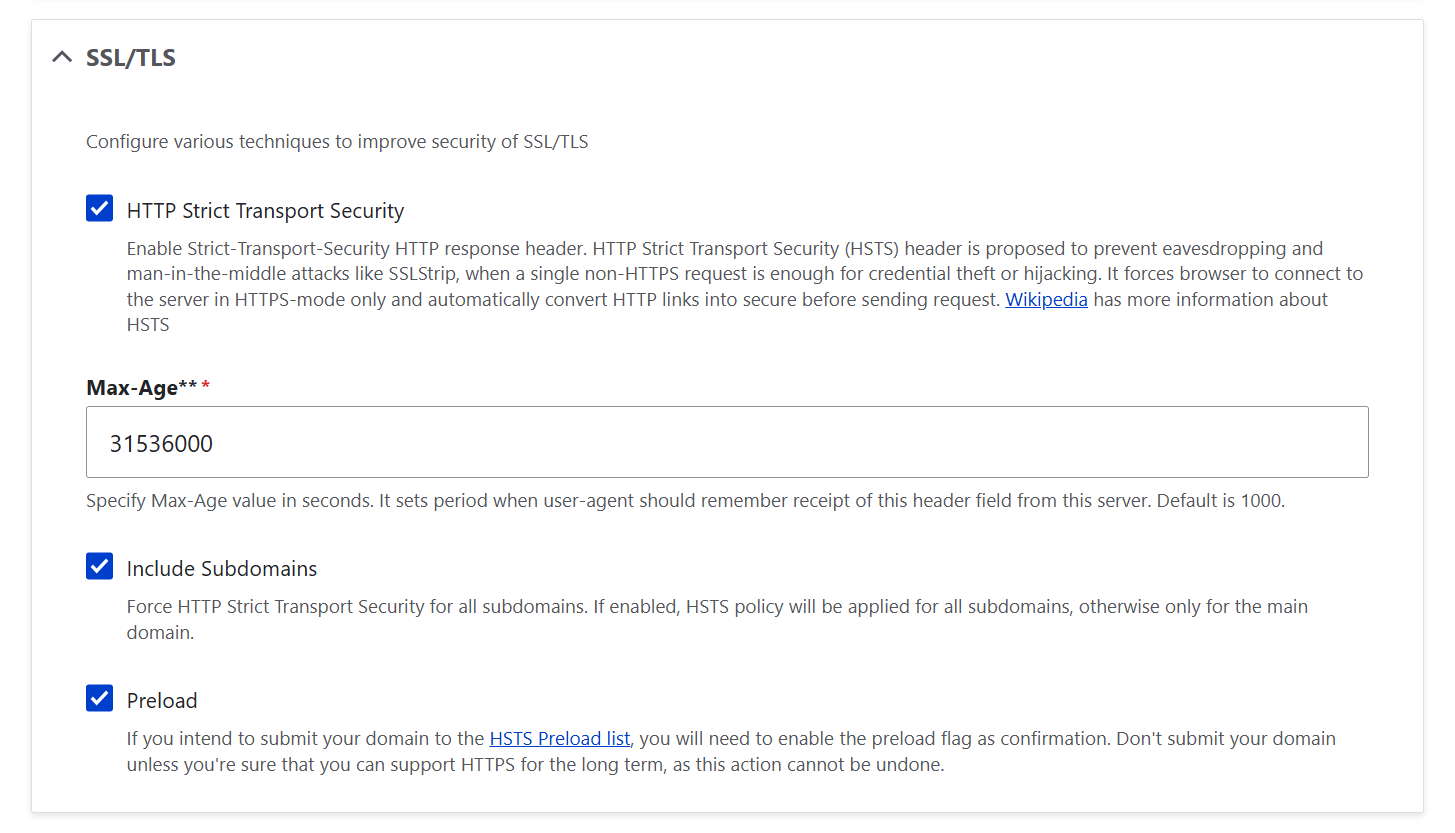
4. SSL/TLS
Here is how SecKit lets you enable the HTTP Strict Transport Security (HSTS) standard to make sure that all connections to your website happen over HTTPS only:
- “HTTP Strict Transport Security”: this setting lets you enable the Strict-Transport-Security response header, turning on HSTS. Your site will tell browsers to always use HTTPS, even if someone tries to open an HTTP link.
- “Max-Age”: this option defines how long (in seconds) the browser should remember that your site requires HTTPS. The default is 1000, but a common safe value is 31536000 (1 year). It comes from common HSTS best practices in the web security community, including Mozilla and Google guidelines.
- “Include Subdomains”: this setting applies HSTS to all subdomains, not just the main site.
- “Preload”: this allows your domain to be added to the HSTS Preload list, which is built into browsers. Only enable this if you are confident your domain will support HTTPS long-term, because it’s hard to reverse. This checkbox just adds the preload directive to your HSTS header, signaling that your site is ready for the HSTS Preload list, but to actually submit your domain to the list, you still need to go to the official HSTS Preload submission page and submit it there.
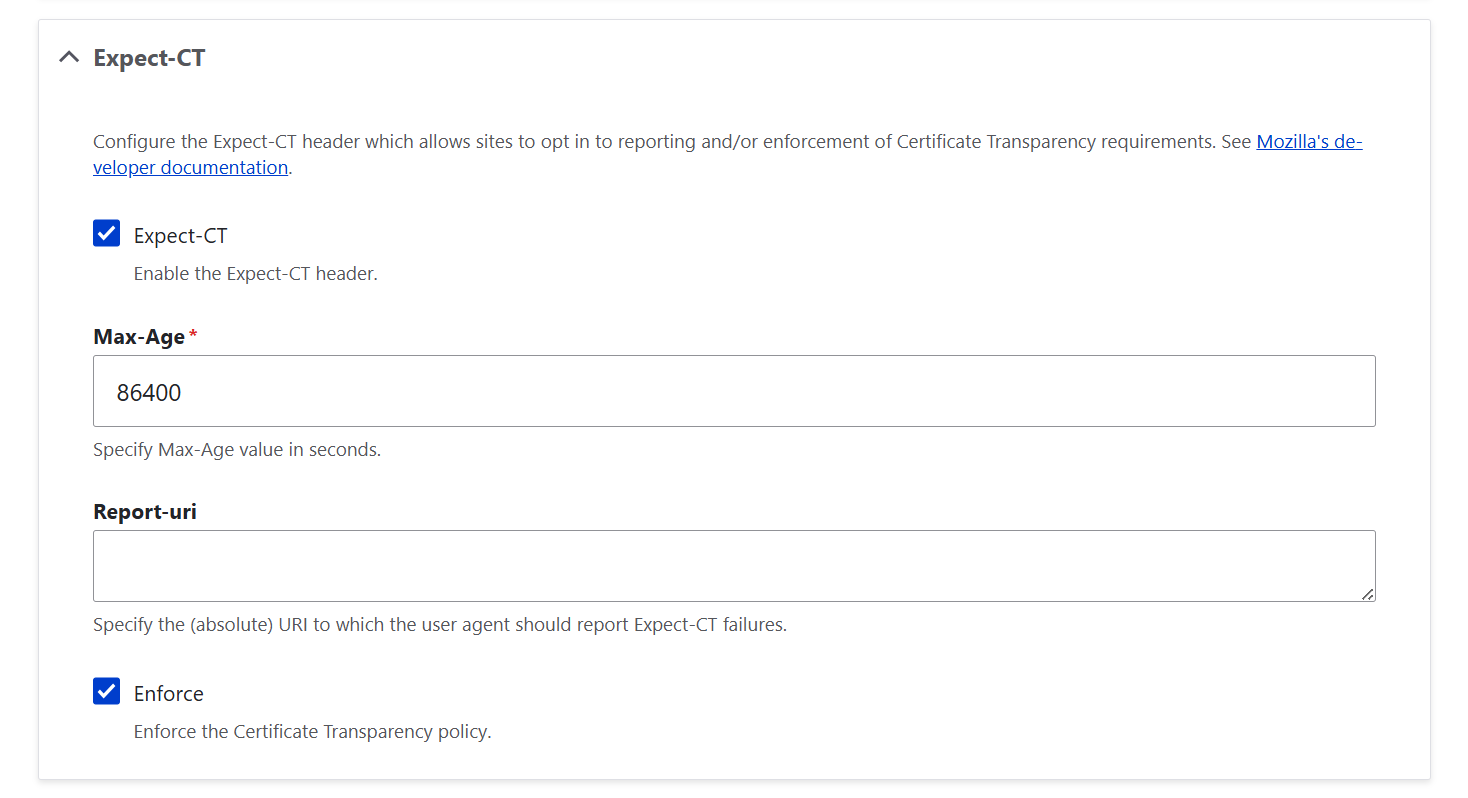
5. Expect-CT
By enabling the Expect-CT header, you opt in to reporting and/or enforcement of Certificate Transparency requirements. This helps browsers ensure that your SSL/TLS certificates are properly logged and trustworthy. This adds another layer of assurance that your site’s certificates are legitimate.
- “Enable Expect-CT”: this turns on the header so browsers know to check CT compliance.
- “Max-Age”: this defines how long (in seconds) the browser should remember this policy. The default is 86400 (1 day), which is safe for most sites. You can increase it once you’re confident your certificates are correct.
- “Report-uri”: this defines the URL where browsers send reports if they detect certificate problems. The default can usually be left empty unless you have a reporting endpoint. Leaving it empty is fine for most sites that just want CT enforcement without monitoring, but if you want to know when issues occur, you would need to specify a reporting endpoint.
- “Enforce”: if this is checked, browsers will reject connections that don’t comply with CT. If unchecked, browsers just report violations without blocking access.
6. Feature Policy
Here is how SecKit helps you control what browser features are allowed on your website:
- “Feature Policy”: this checkbox enables the Feature-Policy header.
- “Policy”: here, you can list the features you want to allow or block. For example, you might disable camera or microphone access if your site doesn’t need them, or restrict geolocation to certain trusted origins. You could say: geolocation ‘self’ (only your site can request location), microphone ‘none’ (disable microphone access completely), fullscreen * (allow fullscreen mode from anywhere), and so on.

7. Miscellaneous
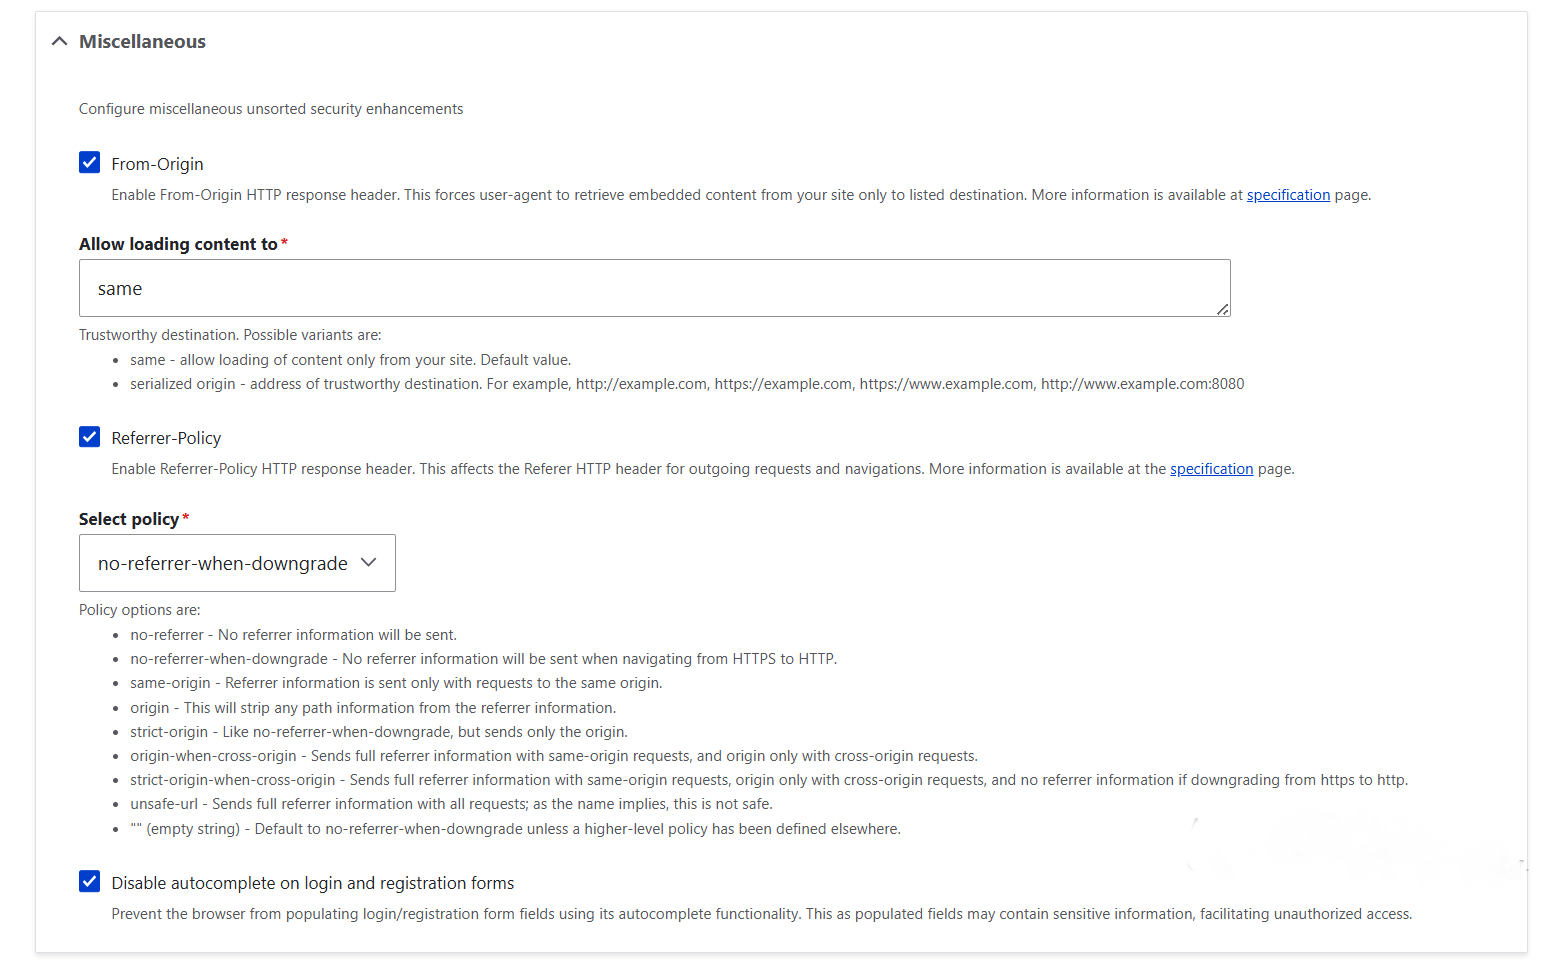
7.1. From-Origin
This setting controls where embedded content from your site is allowed to load:
- “Enable From-Origin”: this turns on the From-Origin header so browsers will only allow content to be sent to safe destinations.
- “Allow loading content to”: this is usually set to ‘same,’ meaning embedded content can only go to your own site. You can also list specific trusted addresses if needed.
7.2. Referrer-Policy
This controls what information your site sends when users click links to other sites.
- “Referrer-Policy”: this checkbox turns on the Referrer-Policy header.
- “Select policy”: in this dropdown, you can select the specific Referrer-Policy type you want the browser to apply. For most sites, a safe balance is no-referrer-when-downgrade (default) or strict-origin-when-cross-origin if you want stronger privacy.
- “Disable autocomplete on login and registration forms”: this prevents browsers from pre-filling usernames or passwords in forms, which can help stop unauthorized access if someone else uses the same device.
Final thoughts
Don’t worry if you’re not ticking every box right away, even a few steps forward make a real difference. Each setting in Security Kit is a small win, and together, they build a strong shield around your site. Paired with other Drupal security best practices, this turns your site into a well-guarded fortress. And if you’d like your protection to be fully tailored, seamless, and future-proof, a professional Drupal team can help make sure everything fits your site’s exact needs.