
What’s New in ECA 3 and How to Build an Automated Drupal Workflow

Modern, intelligent Drupal websites rely on automation to save teams plenty of time. Tools like Drupal Cron handle scheduled tasks at set intervals, but not every automated workflow is tied to a schedule. Some need to respond immediately to events on your Drupal site, such as a user logging in, an article being published, or a custom form being submitted.
That’s where the ECA (Event-Condition-Action) module comes in. It lets you define what actions should be triggered automatically when a specific event occurs and a specific condition is met.
We previously explored creating event-driven Drupal workflows with ECA. Since then, the module has continued to evolve, becoming more user-friendly and more aligned with Drupal’s best practices. The ECA 3.x branch marks a major evolution of the tool. In this article, we’ll explore what’s new in ECA 3 and how to build an automated workflow on your Drupal website.
ECA 3: the next generation of Drupal automation
An improved modeler experience
At the heart of ECA automations are ECA models. They are visual workflows that define what should happen on your website by connecting events, conditions, and actions. User interfaces for creating and managing these models are known as modelers.
Jürgen Haas, the creator of ECA, wrote an article about the newly introduced Modeler API for ECA 3. This tool establishes a standardized interface between:
- modelers, which provide the user interface for creating and editing configuration
- and applications like ECA that store, parse, and execute that configuration.
By decoupling the visual interface from the underlying business logic, the Modeler API makes integrating different visual editors with ECA much easier. It also allows other Drupal projects to reuse these visual editors, making the entire ecosystem easier to maintain and extend.
For years, BPMN.io was the primary modeler option for ECA, and its 3.x branch has been released with major enhancements. While its graphical canvas remains familiar, much of its surrounding interface has been replaced with native Drupal core components. The result is an editor that feels seamlessly integrated into the Drupal administrative UI.
Furthermore, a new modeler is also now available for ECA, called Workflow Modeler. According to the official ECA project page, it is now the new recommended visual editor. Built using the modern React Flow library, it delivers a fast drag-and-drop experience packed with site-builder features. Among them:
- Context-aware quick add. It intelligently suggests valid events, conditions, or actions as you build.
- Execution replay. You can step through past workflow runs visually to inspect them and debug their logic.
- Live testing. You can trigger and observe ECA workflows directly within the Modeler interface.
Regardless of which visual modeler you use, the underlying ECA logic, events, and sequence conditions work exactly the same.
In-context “Lightning bolt” automations
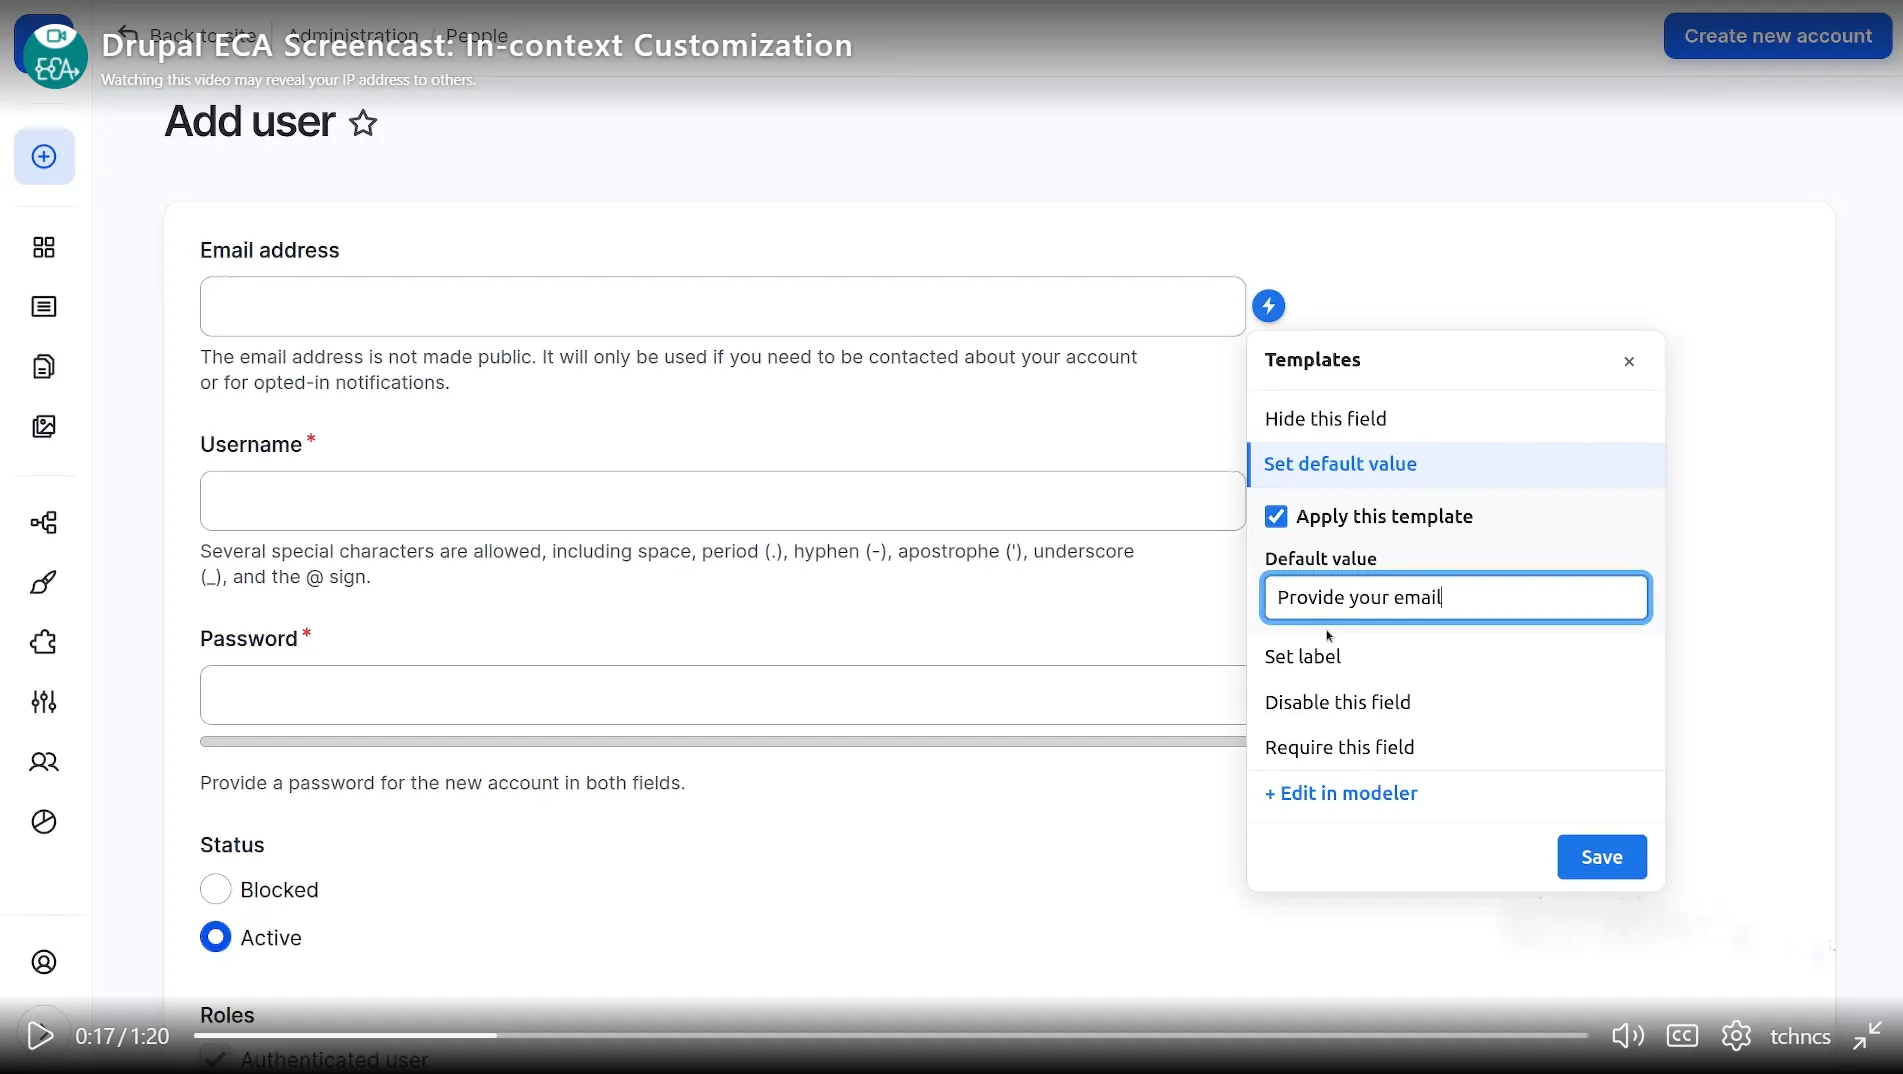
The ECA module now features in-context automation templates. While editing online forms, you see a simple contextual “lightning bolt” action icon right next to specific fields. Clicking the bolt allows you to apply a pre-built automation template to that field instantly. For example, you can set up content publication notifications, user registration automations, form submission workflows, and so on.
There is no need to look at a workflow modeler, write code, or open a dedicated configuration screen. However, more technical users still have the option to open any ECA model in the modeler and edit it based on their preferences. Any ECA model can also be saved as a template for further reuse.
This new feature is meant to reduce the learning curve for users who are not familiar with event-driven architecture. Jürgen Haas called this a breakthrough. He wrote in his article that this brings ECA to where users already are, without requiring them to learn the ECA “language” first.
The one-click “ECA Starterkit”
Getting started with ECA does not always mean choosing which ECA submodules to install, setting up a modeler, configuring the necessary pieces, and figuring out how they all fit together. The ECA Starterkit simplifies this initial setup by packaging the recommended ECA configuration. It works as a Drupal recipe (a pre-packaged set of features for websites). With this recipe applied on your site, you can open the modeler immediately and explore a real ECA workflow instead of starting with an empty canvas.
ECA 3: technical renovation under the hood
As Jürgen Haas highlighted, the backend has been thoroughly modernized in ECA 3. Here are some of the key changes:
- All plugins now use native PHP attributes instead of legacy annotations.
- Every plugin configuration is backed by a full config schema, enabling strict validation (and seamless core translation).
- Procedural hooks have been converted into modern object-oriented classes with proper dependency injection.
ECA’s latest release is compatible with the newest version of Drupal 11 and has forward compatibility with the upcoming Drupal 12.
ECA and AI: a great match
Combining ECA 3 with Drupal’s AI ecosystem enables site builders to construct intelligent, visual, no-code workflows. There is now a dedicated module called AI Integration - ECA. It’s a replacement of the ECA submodule inside the AI module.
The new module seamlessly bridges the AI module and ECA by turning AI operations into 13 ready-to-use ECA actions:
- text & audio: chat, moderation, embeddings, translation, text-to-speech, speech-to-text, speech-to-speech, audio-to-audio
- visuals: text-to-image, image-to-image, image-to-video, image classification, object detection
All results pipe directly into ECA tokens, making them immediately available for your next rule or action.
During a recent Drupal AI Learners Club session, ECA co-maintainer Jürgen Haas demonstrated how AI can directly assist in building ECA workflows. By leveraging a custom MCP (Model Context Protocol) server alongside a full overhaul of the official ECA documentation for AI readability, site builders can now describe a desired workflow in natural language and have an AI agent generate or troubleshoot the ECA model structure automatically.
How to set up a workflow with ECA 3 on a Drupal site
Use case: automated email routing
In this example, we’ll use ECA 3 to automatically route newly created content to specific departments for review. This can be especially useful for multi-department sites, like university sites or large corporate intranets.
Content articles will have a “Department” taxonomy field so users can select the department during content creation. Based on which department they have tagged, the specific team (HR, Law, or Marketing) will automatically get an email notification to review the content.
Step 1. Install the modules
You’ll need the ECA module, as well as one of the modeler modules:
The Modeler API module is also needed, but it will be installed automatically with ECA.
When ECA is installed, you’ll need to enable the submodules you are going to use. There is a long list of submodules, the choice of which will define the specific options in your ECA models. For this example, we’ll need the following submodules:
- ECA Base
- ECA Content
ECA UI
Step 2: Add department options to articles
Navigate to Structure > Taxonomy, click “Add vocabulary,” and set the label to “Departments.” Add terms one by one:
- Human Resources
- Legal & Compliance
- Marketing & Communications
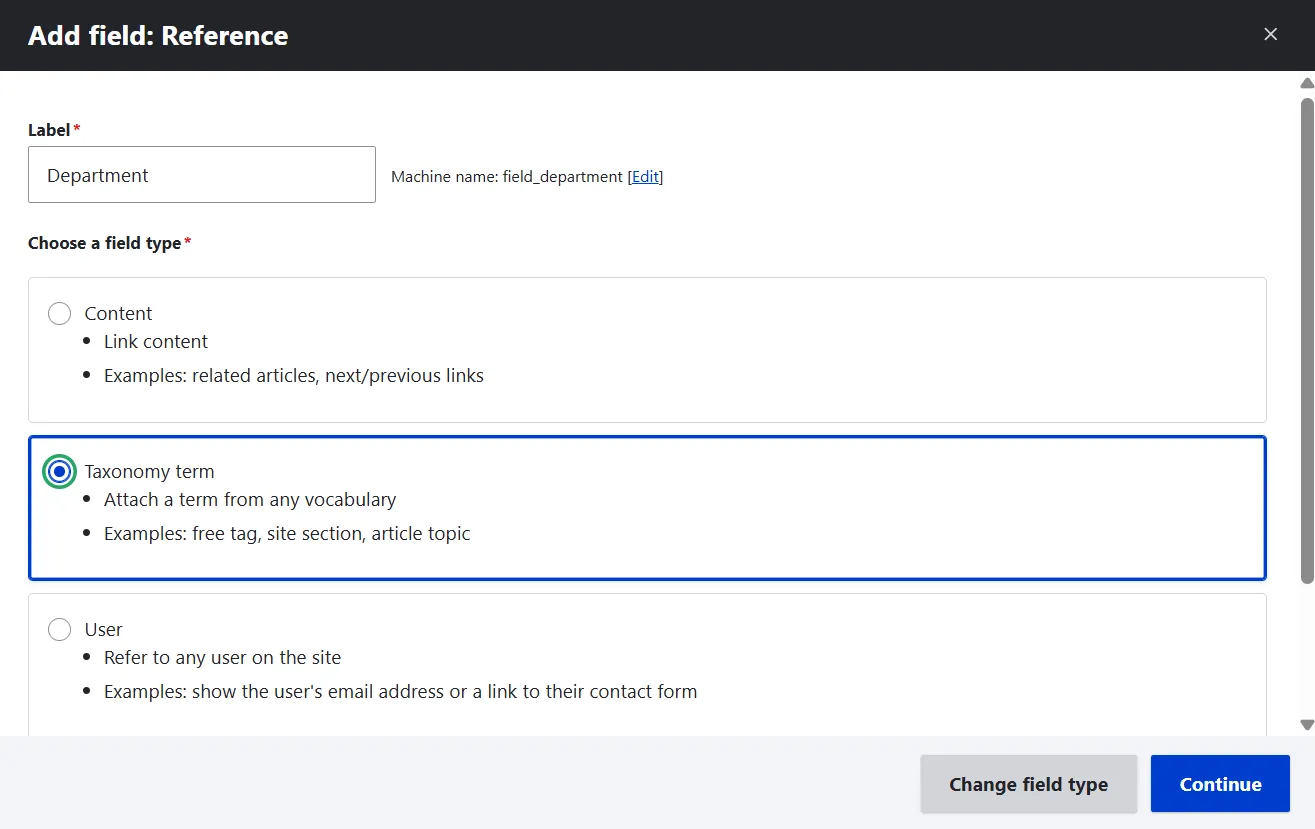
Next, navigate to Structure > Content types, click “Manage fields” next to Article. Click “Add field” and set “Reference > Taxonomy term” as the field type. Set the field label to “Department.” Under “Vocabulary settings,” select the “Departments” vocabulary.
You can also customize how the department options will appear in the article editing form by going to Structure > Article > Manage form display. There, you can select the needed widget next to the “Department” field: the default one is autocomplete, but checkboxes/radio buttons or a select list might work better.
Step 3: Build the ECA model
Let’s move on to the most exciting part of this ECA tutorial: creating an ECA workflow. Navigate to Configuration > Workflow > ECA and click “Add ECA model.” After that, a visual editor will open where you can build a model as a diagram.
3.1 Configure the event
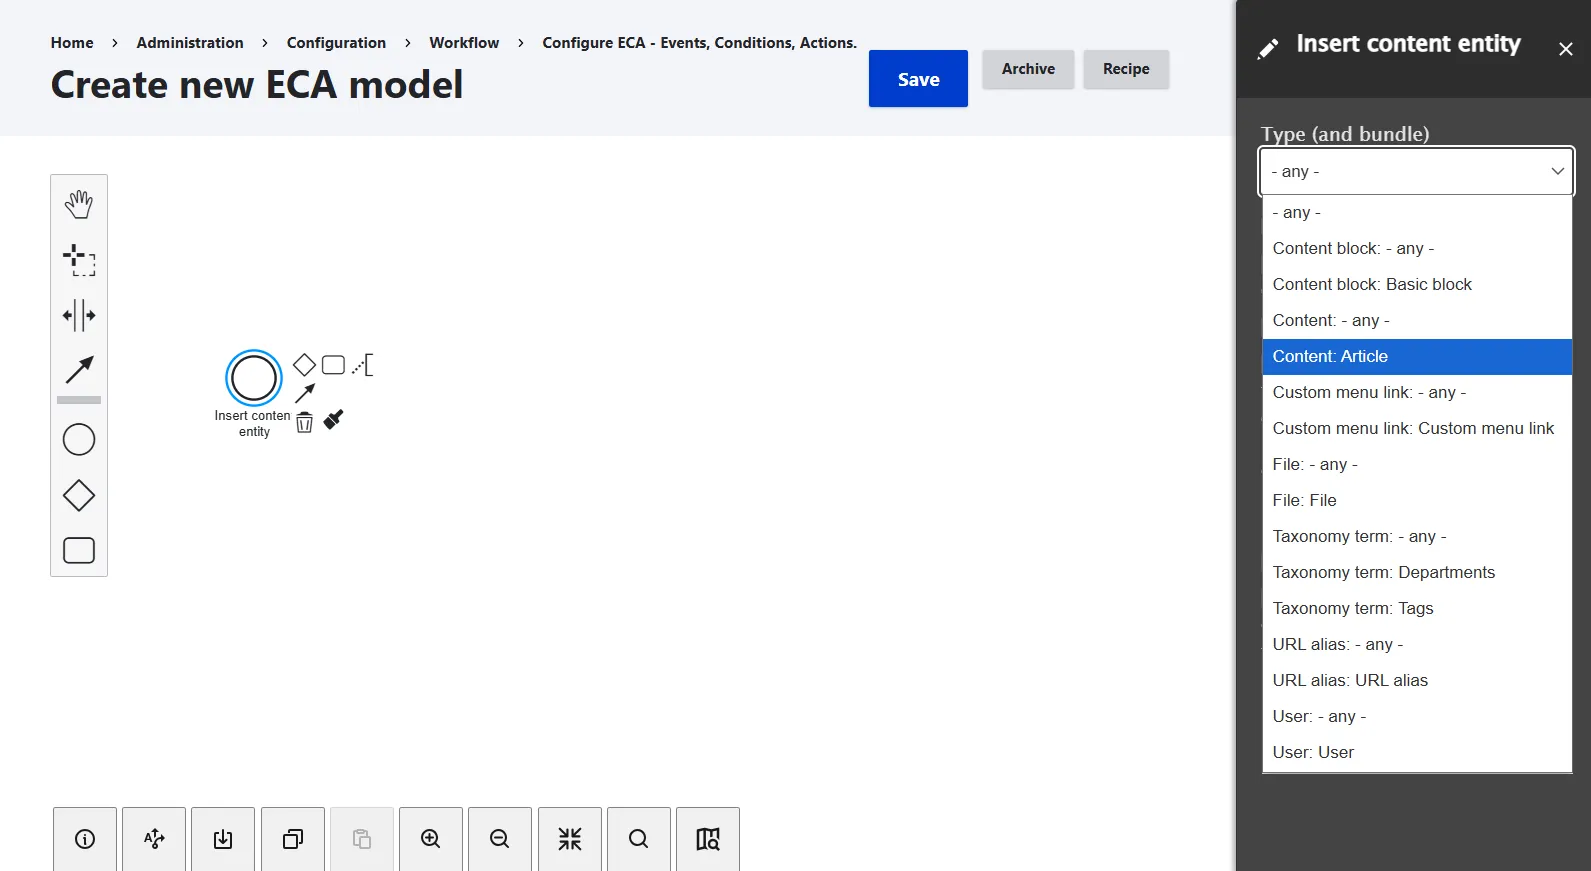
Drag the circle icon to the main canvas. It will represent the main event that you’re configuring. In this example, the event is an article being created on the website.
Select “Insert content entity” from the list of possible events. In the right panel, set the “Type (and bundle)” to “Content: Article.”
3.2 Configure the actions
Come back to the main canvas and click on the circle again to see the options for your newly created event. There is a rounded rectangle next to the circle. As you hover over it, it will show the “Append Task” tooltip. Click on this rectangle to create the action that needs to be performed on the website after an article has been created.
Select “Send email” from the list of possible actions. In the right panel, configure the email details. Our first action will be sending an email to the HR department with the following details:
- Recipient: hr@website.com
- Subject: A new article has been submitted!
Message: A new article has been submitted that needs the Human Resources department's review.
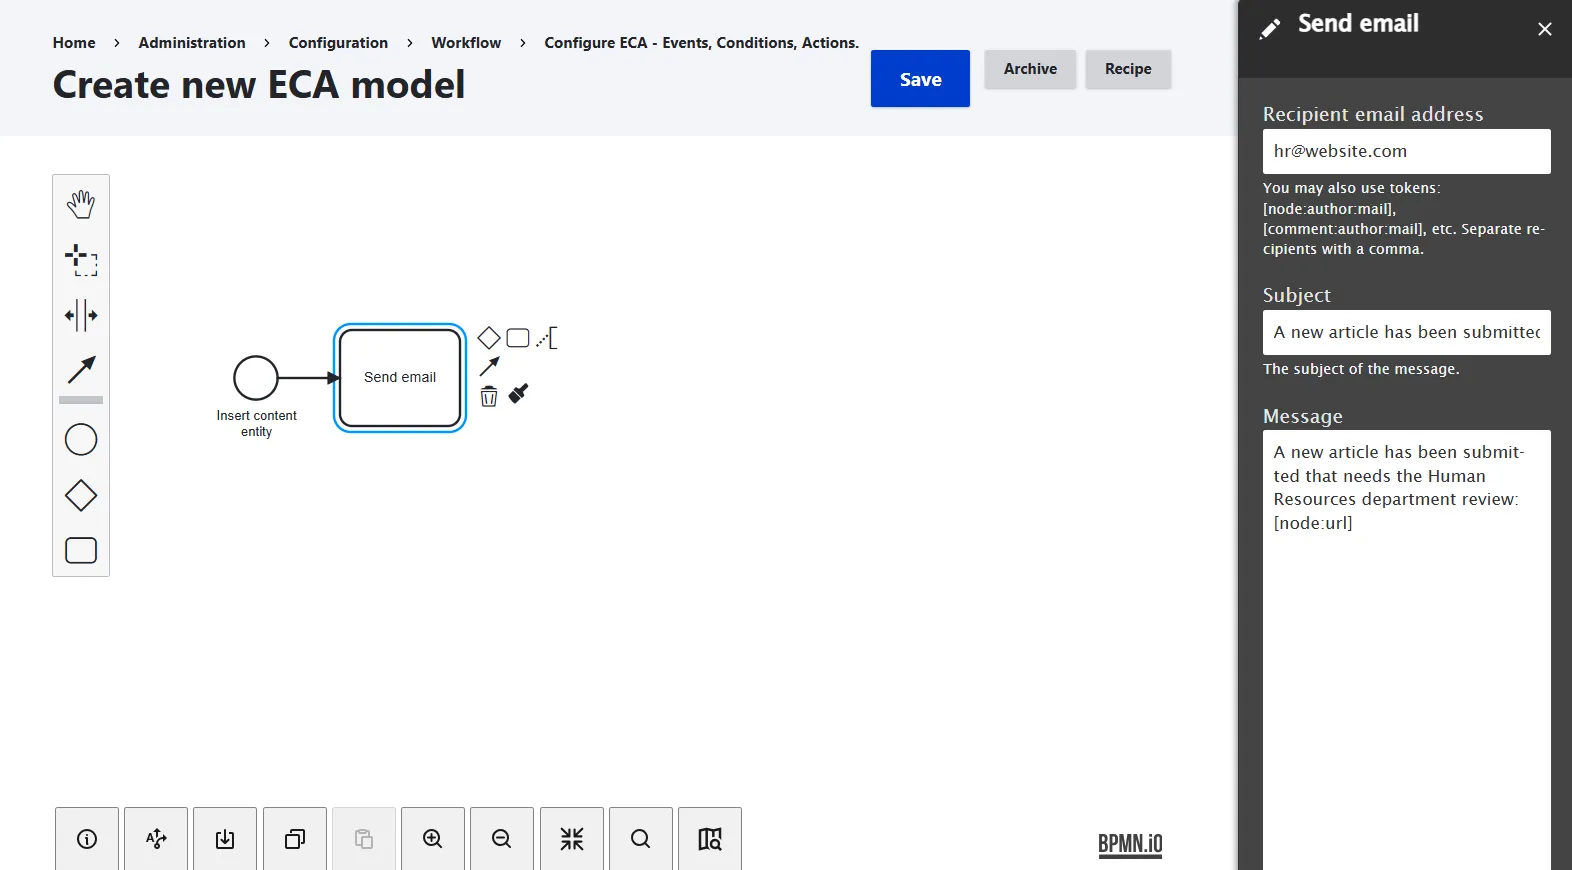
Creating an ECA action in Drupal
By clicking the “Append Task” rectangle next to your event circle again, repeat this step for all the other departments, customizing the email addresses and messages.
3.3 Configure the conditions
As you can see on the diagram, the event is connected by arrows to specific actions. If you click on a connecting arrow, you’ll be able to configure the condition upon which the action will be performed. Although conditions are optional in ECA, they make workflows richer.
In the right panel, set the template to “Entity: compare field value.” Set the “Field name” to “field_department” and the “Expected value” to “1.” (In our example, 1 is the ID of the “Human Resources” taxonomy term, which you can check either in the content editing form where this field is filled out or in the term’s URL at Structure > Taxonomy)
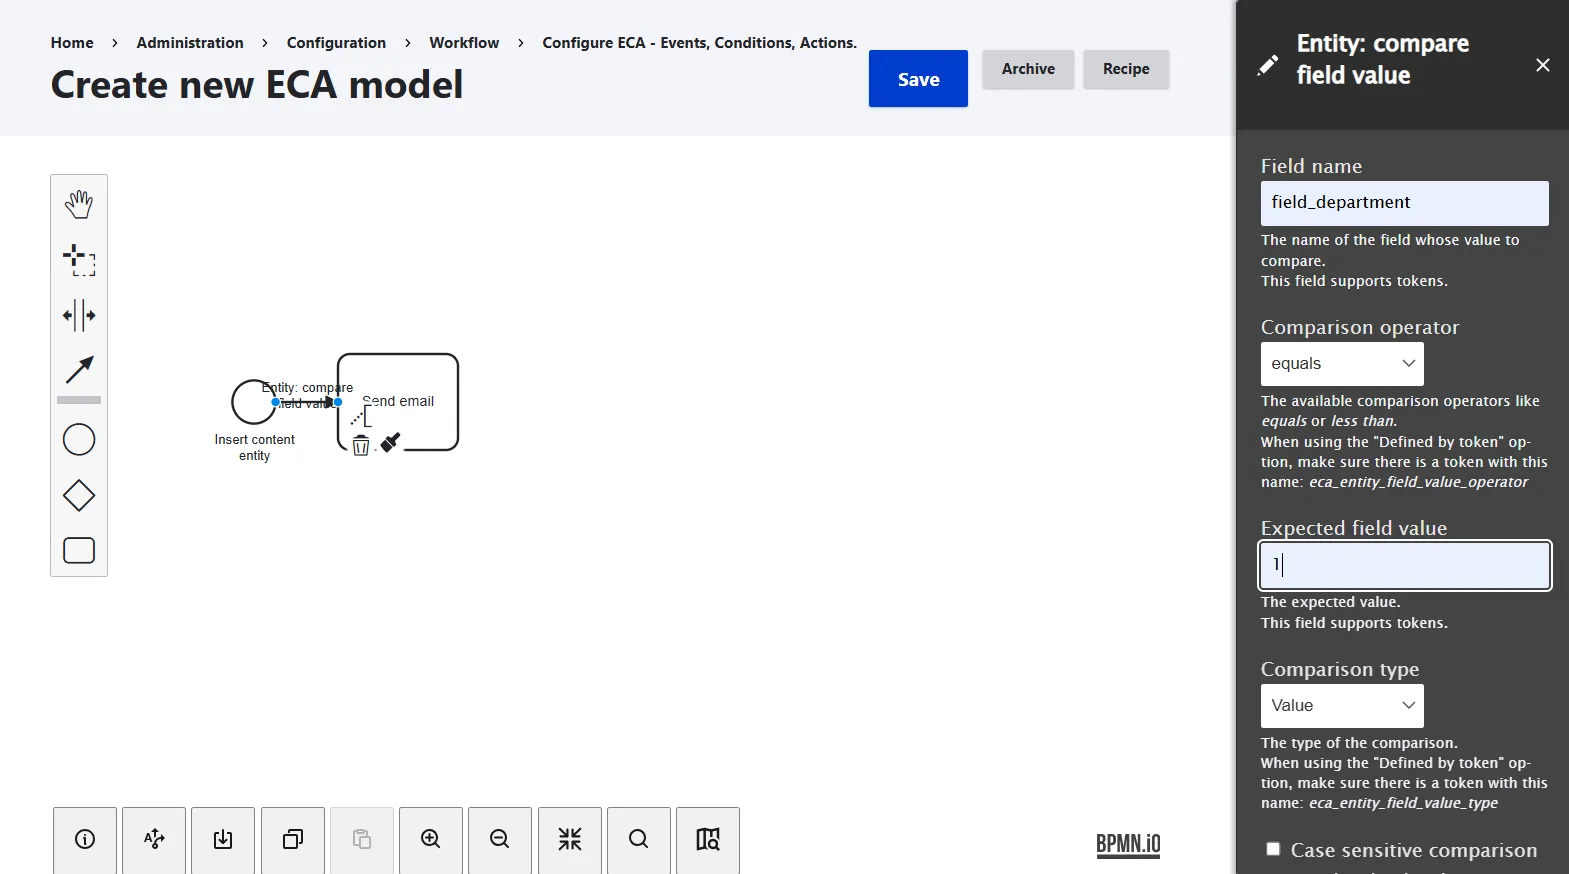
By clicking on each connecting arrow, repeat the step for each department.
3.4 Save the ECA model
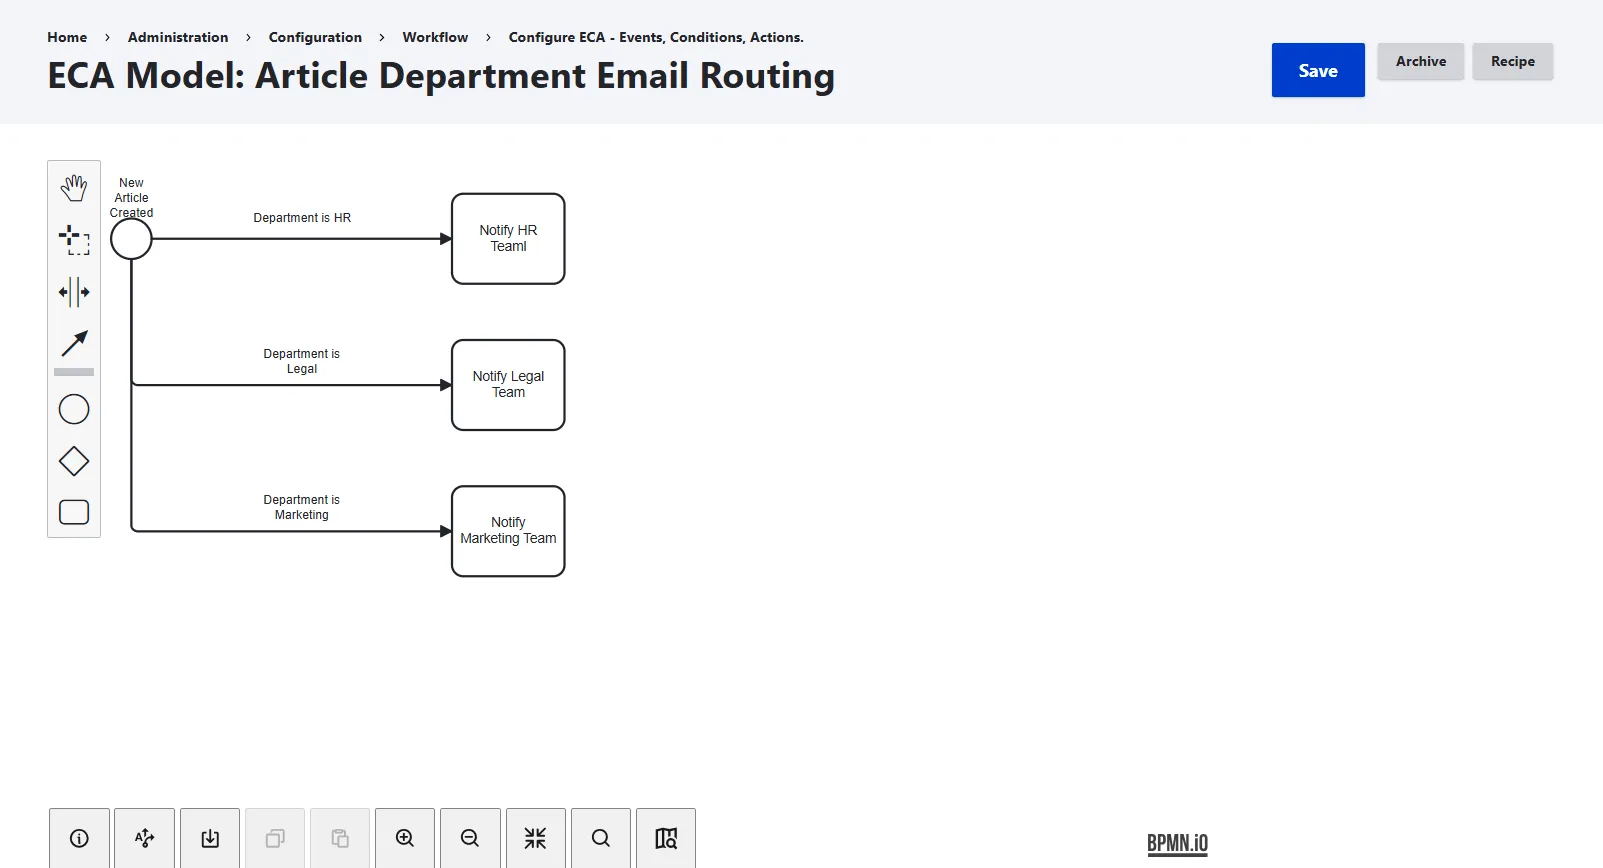
Click “Save” in the top action toolbar. You can rename your model as desired by clicking the “Information” icon in the bottom left menu and changing the model’s label. It’s also possible to rename the actual events, conditions, and actions directly on the diagram so they make more sense. As a result, there is a model like this:
Article Department Email Routing:
- Event: A new article has been created
- Condition 1: Selected department is HR > Action 1: Notify the HR team
- Condition 2: Selected department is Legal > Action 2: Notify the Legal team
- Condition 3: Selected department is Marketing > Action 3: Notify the Marketing team
You can drag the elements around to position them as desired and fix some clunky visual overlaps, zoom the model in and out, apply the auto-layout feature, save the model as SVG, and much more.
Step 4: Check the result
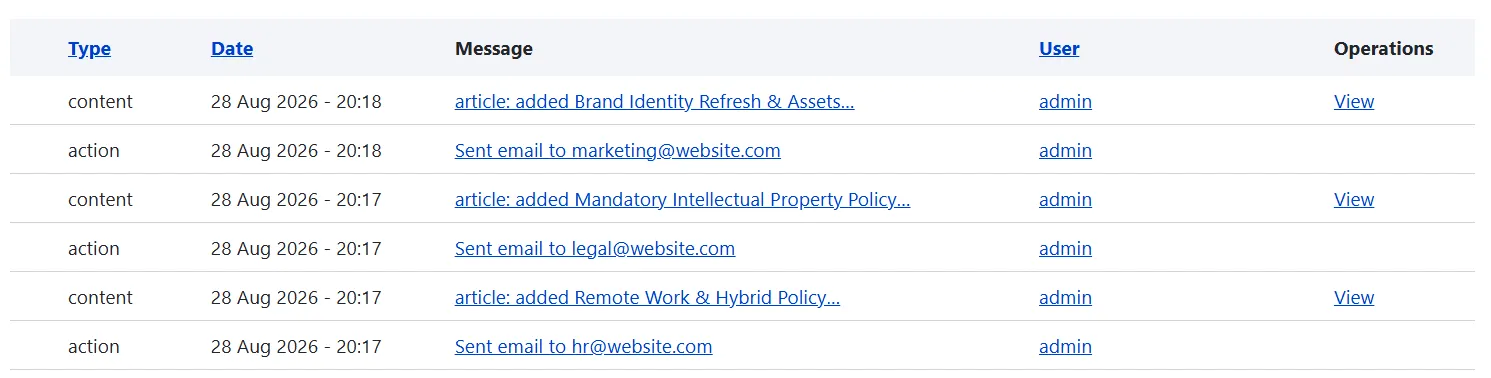
For testing purposes, let’s create one article for each department:
- “Remote Work & Hybrid Policy Guidelines” for Human Resources
- “Mandatory Intellectual Property Policy Update” for Legal & Compliance
- “Brand Identity Refresh & Assets Guide” for Marketing & Communications
There’s no better way to test whether this model works than to go to Reports > Recent log messages. There, you should see the latest logs of what happened on your site. It should now display the added articles alongside the emails successfully sent to the respective departments.
Final thoughts
This guide has demoed a very simple example with ECA, while the module’s capabilities are much more extensive for a real-world website. The ECA module keeps developing, firmly holding its title as Drupal’s main orchestration engine. Today, it is more modern, easier to use, and more native to Drupal’s best tools than it has ever been before. So this might be a great moment to think of the ways to automate things on your site, letting your team focus on creative tasks and outsourcing the behind-the-scenes work to ECA.