Rollback Ready: Why Drupal Content Revisions Are An Underrated Backup Tool

We’ve all been there. Anyone who has worked with content knows that feeling when critical changes are lost because of human error or a technical glitch. The first instinct might be to panic and call your development team to restore last night’s database backup.
No worries! Drupal has a lightweight solution that is available to any non-technical user: Content revisions. It’s an elegant, enterprise-grade “time machine” built right into the Drupal core architecture. Content revisions are often underrated compared to more technical ways to back up your Drupal website. Let’s discuss how Drupal content revisions work, why they matter, what extra modules can be used with them, and what best practices you could rely on.
What are Drupal content revisions?
When you save a content edit in Drupal, the system creates a new revision instead of just overwriting the existing page. A revision is essentially a specific saved version of the piece of content.
Editors can view the history of changes with all these saved content versions along with the date and time of the changes, who made them, and, optionally, the comments. It’s possible to revert to the needed version in just one moment, making it the current revision. We’ll walk you through the detailed steps further in this article.
One of the greatest things about Drupal revisions is that even if you revert the wrong version or change a status by mistake, you haven’t destroyed anything. Drupal just creates a new row in the timeline. You can always click the “Revisions” tab and roll right back to where you started 5 minutes ago.
Drupal content revisions vs. web infrastructure backups
Web infrastructure backups and recoveries are indispensable in many cases of data loss. However, they are external, sometimes slow to restore, and usually handled by IT. On the contrary, content revisions are granular, instant, and entirely in the hands of the creator. That being said, you don’t always need to bring in the “heavy-duty machinery.”
Web infrastructure backups are more suited to disaster recovery, like a server crash or a security breach. But when it comes to fixing a single broken page, restoring an entire database risks overwriting every other update, comment, or transaction made on the site since that backup was taken.
Revisions let you target one exact piece of content at a single point in time. This means restoring only the targeted page with zero impact on other content.
Content revisions vs. autosave in the new admin interface
The updated admin interface in the latest versions of Drupal 11 provides yet another safety net for content editors. It’s the autosave feature that protects you if your browser crashes or your internet drops during the editing process.
However, the moment you successfully hit “Save,” that temporary autosave cache is cleared out. If you look at your newly updated page and realize you accidentally deleted a paragraph, autosave cannot bring it back. It only protects your work before you save. Revisions, on the other hand, act as your permanent insurance policy after you save, allowing you to instantly roll back the clock to any point in the website’s history.
How to work with Drupal content revisions: step-by-step guide
1. The “Revisions” tab
Every piece of content includes administrative options such as “View,” “Edit,” “Delete,” and “Revisions.” Depending on the Drupal core version, it can be positioned differently. For example:
- They can appear as standard horizontal tabs sitting directly at the top of the content item.
In the newest versions, they are pinned to the top right of the page in a persistent, sticky action header, keeping your primary buttons available even when you scroll down long pages.
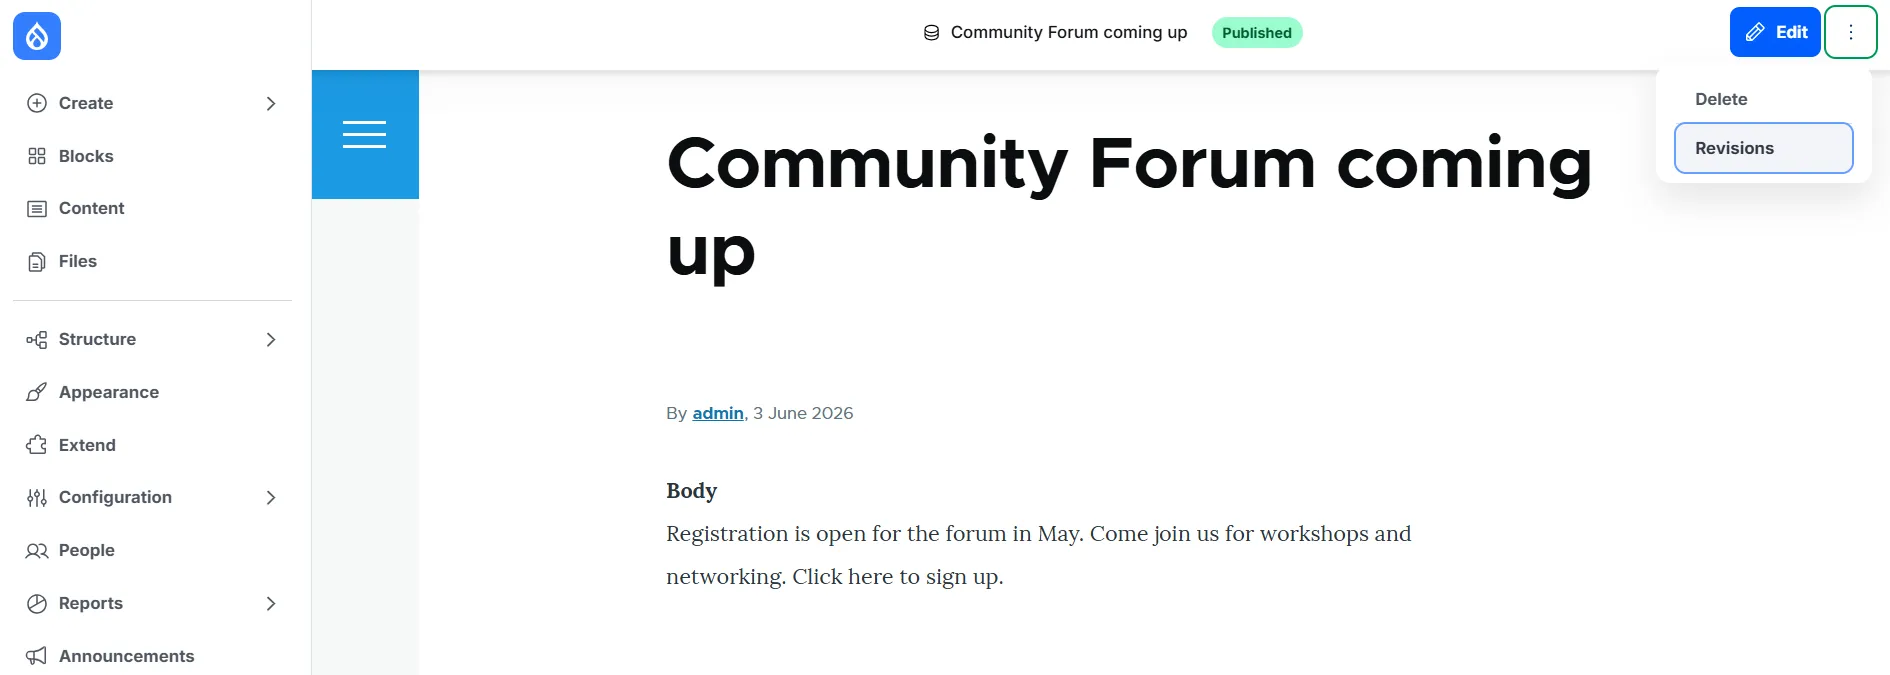
Finding the revision history for a Drupal content item
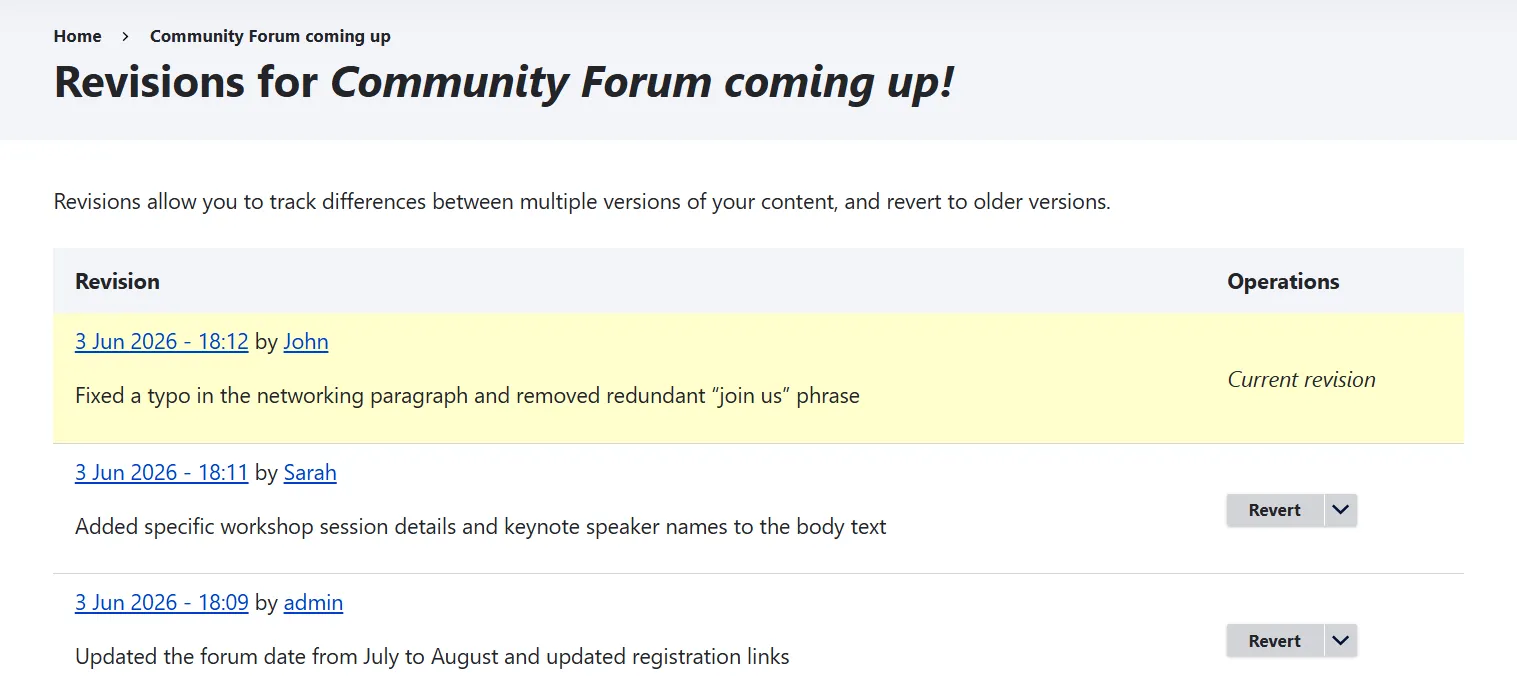
As you click “Revisions,” you see the history of changes for this content item. It tells you exactly:
- What the current revision is (it’s marked and highlighted)
- When the change was made (the date and time)
- Who made the change (the username)
Optionally, what this change was about (if the author of the change left a comment)
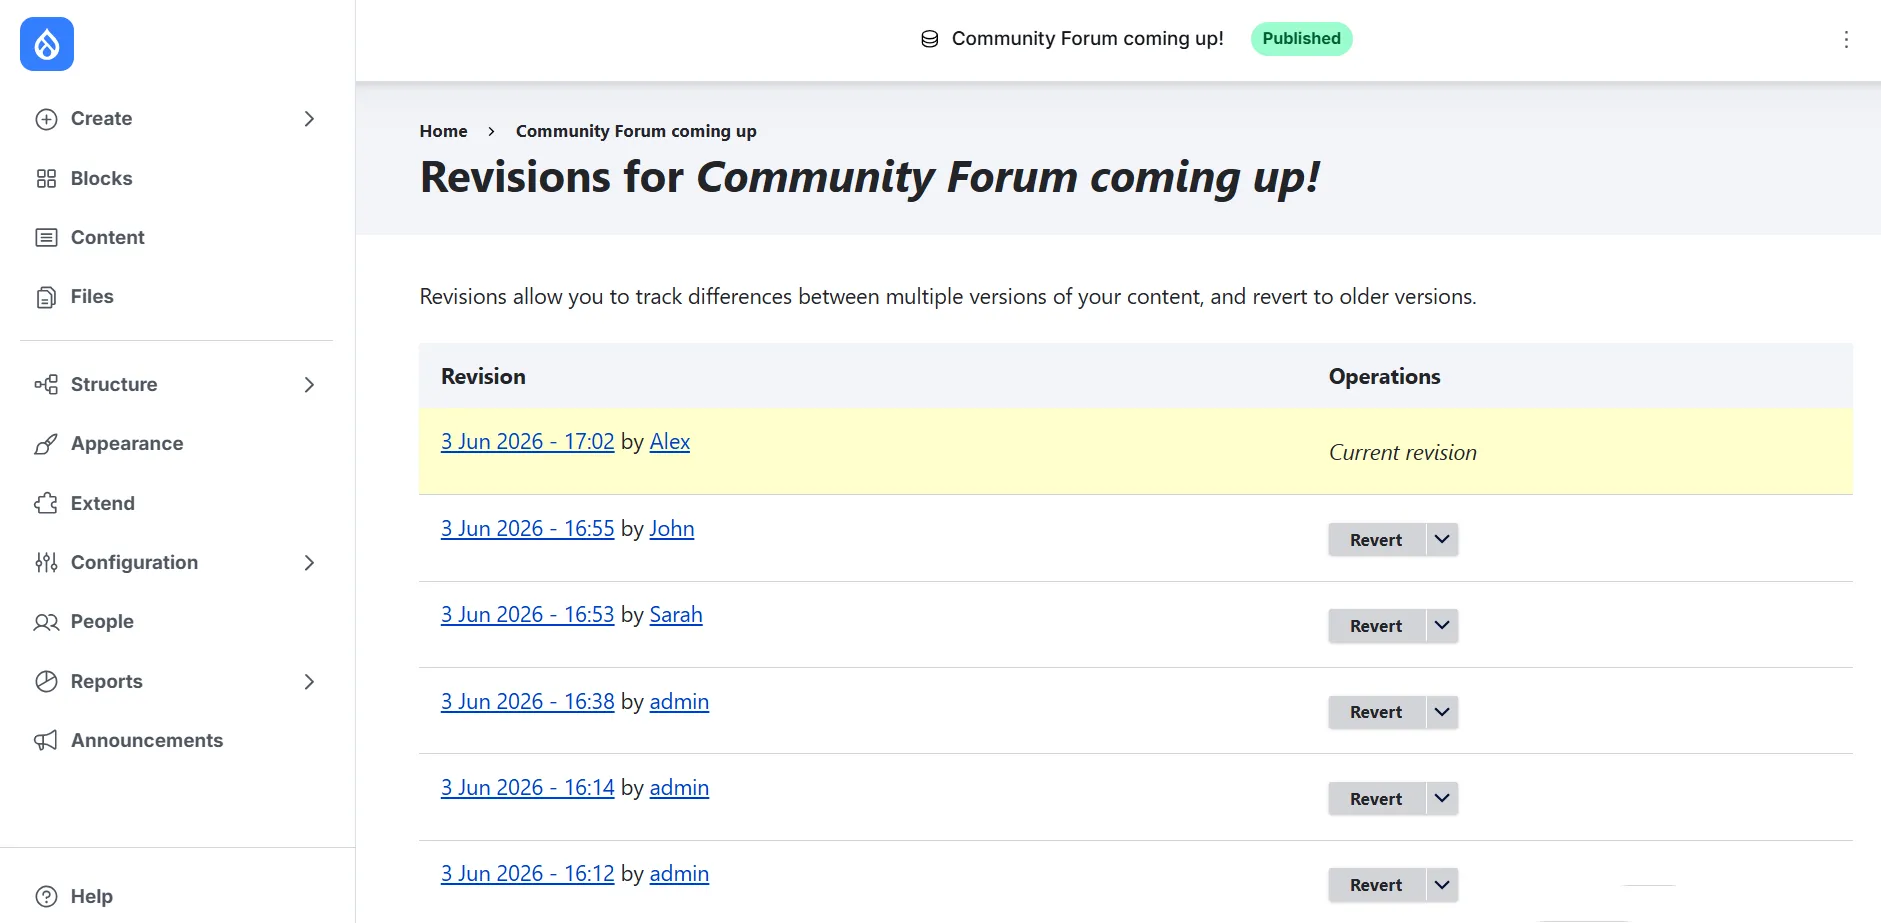
To undo some unfortunate edit, you simply find the latest correct version and click “Revert.” You’ll be asked to confirm your decision.
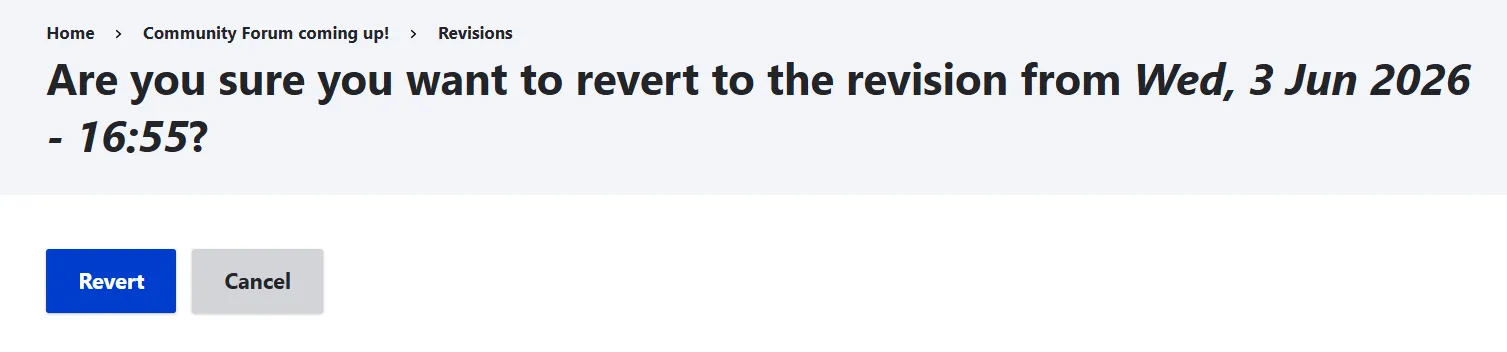
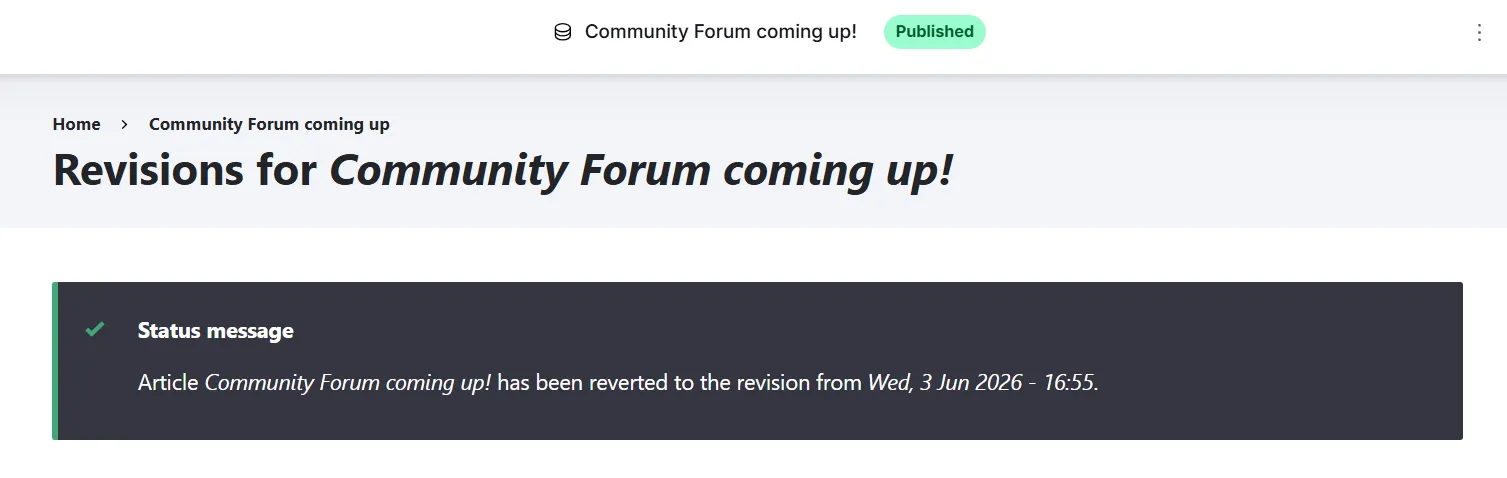
And then Drupal handles the rest, reverting to the needed version and making it the current one.
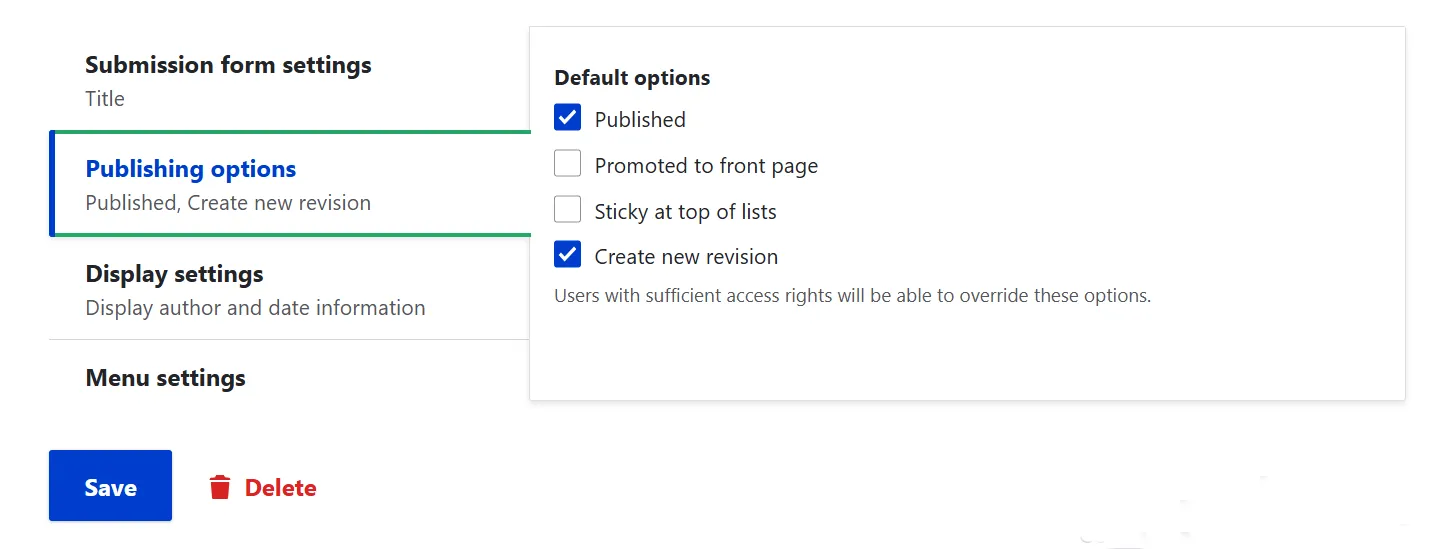
By default, all content types are configured to save content revisions, but double-checking is always a useful thing to do. Go to Structure > Content types > [Your content type (like Basic Page or Article)] > Edit, scroll to the “Publishing options,” and make sure the box that says “Create new revision” is checked.
2. Revision log messages
Looking at the time a content change was made is not always enough to quickly decide which version to revert to. Here is where revision log messages come in.
When editing content, you’ll see a simple text area under the “Revision information” settings that says: “Revision log message.” This message is a comment an editor can leave about what’s changed in a specific content version.
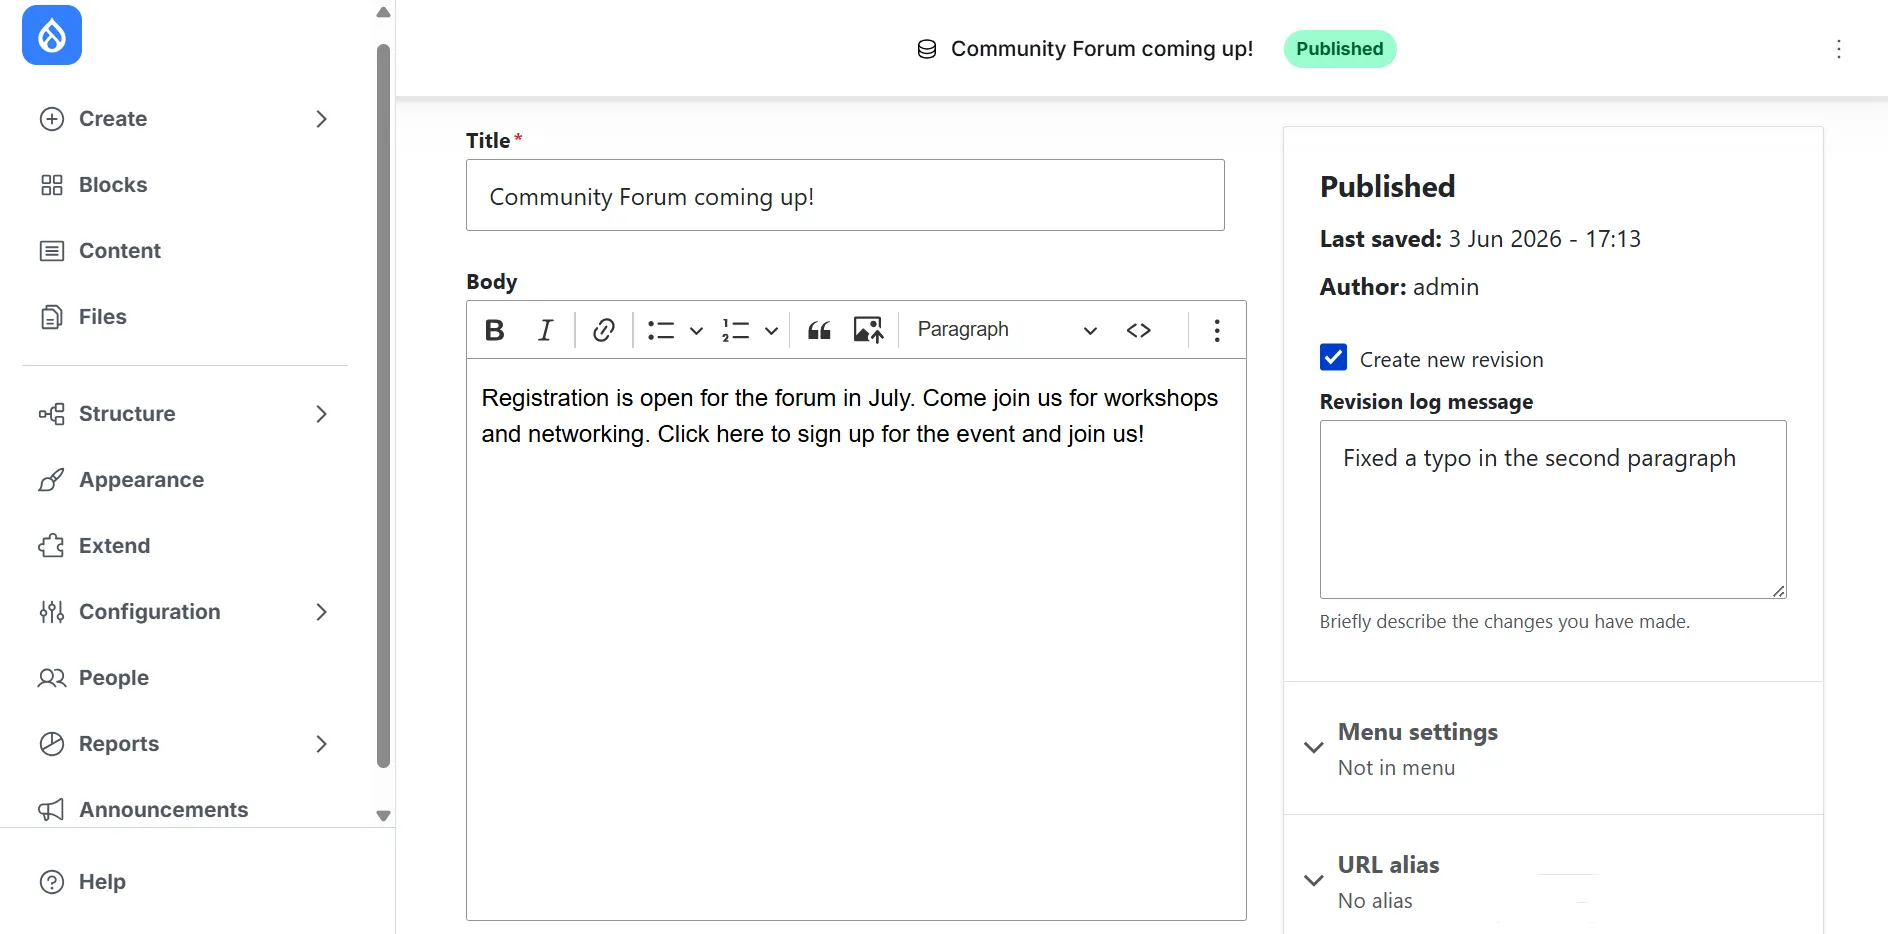
These can be messages like this:
- “Updated the forum date from July to August and updated registration links.”
- “Added specific workshop session details and keynote speaker names to the body text.”
- “Fixed a typo in the networking paragraph and removed the redundant “join us” phrase.”
For example, if the registration link is suddenly broken, you don’t waste your time checking other versions. You know exactly that the revision that mentions the registration links is the one to check before everything else.
Sadly, editors often completely ignore the "Revision log message" field or just type generic placeholders like “update” or “edit.” Here is where modules like Revision Log Default can be helpful. This module uses automated intelligence for your backup log. If someone leaves the field completely blank, the module dynamically writes a custom message based on what they actually did. These can be logs about creating a new article, creating a translation, updating the title, body, and image fields, and so on.
Another option is to make the field required before an editor can save their changes. While you can do this with custom code, the easiest way for non-technical users is by installing a lightweight module called Required Revision Log.
3. Visualizing changes with the Diff module
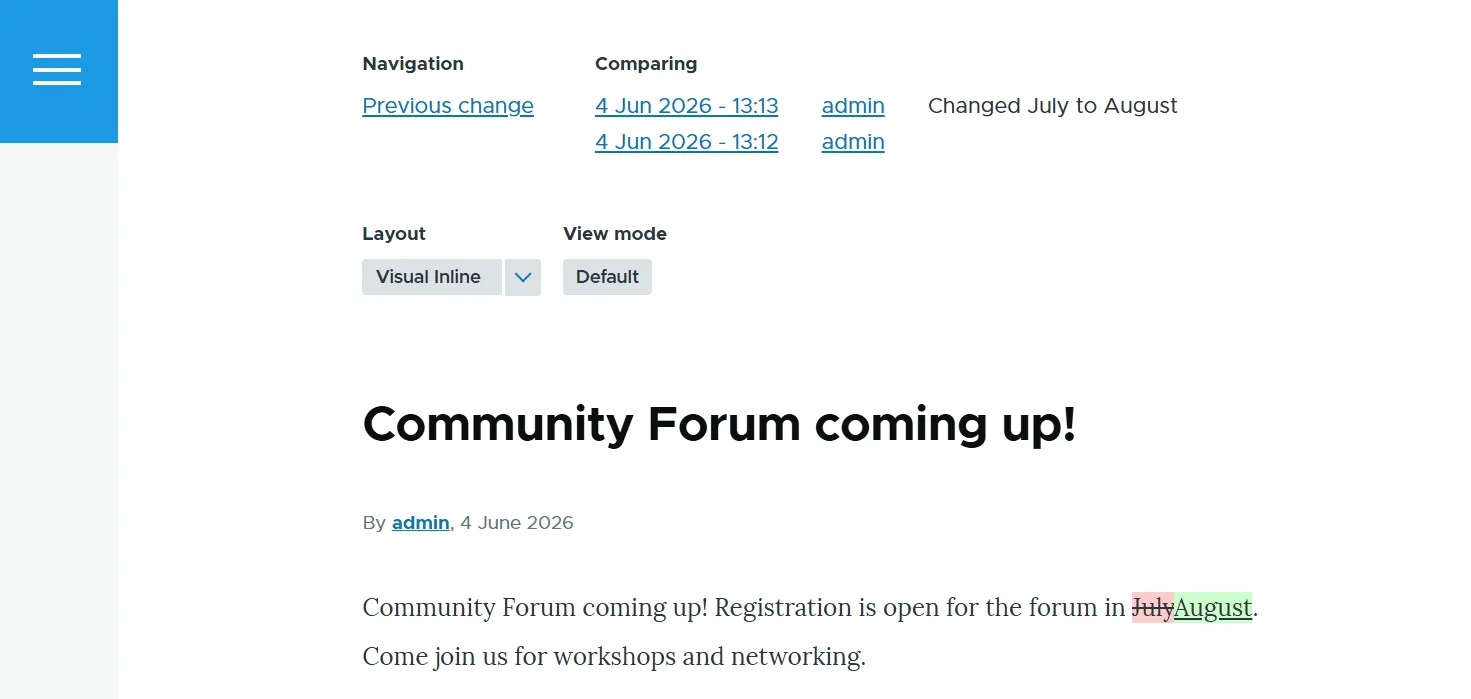
Furthermore, the Diff module can help you visualize what exactly changed in the content. The module highlights your content changes using standard, universally understood coding colors. For example, the text that was deleted appears highlighted in a soft red block, while text or blocks that were added show up in green.
4. Regular clean-ups of Drupal revision history
Because Drupal tracks every edit so robustly, a heavily managed site can accumulate thousands of revisions over time, bloating your database. Keep things lean by using a community module like Node Revision Delete. You can configure it to automatically discard old, irrelevant history: for instance, keeping only the last 10 revisions or deleting drafts older than 30 days.
5. Drupal revisions and workflows (the pro-level strategy)
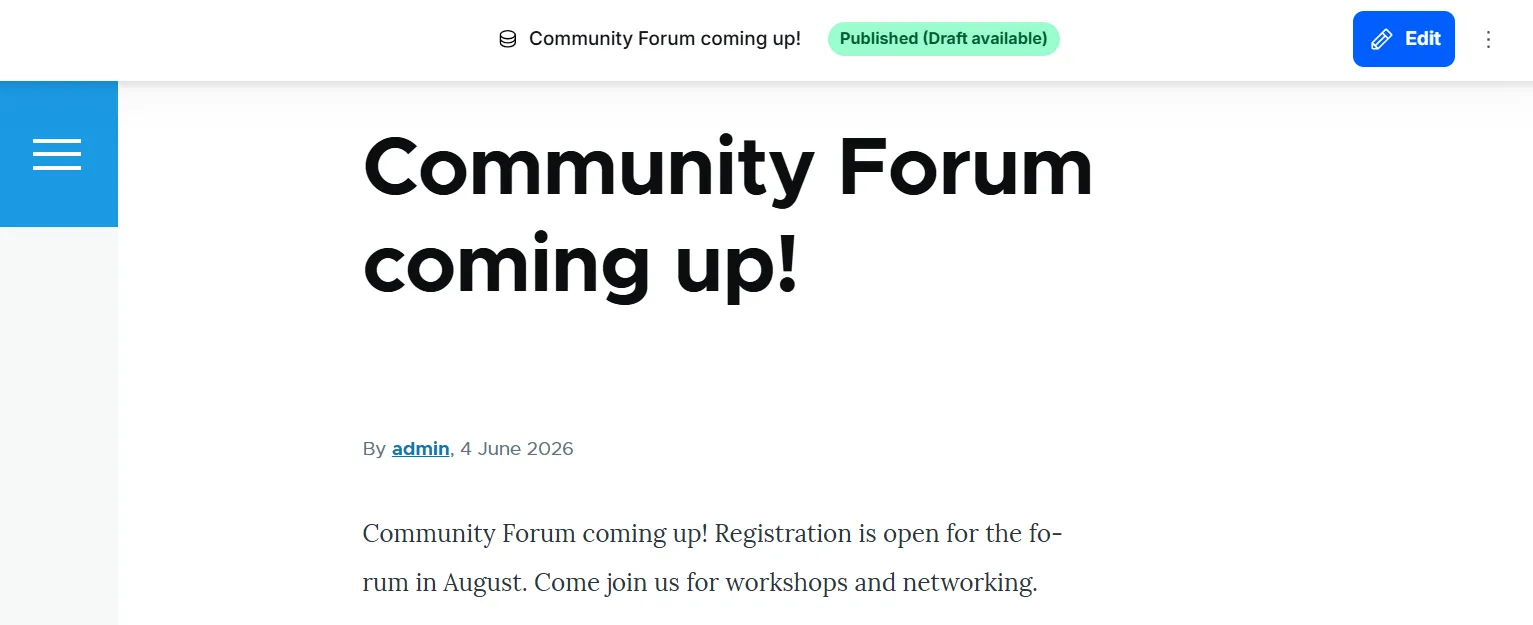
Revisions can be especially powerful when you use them with Drupal’s Content Moderation and Workflows modules. These modules are included in Drupal core but are not enabled by default because not every website requires a structured editorial workflow. With Content Moderation and Workflows, content can move through states such as “Draft,” “Published,” and “Archived,” with defined transitions between them.
In many publishing workflows, editing published content means that your changes become visible as soon as you save them. Content Moderation changes this by separating your working draft from the version currently visible to the public.
For example, if you have an important content page that is already live, and you need to make extensive updates to it, but the new content must first pass a review. You open the page, make your changes, and save the page as a “Draft” instead of publishing it. Drupal creates a new revision that exists alongside the currently published version.
Visitors continue to see the original page, while your team can access and review the latest draft behind the scenes. The draft can go through multiple rounds of editing, feedback, and approval without affecting the live site. Once it is ready, an authorized editor can publish that revision, making it the new public version of the content.
6. Who is allowed to manage Drupal revisions?
You can specify who can manage revisions at the People > Permissions tab, specifically in the “Node” section. Make sure the checkboxes for your editor roles are ticked for these three essential keys:
- View all revisions. This permission gives editors the ability to see the history timeline and the “Revisions” tab.
- Revert all revisions. This one grants the power to actually click “Revert” and roll back a page to an older snapshot.
Delete all revisions. Use this one cautiously! It allows users to erase individual snapshots from the history map. Most teams leave this restricted to administrators to preserve the audit trail.
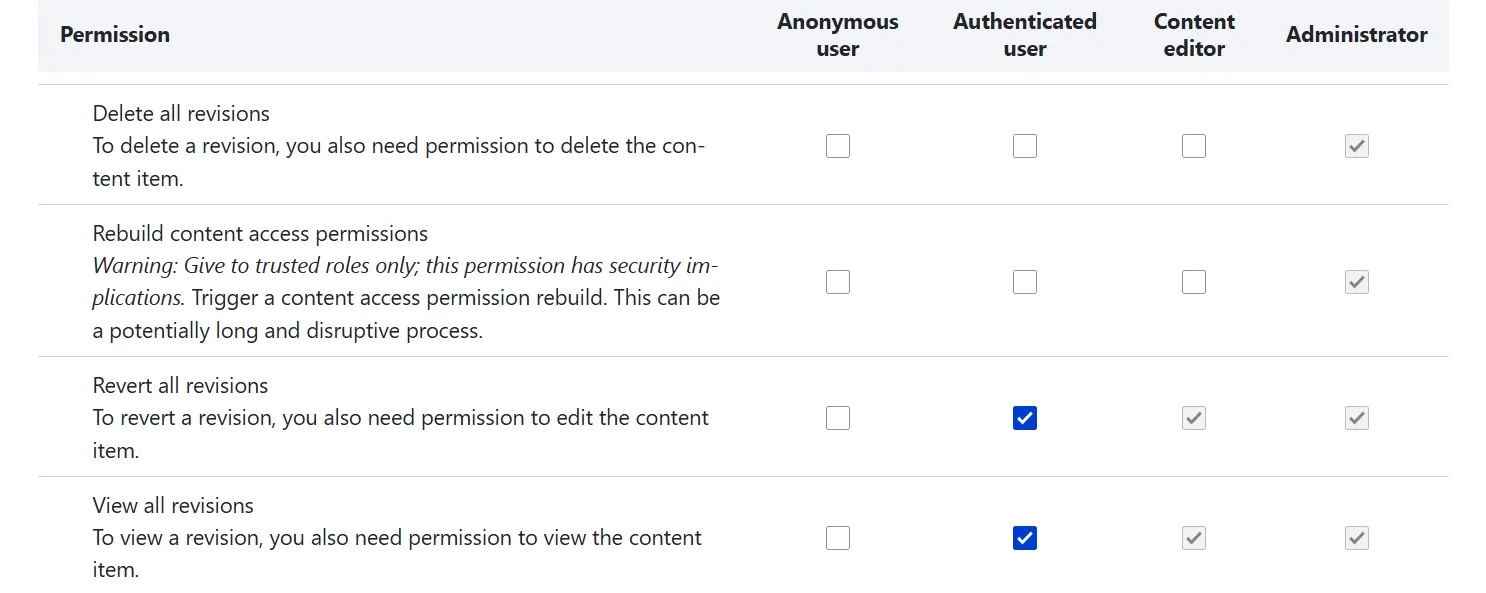
Drupal revision management permissions
The revision management permissions can also be configured for every content type individually, along with all content blocks, taxonomy, and other Drupal entities that use revisions.
Final thoughts
True digital peace of mind doesn’t always require complex server architecture or an emergency call to your IT team. Sometimes, the ultimate safety net is already built right into your dashboard, quietly waiting to rescue your hard work in just a couple of clicks.
So go ahead, make those bold updates, explore those new layouts, and write with confidence, knowing that your enterprise-grade time machine, such as Drupal content revisions, always has your back.