The Smart Date Module and Its Smart Approaches to Creating Events in Drupal
Authored by: Nadiia Nykolaichuk
Many websites include an Event section or a dedicated area where they feature information about upcoming events. A well-crafted event listing comprises several key elements. Among them are an event’s name, description, location, schedule or agenda, compelling visuals, registration or ticketing information, and, of course, the event’s date and time.
The date and time of an event have quite a number of details and nuances, so managing them often requires cumbersome work from content editors. Furthermore, making sure the date and time are formatted in accordance with the website’s needs may require custom coding from developers.
Fortunately, there is the Smart Date module for Drupal that brings the “Work Smarter, Not Harder” approach to date management, giving teams an invaluable gift — time! So we invite you to dedicate a couple of minutes of your time to read about the tool that could save your team long hours in the future.

The Smart Date module for Drupal: overview and key features
The Smart Date module provides an intelligent and user-friendly UI with a “touch” of JavaScript to ensure that date and time can be added and formatted in a snap. This makes the module great for creating events, as well as other time-specific content in Drupal.
The module leverages Drupal’s existing date and time functionality while extending and improving it. It provides a special “Smart Date range” field with formatters and widgets to fulfill its mission.
The 4.0.x branch of the Smart Date has been released this year to make the module compatible with Drupal 10 websites. Among its improvements are even more flexible formatters and widgets to configure what elements of the date & time should be displayed on a Drupal website.
So here are some of the main features the Smart Date module has in its arsenal:
- Auto-populating the end time of events
It can be time-consuming to provide the details for both the start and the end of an event. Depending on the date settings, this may include as many elements as the year, the month, the day, the hour, the minute, and PM or AM, with all of that to be entered twice.
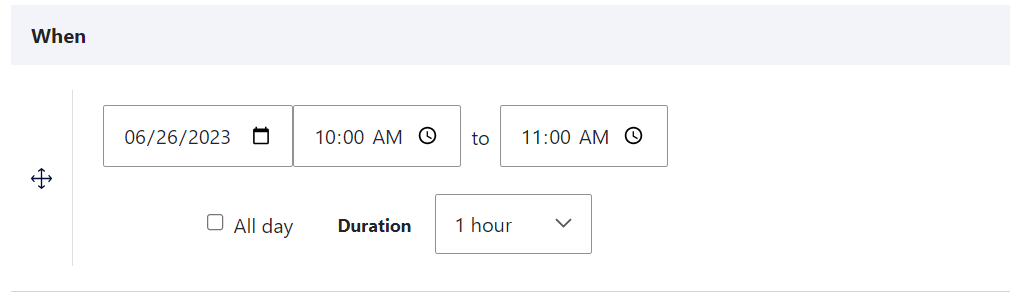
It gets smarter with the Smart Date module because it works with the concept of duration. This means you’ll only need to provide the start and the duration of the event — and the end date & time will be populated automatically.
- Extremely flexible formatting
We can also see in the image above, the content editing form shows the start and end times as a range but with the same date, which speeds up content editing. But this is actually one of a million options — the Smart Date enables you to configure at a granular level how the date should look both on the front end and in the admin UI.
One of the most remarkable new features in the 4.0.x version includes convenient checkboxes in the widget settings to define what elements of the date should be displayed.
- Default event duration
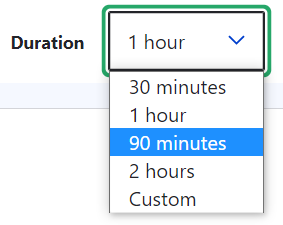
Thanks to the next feature, there’s no need to provide the duration for each event manually. If you have multiple events that last some standard time (for example, conference sessions, each of which lasts 1 hour), you can set this duration as default and it will be auto-populated. Whenever a non-standard duration is needed, a content creator will still be able to specify it for a single event.
Furthermore, you can have not just one but an entire set of duration options that will appear in the content editing interface to choose from. In the 4.0.x release, the duration dropdown gets removed automatically if only one duration option is allowed.
- Auto-populating the date and time
The intelligence of the module goes as far as allowing content editors to never enter any date & time details manually at all. It’s not always possible based on the specifics of your event timing, but in many cases, you might find it convenient to set the default date & time as current, next hour, or relative to the current moment (e.g. +3 days). Considering the default duration can also be set up, there is absolutely nothing left to enter manually — everything is auto-populated.
- All-day events
The module provides a one-click option to make your event span a full day. This feature is available in all popular calendar applications, and the Smart Date module brings it to Drupal as well. This will make the event look more concise, without extra fields.
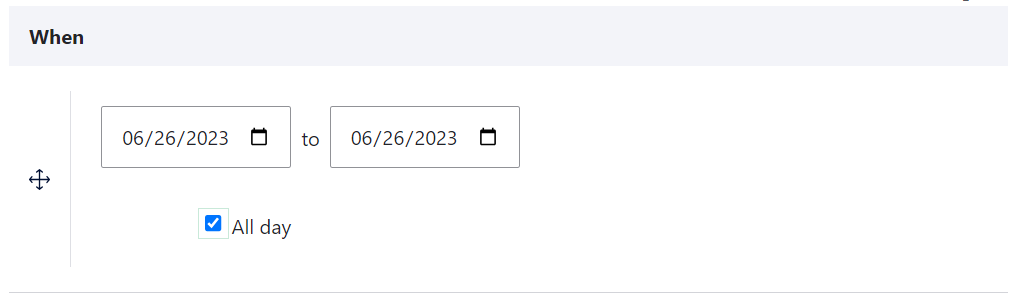
As of 4.0.x release, the "All day" checkbox can be easily removed if it’s not needed for a specific website. Removing it is all about unchecking a box in the configuration. Martin Anderson-Clutz (mandclu), the module's creator, wrote in his article “A Major Step Forward for Smart Date” that it was one of the feature requests from users.
- Zero-duration events
Some events just don't need a duration. If you have this case on your Drupal website, the Smart Date module comes in handy, enabling you to show only a single time for them.
- Views integration
Thanks to the integration with Drupal Views, the Smart Date module enables you to create entire pages or blocks with multiple events, including a full-calendar view.
- Improved performance
The module resolves some concerns over the performance of the Drupal core’s date & time functionality. For better performance, the module stores the dates as timestamps.
- Recurring Dates
The Smart Date Recur submodule enables you to define recurring dates via a user-friendly interface. It’s possible to only display a specified number of past and/or upcoming event instances.
- Timezones
The Smart Date enables you to specify a timezone per date, which is very useful if your website needs to show the event dates in different timezones.
How to use the Smart Date module for creating events
Adding and configuring the “Smart Date range” field
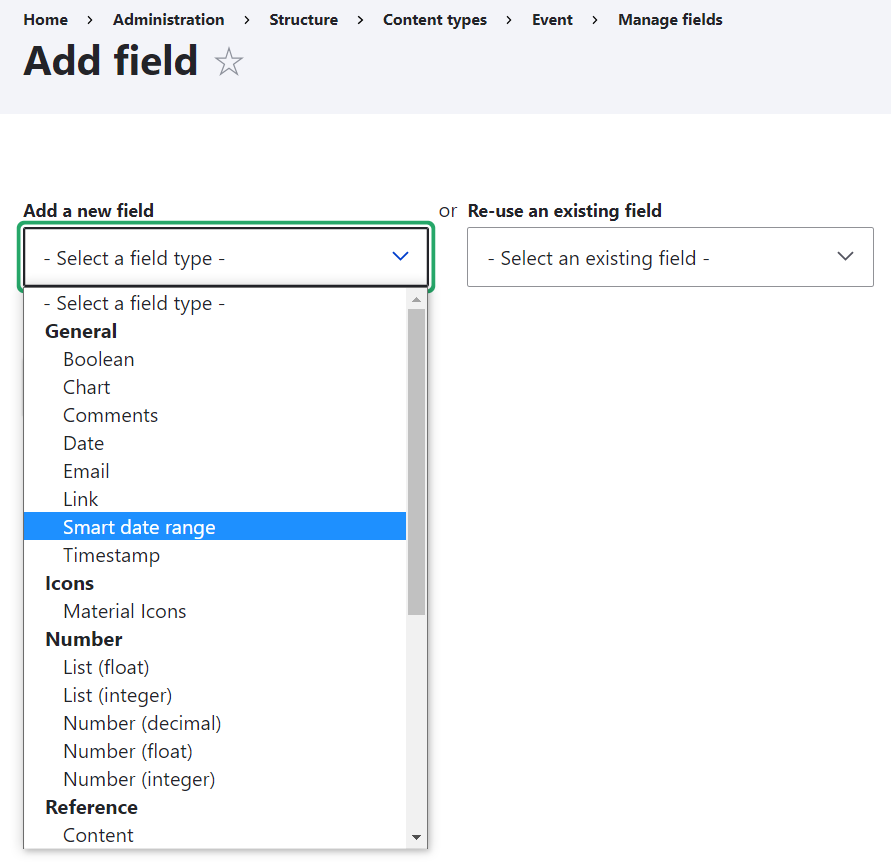
With the Smart Date module installed and enabled on your Drupal website, the key thing to do is to add a special field to a content type. For example, if you have an Event content type, go to the Structure > Event > Manage fields > Add field and select the “Smart Date range” field type.
Click “Save and continue” and you will be redirected to the settings page of the newly created field. You’ll also be able to reach this settings page at any time later by going to the “Manage fields” tab and clicking “Edit” next to the field.
The key details in the field’s settings are as follows:
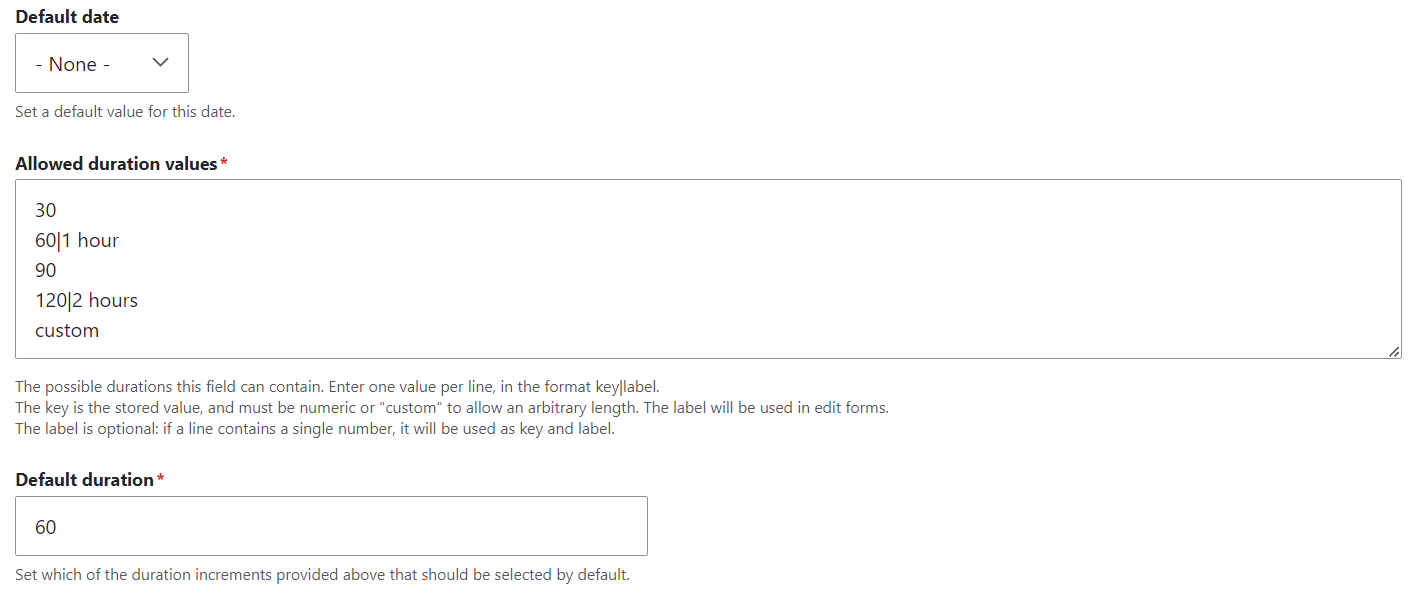
- Default date
This is an optional setting if you want the date to be auto-populated on every new Event content node. You can have it auto-populated either with the current date, the relative date (for example, '+10 days'), or the next hour's time. If you leave it as “None,” the date will be blank on the content editing form and will need a standard manual entry via the calendar widget.
- Allowed duration values
Here you can provide the duration options, one value per line, in the key|label format where the key is the numeric value and the label is how it will be displayed in the content editing form. The labels are optional. The “custom” option will enable content editors to enter any other duration value. The default numbers are minutes.
- Default duration
This is the duration that will be automatically assigned to a new event if nothing else has been selected by the content editor.
When you’ve finished with the “Smart Date range” field settings, click “Save settings.”
More settings for how the date looks in the content editing form
By going to Structure > Event > Manage form display, you’ll be able to add even more tweaks to how the date fields appear in the content editing form.
First, there is a dropdown with widgets next to the “Smart Date range” field (it will have the name you gave it during the field creation — for example, “When”). The available widgets include:
- Smart Date, date-only range
- Date and time range with timezone
- Smart Date and time range
- Smart Date inline range
- Select list

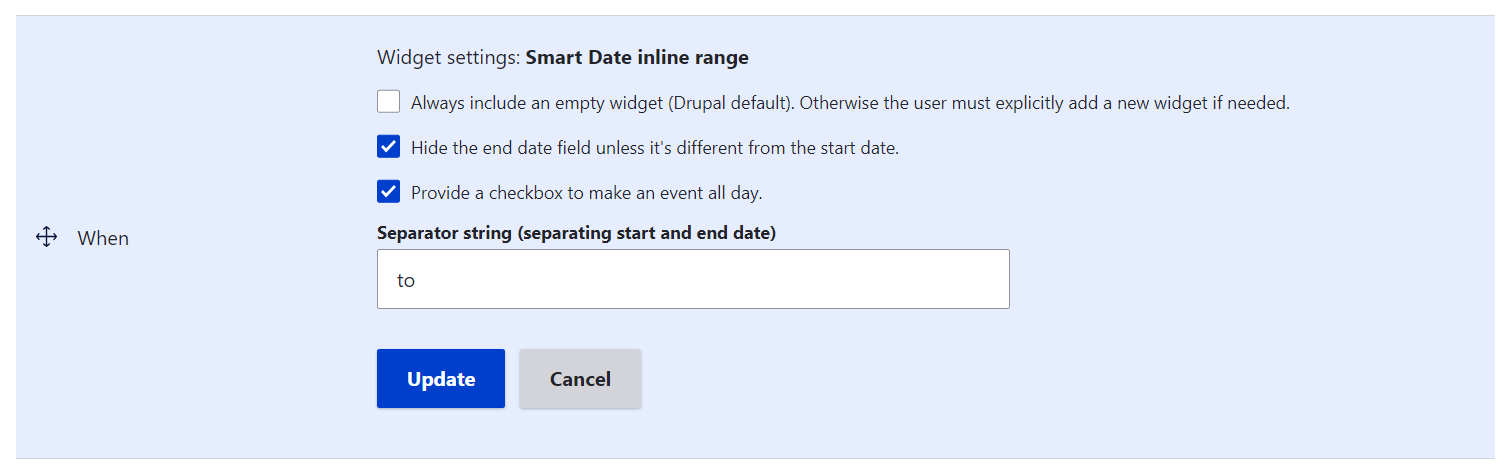
By clicking on the gear icon to the right, you’ll see the settings for the selected widget. In our example, the “Smart Date inline range” widget is used, so here is what you can configure for it:
- hide or show the end date field unless it's different from the start date
- hide or show a checkbox to make an event span all day
- specify the separator for the start and the end date (the default is “to”)
When you’ve finished setting up the widget, click “Update” and then click “Save” at the bottom of the entire “Manage form display” tab.
Configuring how the date looks on the front end
To add some tweaks for how the date should appear to website visitors, you can go to the neighboring tab — at Structure > Event > Manage display. Similarly to what was done on the “Manage form display” tab, you can find your “Smart Date range” field (it will have a different name according to how you named it) and select the widget for it. The default “Smart Date Formatter” widget is the recommended choice though.
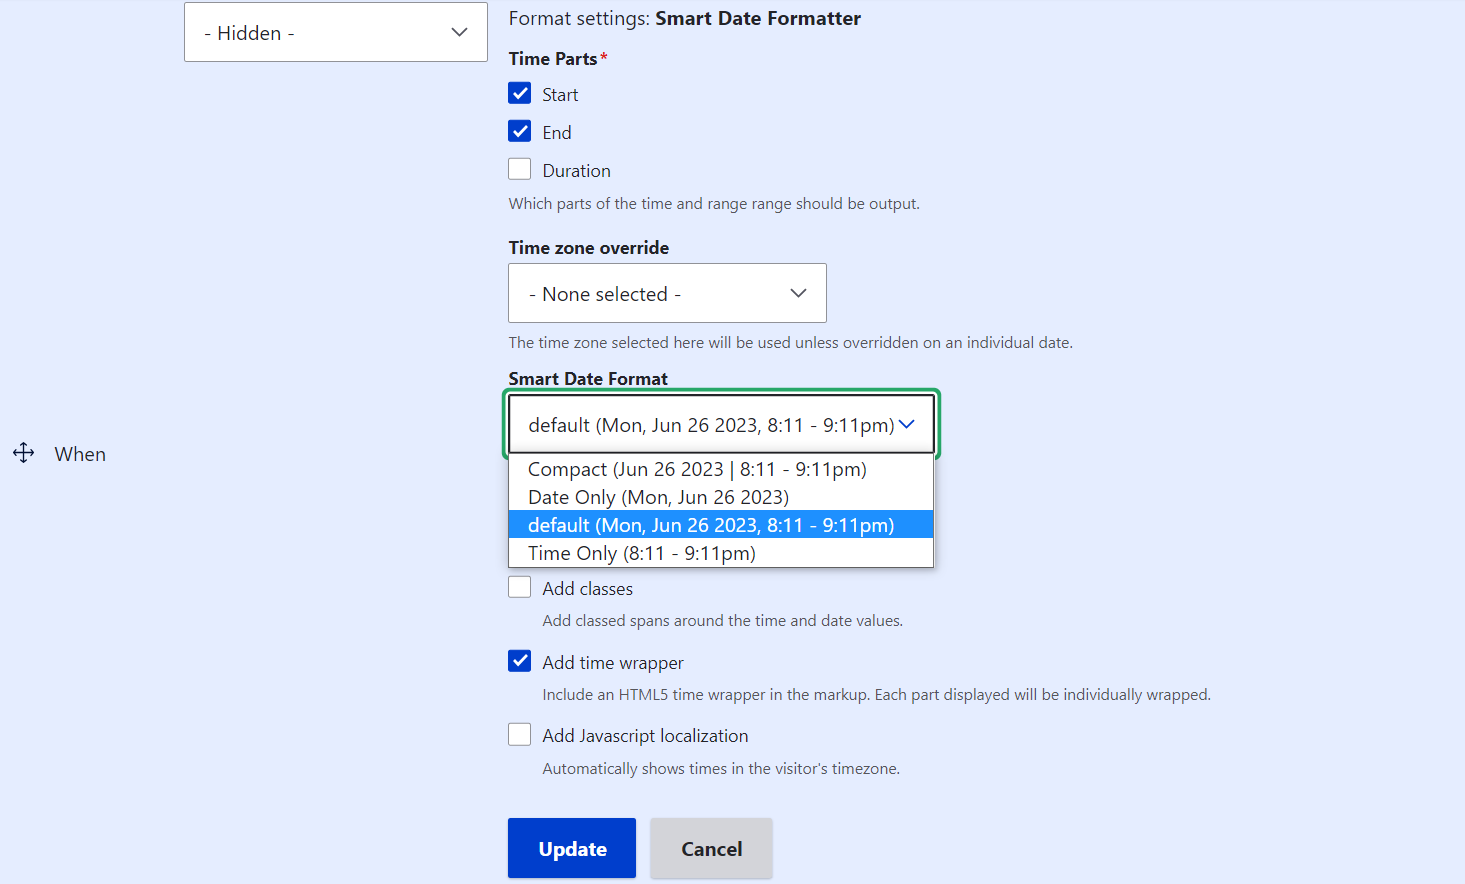
By clicking on the gear icon to the right, you’ll see the widget settings. Here are some of the most important ones:
- you can check or uncheck the boxes for which date elements should be displayed (start, end, and/or duration)
- you can select the Smart Date Format (Default, Compact, Date Only, and Time Only) from the dropdown
When you’ve completed your widget configuration, click “Update” and then click “Save” at the bottom of the entire “Manage display” tab.
Configuring the Smart Date formats
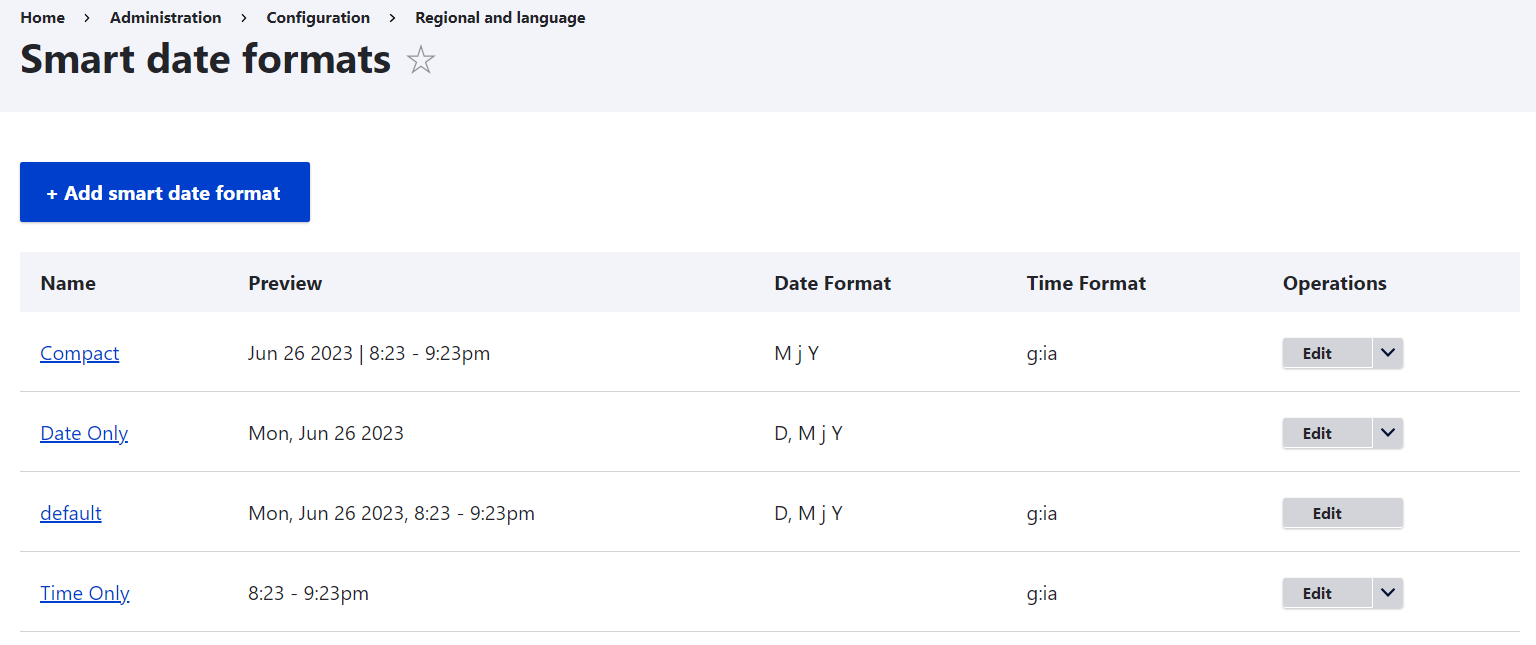
The dropdown described above shows the available Smart Date formats, but you can change them based on your Drupal website’s needs by going to Configuration > Regional and language > Smart date formats.
It lists all the formats and you can click “Edit” next to the one you’d like to change. They are configurable with the help of PHP tokens — placeholders that represent specific elements of date or time (year, month, etc.). By combining these tokens in a specific order, you can create customized formats.
For example, the Default format looks the following:
Mon, Jun 26 2023, 8:23 - 9:23pm
Its “Date format” in PHP tokens is “D, M j Y” (day of the week, month, day of the month, and year).
Its “Time format” in PHP tokens is “g:ia” (a 12-hour clock format, with the hour displayed without leading zeros, followed by a colon, the minutes displayed with leading zeros if necessary, and finally, the letters “AM” or “PM” indicating whether it is morning or afternoon/evening).
Win some precious time with smart tools!
We have just covered the most basic capabilities of the Smart Date module. But even our relatively brief tutorial shows that the tool can take care of every slightest detail of managing and formatting the date and time. Creating events on your Drupal website becomes considerably faster and more efficient with its help.
Since we all know how precious time is, never lose another minute but contact our Drupal team for professional assistance in implementing the Smart Date module or other intelligent time-saving tools on your Drupal site.