Easy Recipes with Placeholder Tokens for Your Drupal Website’s Optimization

Would you likne to streamline content management, reduce manual updates, automate workflows, and boost user experience on your ‘[site:name]’ website? Many website owners would, too, that’s why the Token module is #1 of the most installed Drupal modules ever. It helps achieve all those and many more goals through placeholder tokens. The above-mentioned ‘[site:name]’ is a vivid example of a token, but read on to discover many others, with all the details about how these small elements do a huge job.
The capabilities of the Token module are a treasure trove with no end. Tokens might look a little sophisticated and developers indeed can create complex custom setups with them. Still, there is an infinite array of things that can be done easily through the user interface, and their impact might be great. We have got you covered by providing this cheat sheet of the top easy tweaks you can make using tokens.
Introduction to tokens: what they are and how they work
Tokens are placeholders that are replaced with actual data dynamically — at the moment the content is rendered. They are enclosed in square brackets — like ‘[site:name]’, ‘[site:url]’, ‘[current-user:mail]’, and so on. Tokens could be associated with content, site configuration, user profiles, and so on.
For example, the ‘[site:address]’ token pulls the website’s address into every part of the website where it’s used. If you have a new address, you can just update it in the settings, and it will be automatically changed everywhere. This has been an example of pretty static data, but tokens are even more impactful with the automatic pulling of dynamic values such as the current user’s name, current page title, and so on. They are the shining stars of all kinds of automated scenarios, often involving the creation of personalized experiences for website users.
This modern, flexible, and consistent way of dealing with data is beneficial for everyone. Developers don’t have to hardcode data into specific website blocks or write tons of custom code, content editors can save long hours of repetitive manual updates and eliminate the risk of human error, and SEO managers are happy to see the impact of consistent URLs and metadata auto generated based on patterns with tokens.
The key features of the Token module in Drupal
- Streamlined token management
The Token module for Drupal provides a unified API for managing and using tokens. This centralization makes it easier to handle dynamic data consistently and efficiently.
- A wide range of available tokens
The module supports a comprehensive set of tokens for various Drupal entities, including users, content nodes, taxonomy terms, and more.
- Vast integrations with other modules
The Token module integrates seamlessly with numerous other Drupal modules, such as Pathauto, Metatag, Views, Webform, Drupal Commerce, ECA, and so on — the sky’s the limit. The Token module acts as a central framework that allows other modules to define and use tokens. That’s why, many tokens are brought by other modules.
- A user-friendly interface
The Token module provides a token browser that can be accessed within various configuration pages. This browser enables you to easily find and insert tokens with no need to memorize their names. By the way, certain popular tokens get deprecated with time (like ‘[current-user:name]’), but the token browser will have you covered with the relevant and up-to-date options.
Easy recipes for useful token setups on your Drupal website
For all these examples, you’ll need to have the Token module installed and enabled on your Drupal website. In some cases, it will do all the work, and sometimes, you’ll also need to add other modules as well.
1. Personalized subscription confirmations
One of the things that can work wonders for user engagement on your Drupal website is content personalization. An example that is great in its simplicity but still very impactful is to display a personalized confirmation message after a user subscribes to your newsletter. It creates a positive experience, shows that you appreciate their interest, and inspires them to explore your content further.
You can actually use this workflow to customize any other forms on your Drupal website. In this area, Token pairs with another very popular module — Webform. The abundance of form types it provides will impress anyone.
How to set this up
Install and enable the Webform module if it’s not installed already. Navigate to Structure > Webforms. In “Forms,” click to edit your existing subscription webform. Alternatively, in the “Templates” tab, select the out-of-the-box “Subscribe” template and create a form on its basis by giving it a name and saving it.
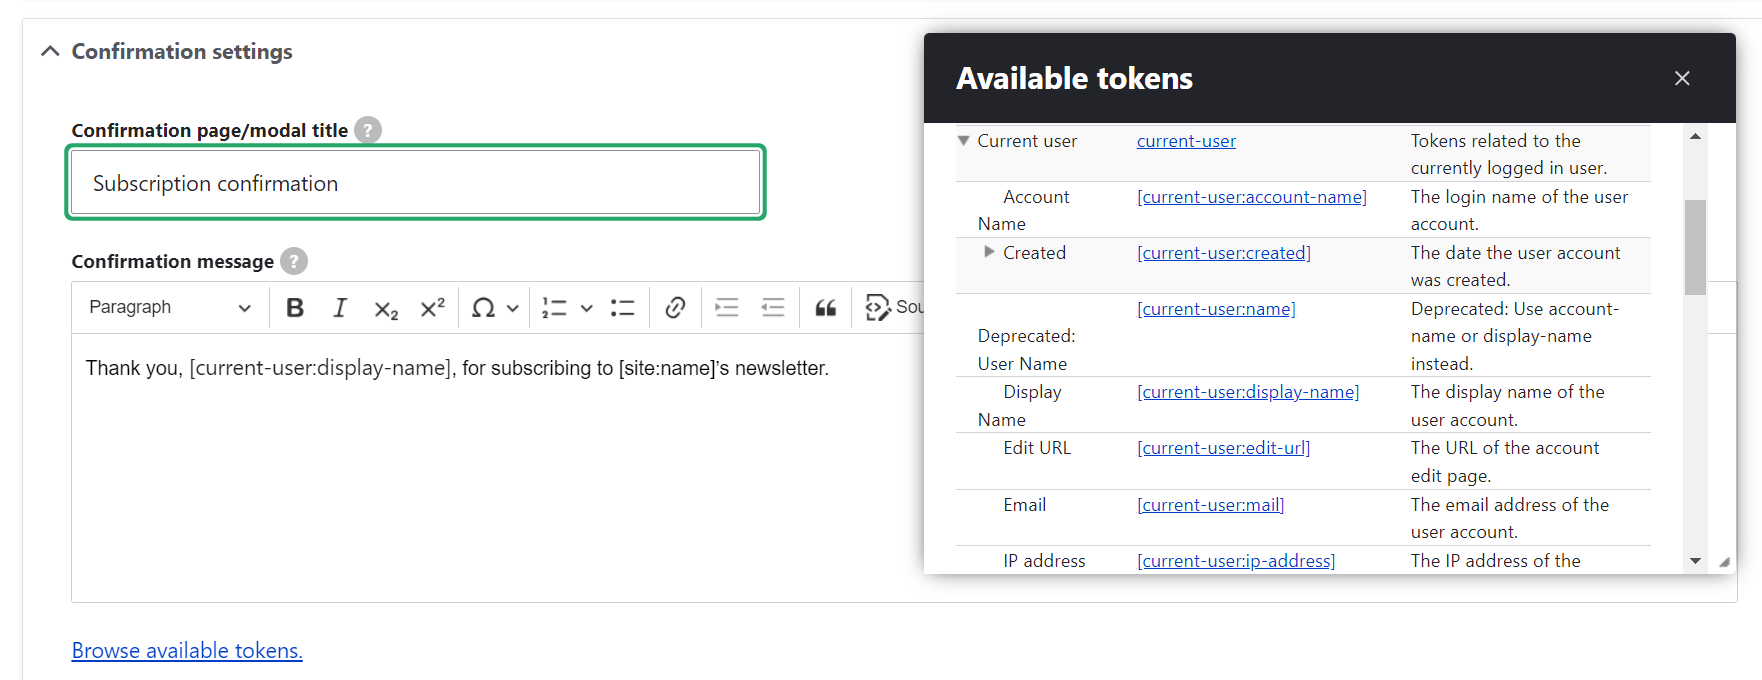
Go to the form’s “Settings” tab and find the “Confirmation” subtab. You can customize both the “Confirmation page/modal title” and “Confirmation message” fields with tokens.
Put your mouse inside the text where you want to add a token and click the “Browse available tokens” link below the form. You’ll see tokens grouped by category (“Site information,” “Current user,” etc.), and you’ll need to expand the categories you’re interested in. Click on specific tokens to add them to the form.
For example, let’s add ‘[current-user:display-name]’ from the “Current user” section and ‘[site:name]’ from the “Site information” section to shape the message:
“Thank you, [current-user:display-name], for subscribing to [site:name]’s newsletter.”
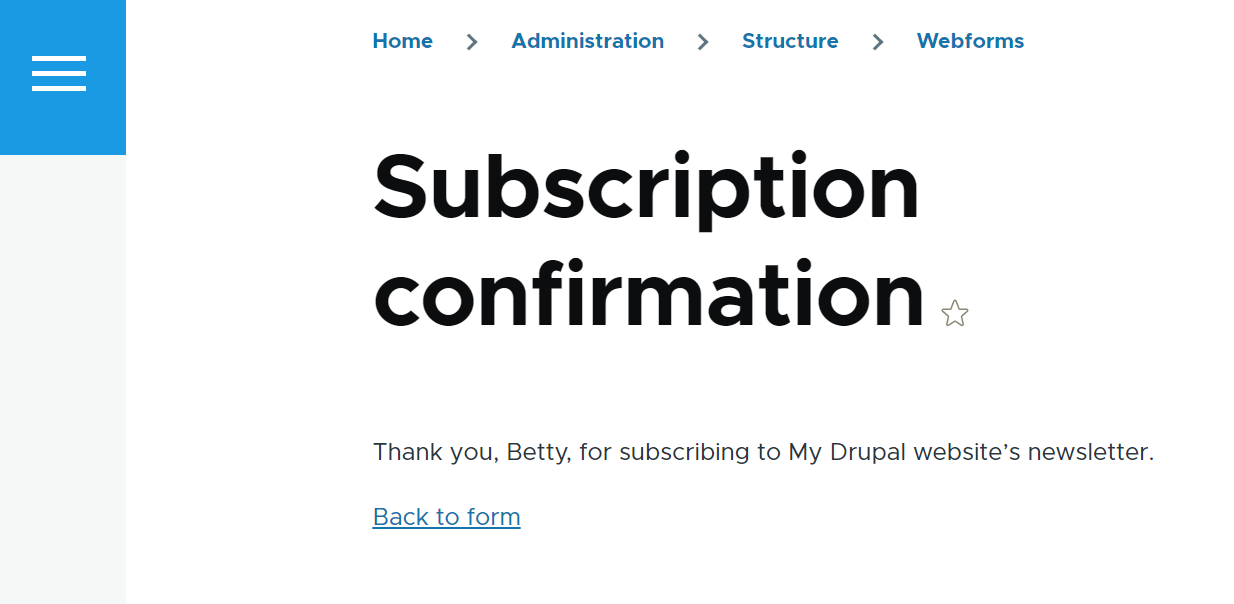
The last step is just to save the form’s settings and test it by clicking the “View” tab on the form and actually subscribing to the newsletter. It does show the user’s display name (in this example, “Betty”) and the site’s name (“My Drupal website).
2. An automatically updated copyright year
As users scroll down to your footer, seeing a current copyright year gives them a good impression while anything previously dated might be confusing. So it might be great to have your copyright year updated automatically via tokens, without manual effort.
Disclaimer: Of course, before doing it, it’s always a good idea to ensure compliance with legal requirements specific to your jurisdiction. Some jurisdictions may have regulations regarding the copyright notice format and update frequency.
How to set this up
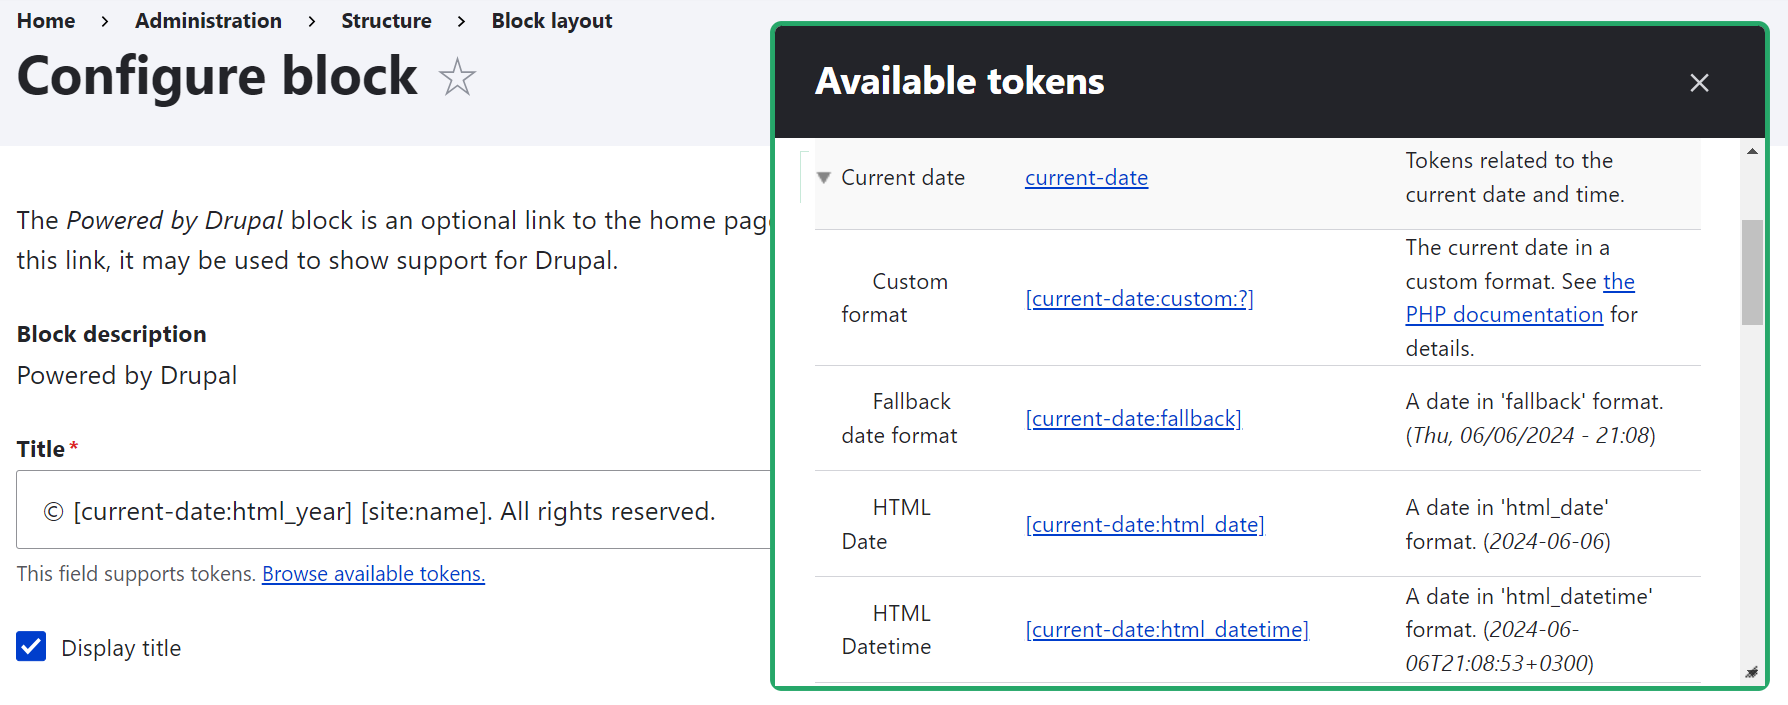
Go to Structure > Block layout and click “Place block” next to the “Footer Bottom” region. Find the “Powered by Drupal” block on the list of blocks and click “Place block” again. Customize its title with tokens by clicking “Browse available tokens.” Click to select the ‘[current-date:custom:Y]’ token from the “Current date” section and the ‘[site:name]’ token from the “Site information” section.
© [current-date:custom:Y] [site:name]. All rights reserved.
Then, check the “Display title” box so it’s visible to everyone, save the block, and also click “Save” for the entire “Block layout” page.
Check the new footer — and it should show the copyright year and website’s name. The year displayed will always automatically be the current year.

This has been a simplified version of the copyright notice setup, while this can also be done in a content block with a full-fledged body. Standard content blocks do not have a token browser, but tokens can be added via custom tweaks.
3. Automatic generation of SEO-friendly URLs
One of the most impactful tandems is made by the Token and the Pathauto modules. It enables you to set up automatic URL creation based on specific patterns you define. Descriptive and structured URLs improve SEO and enhance user experience. Their automation provides URL consistency and relieves editorial teams from tons of manual work, especially on content-rich websites.
How to set this up
Install and enable the Pathauto module. Navigate to Configuration > Search and metadata > URL aliases > Patterns. Click to add a new pattern or edit an existing pattern.
Select the entity type for it (like “Content”) from the dropdown. You can narrow it down to specific content types like “Article” if needed. Give your pattern a name.
Put the mouse into the “Path pattern field” and click “Browse available tokens.” To create a URL pattern for articles, you’ll need tokens in the “Node” section. Open the section, find the needed tokens, and click on them to add to the pattern. They will also need to be separated by slashes for the correct look of the URL.
For example, to create a URL pattern that is generated with the article category + article title, you’ll need the ‘[node:field_article_category]’ and the ‘[node:title]’ tokens. The ‘[node:field_article_category]’ is not the default one — it becomes available if you have a taxonomy vocabulary for article categories created and added as a field to the “Article” content type.
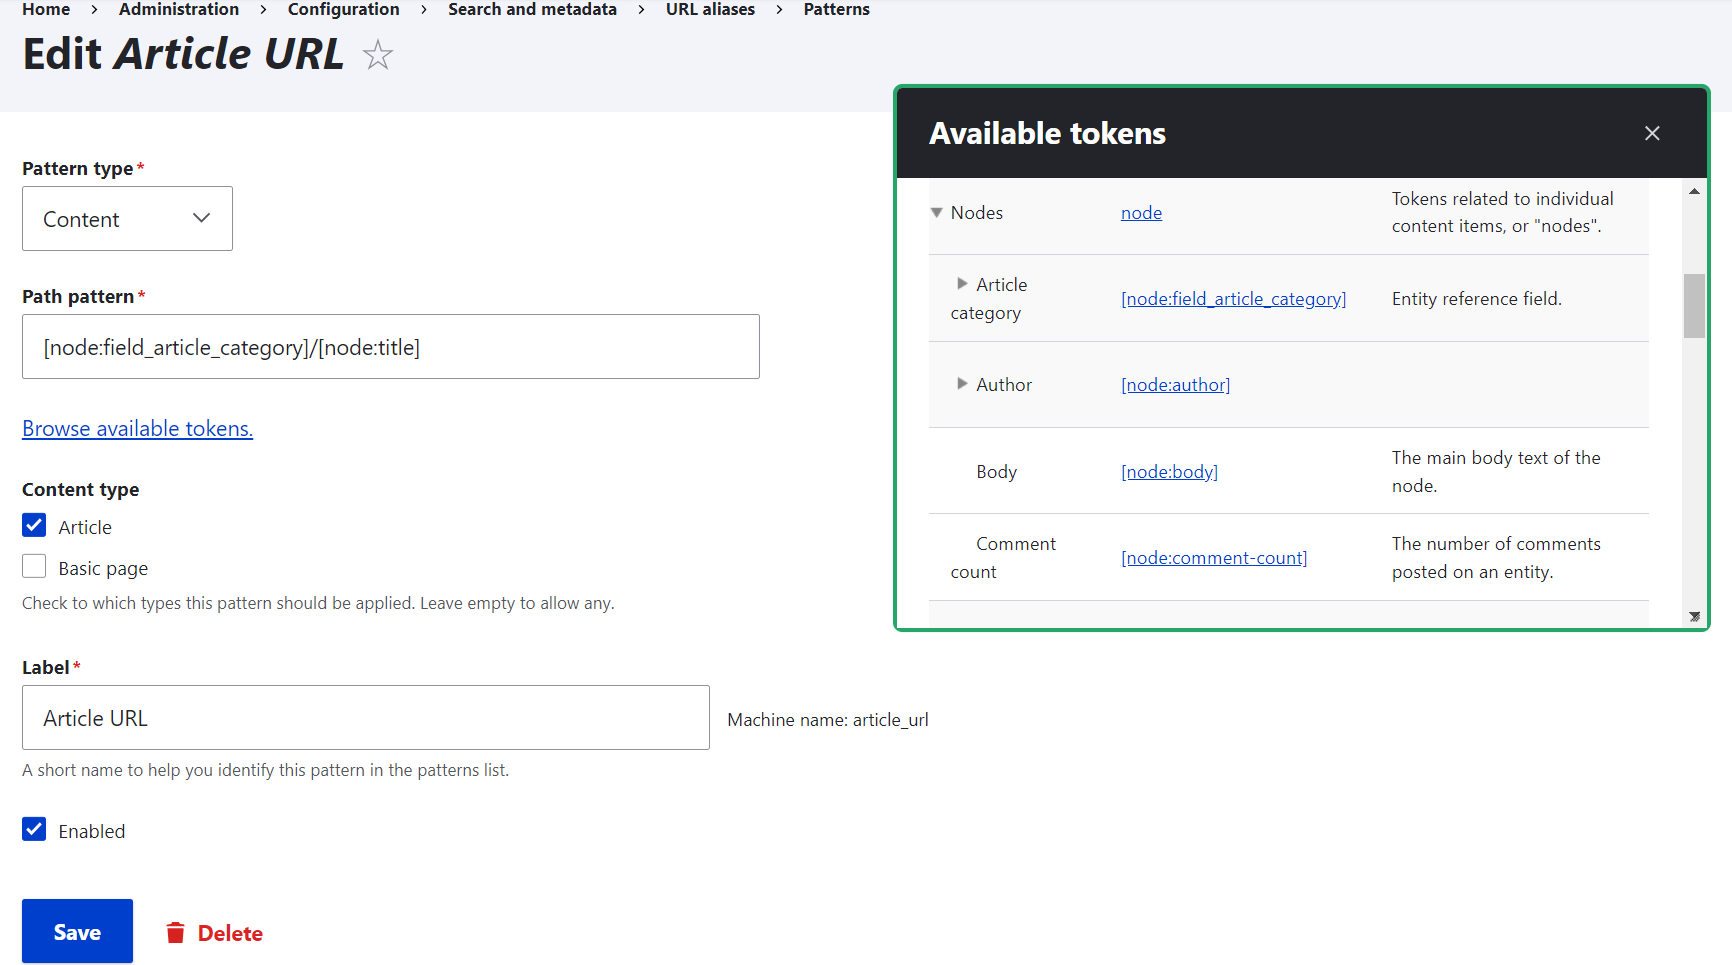
As a result, there’s the ‘[node:field_article_category]/[node:title]’ pattern. It generates a ‘technology/token-module-drupal’ URL if you create an article named “Token Module in Drupal” and put it into the “Technology” category. Check out more details and tweaks about automatic URL generation.
4. Automatic creation of meta tags
Another impressive duo is the Token module with the Metatag module. Thanks to it, you’ll be able to automate the generation of structured metadata, AKA meta tags for your content pages. This improves search engine rankings and provides relevant information for social sharing. And, of course, consider long saved work hours if you have a large website.
How to set this up
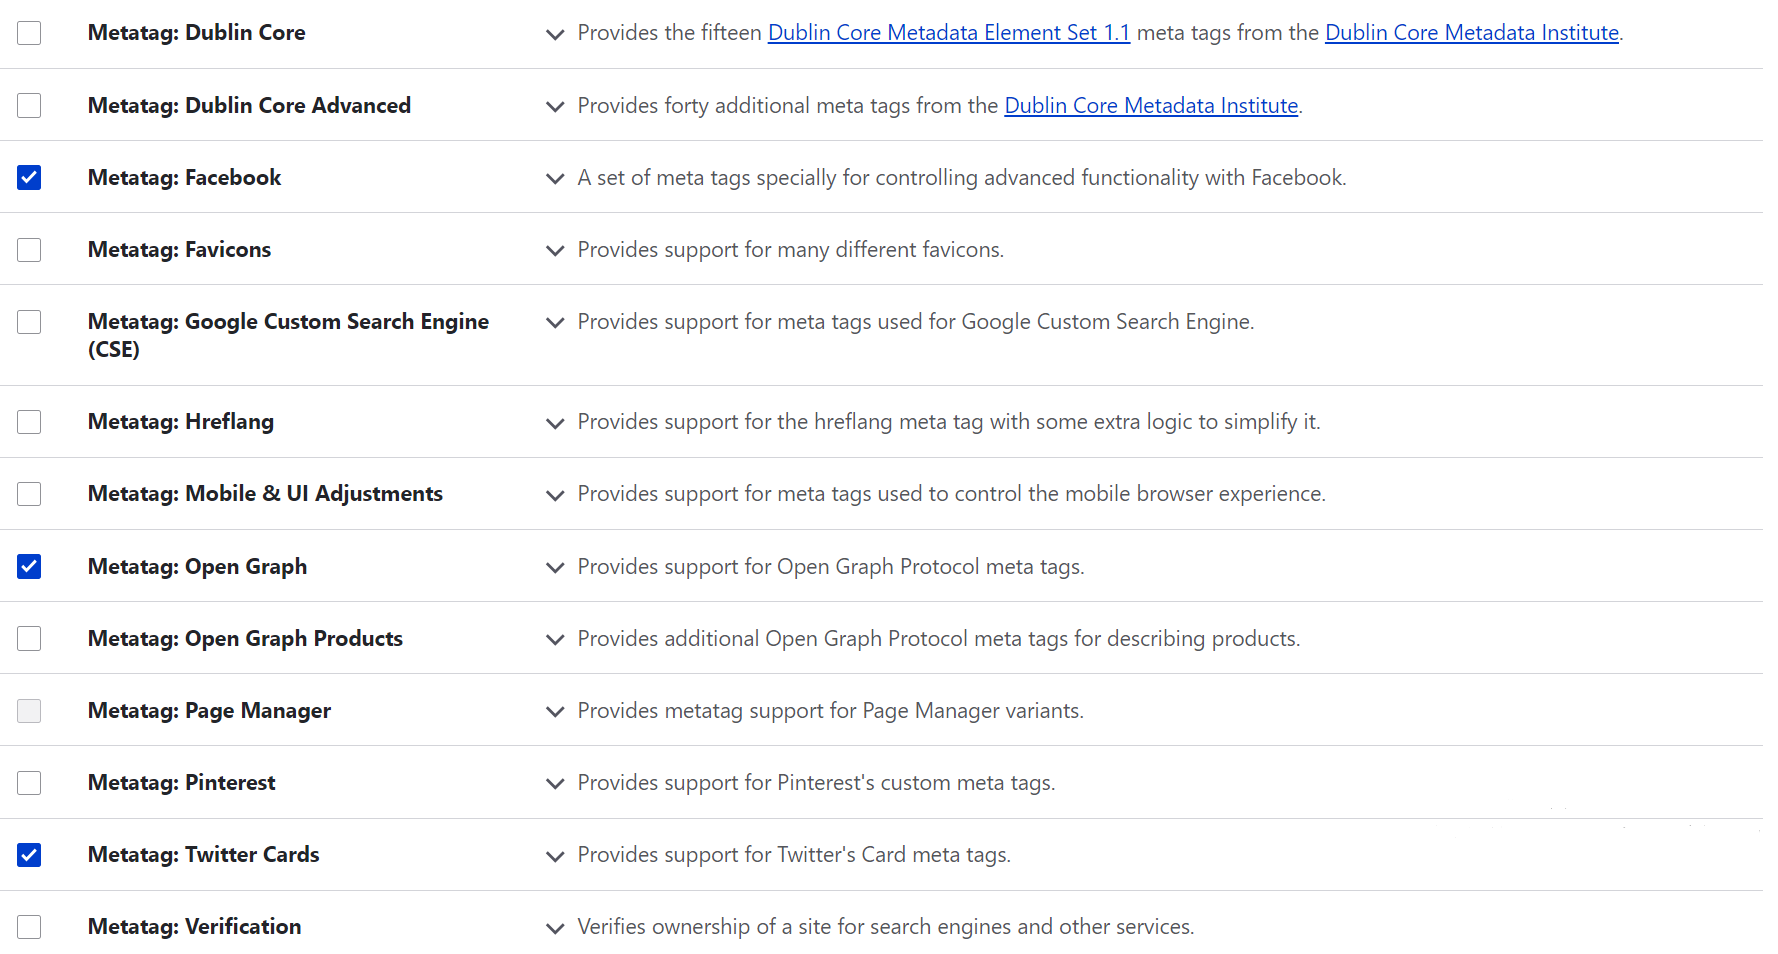
Install and enable the Metatag module. It is a complex module consisting of various submodules for types of tags that control how the tags appear in social networks and more. You’ll need at least the main module, then you can enable additional submodules based on your interest (Metatag Facebook, Metatag Twitter Cards, Metatag OpenGraph, etc.).
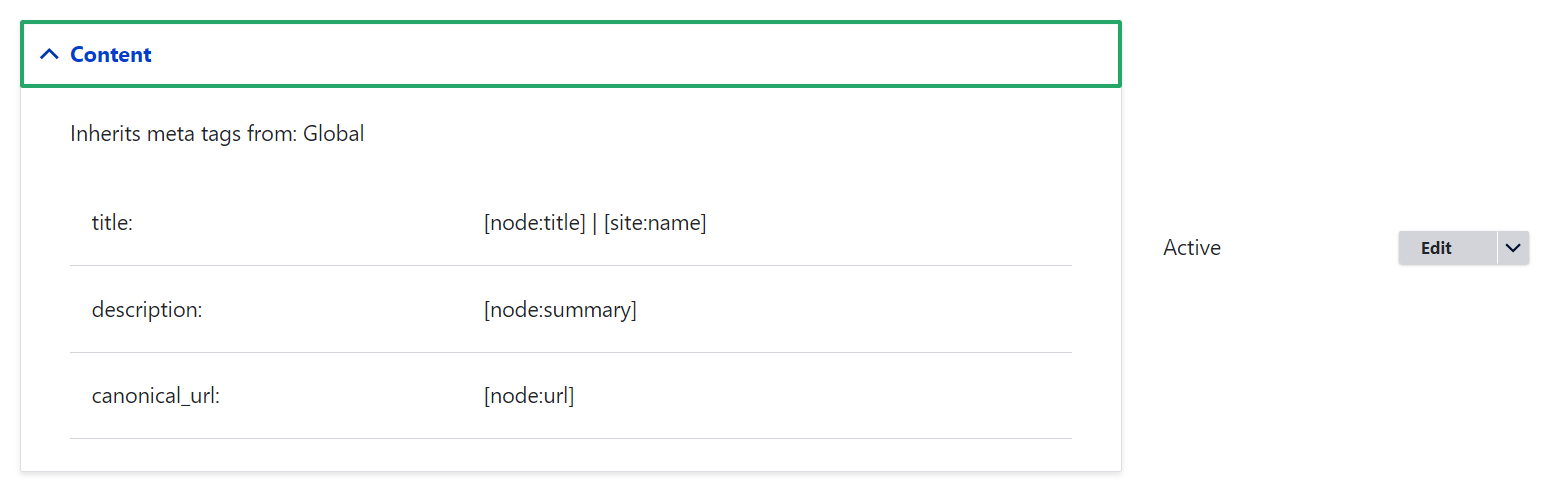
Navigate to Configuration > Search and metadata > Metatag > Metatag Defaults. It shows the patterns for all types of meta tags that are available on the website based on the enabled submodules.
There are very sensible defaults for all the main tags. For example, in the “Content” section, you can see the following patterns for the basic tags based on tokens:
- title — [node:title] | [site:name]
- description — [node:summary]
- canonical URL — [node:url]
Based on this pattern, an article should appear something like this in search results and other snippets that pull the meta title and description:
How to use tokens in Drupal | My Drupal website
A comprehensive guide on using tokens in Drupal to improve site efficiency, automate content, and enhance user engagement.
The sensible defaults make Metatag pretty much a zero-configuration module when it comes to the key meta tags provided by the main module. At the same time, additional meta tags like the ones for OpenGraph or Twitter Cards will need to be added manually. Click to see more details about meta tag tweaks with a focus on configuring meta tags for social sharing.
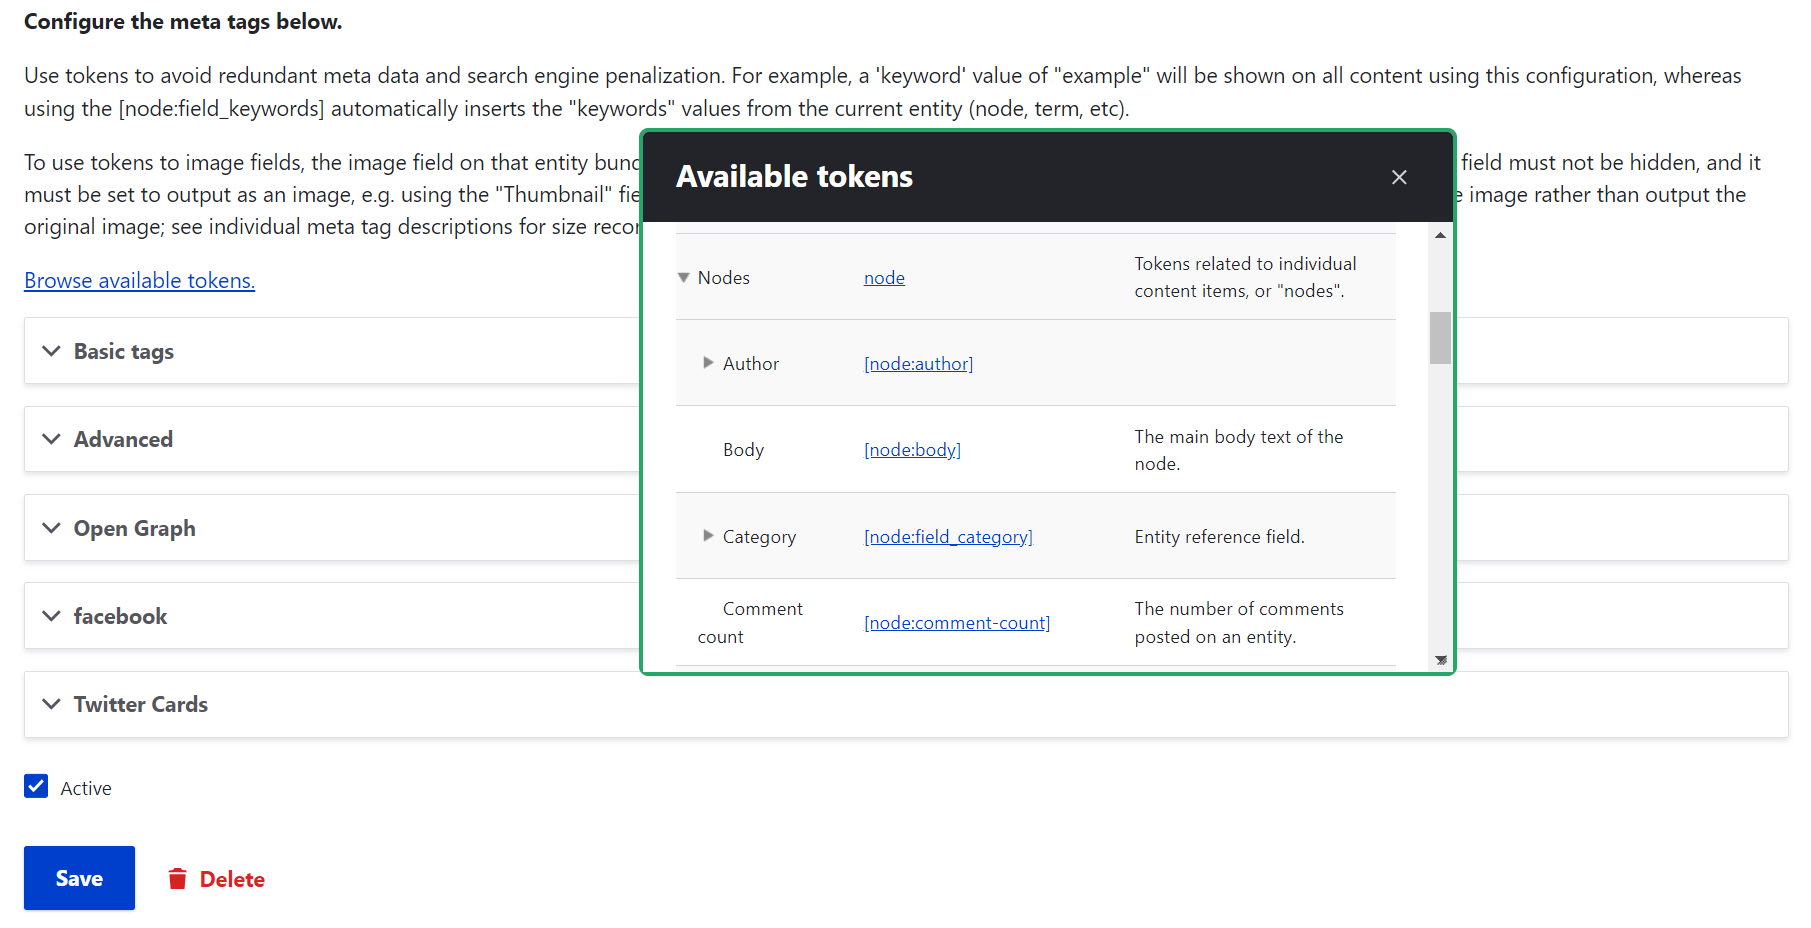
You can add or edit any patterns by clicking “Edit” to existing ones or “Add default meta tags” to create specific ones (for example, for the Article content type). You’ll see the already familiar “Browse available tokens” link everywhere.
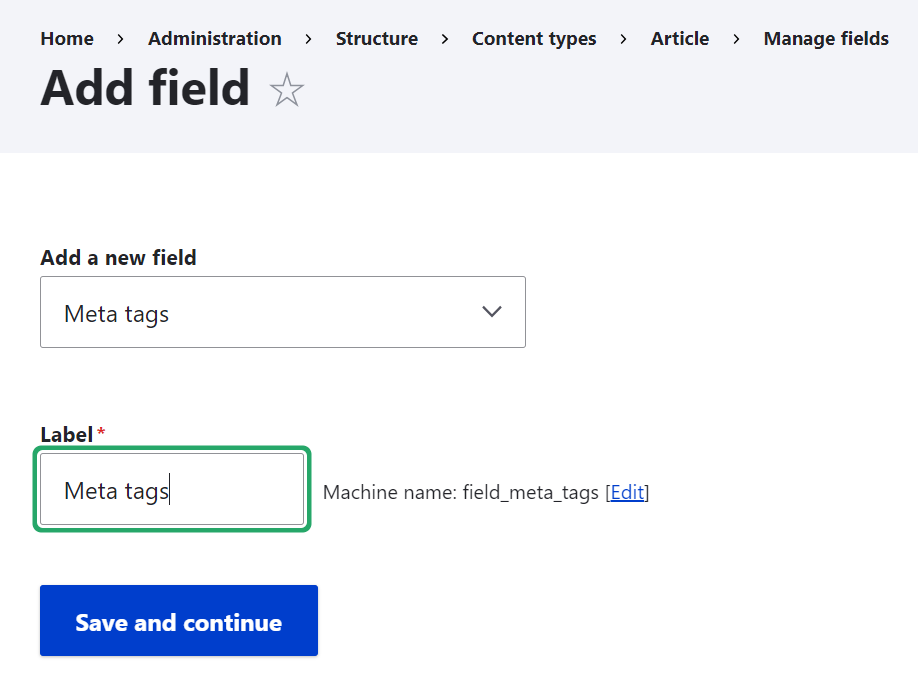
It’s also great to have a handy Metatag interface on the content editing form where you’ll be able to customize meta tags for specific content items if needed. To get it, add the “Meta tags” field to the content type (like “Article) by going to Structure > Content types > Article > Manage fields > Add field.
Final thoughts
Tokens can optimize your website and boost its efficiency in so many different ways. We’ve scratched the surface of endless options by giving you those easy recipes. Tokens can also work in content listings created by Drupal Views, as part of automated conditional workflows of any complexity with the ECA (Event-Condition-Action) module, and more. Enhanced with custom code by expert developers, tokens can unlock even greater possibilities for your website. Reach out to us, and let's explore the potential together!