Augment Your Drupal Content Management Workflows with the Augmentor AI Module
Authored by: Nadiia Nykolaichuk.
Robust CMSs like Drupal and AI services seem to be a perfect pairing when it comes to supercharging content management workflows. Luckily, Drupal has got you covered with nice integration options. Soon after the rapid advance of generative AI, the first modules for OpenAI/ChatGPT integration with Drupal came on the scene. Among them were the OpenAI and the Augmentor AI modules, which are at the forefront of Drupal’s ever-growing ecosystem of AI-related tools.
We are always happy to help you discover the most advanced ways to bring efficiency, innovation, and better user experiences to your website. So we walked you through the steps of setting up the OpenAI module and the ways to use AI tools to enhance your SEO. And now it’s time to take a deep dive into the Augmentor AI module that has recently gained traction in the Drupal circles.
The Augmentor AI module acts as a bridge between Drupal and a wide range of external AI services, facilitating integration and configuration. It has a pluggable architecture and is endlessly customizable. This creates infinite possibilities for prompt engineering, which we’ll also touch upon in this article. So prepare for an exciting journey.
Getting the desired output, or a glimpse at prompt engineering
You already know that in order to get the best answer to a question, you must ask it as clearly as possible. This works with humans and even better with AI models that are more predictable and programmable in how they respond.
Designing and refining your queries to AI models to receive the most relevant and meaningful output is the basic idea behind the new “prompt engineering” concept. Prompt engineering is usually associated with the use of so-called LLMs — large language models. An example of this is a GPT (Generative Pre-trained Transformer) model.
A prompt is what a user provides to the AI system when seeking information or assistance — a question, additional context, or instructions. When an AI model is integrated with a website or application, prompt engineering involves adjusting the language, structure, and format of prompts to guide users effectively in their interactions with AI. This may include form fields and labels, buttons, wizards, or format guidelines, to name a few. The flexible Augmentor module is great in this area, so let’s move on directly to the overview of what it can do.
The key capabilities of the Augmentor AI module for Drupal
A rich variety of integrations and potential AI-powered tasks
With the Augmentor AI module, you can connect your Drupal website to AI services by OpenAI, NLP Cloud, Google, AWS, and others. For specific integrations, the module’s maintainers have provided a set of related modules:
- ChatGPT Augmentor
- OpenAI GPT3 Augmentor
- Google Cloud Vision Augmentor
- Google Cloud Speech-to-Text Augmentor
- Google Cloud Text-to-Speech Augmentor
- AWS AI Augmentor
- NLP Cloud Augmentor
Thanks to those integrations, potential AI-powered features on your Drupal website include (but are not limited to):
- automatic text summarization
- suggesting relevant tags or keywords
- image analysis with tag generation
- auto-generating content in a certain tone and structure
- suggesting content ideas
- grammar checks
- sentiment analysis
- interactive chat bots
- text translations
- spam detection
- voice search
Furthermore, thanks to the pluggable architecture, the module can connect Drupal websites to any other AI service. Martin Anderson-Clutz (mandclu), one of the module’s co-maintainers confirmed the possibility of adding your own AI integrations and called it “the beauty of having a composable approach.” He did so in the “Module of the Week” issue of the “Talking Drupal” podcast dedicated to Augmentor AI.
The concept of augmentors
The Augmentor AI module introduces configuration entities called augmentors, and provides a user interface for managing them. An augmentor includes details such as what message should be sent to the AI service prompting it to perform a certain task, and how Drupal should handle the response.
You’ll need at least one augmentor for a specific AI service. Furthermore, the module’s maintainers suggest creating multiple augmentors that represent specific use cases within the same AI service (such as an augmentor for image tagging, an augmentor for content summarizing, and so on). This should allow for structuring the prompts more specifically.
“A content editor needs to be able to click a button and interact with the interface. The augmentor should then be able to go out to an external API, get that data back, and then update the UI for the editor. Then the editor should be able to review the content and accept it or reject it. That’s the basic flow.”
— Murray Woodman, the creator of Augmentor AI
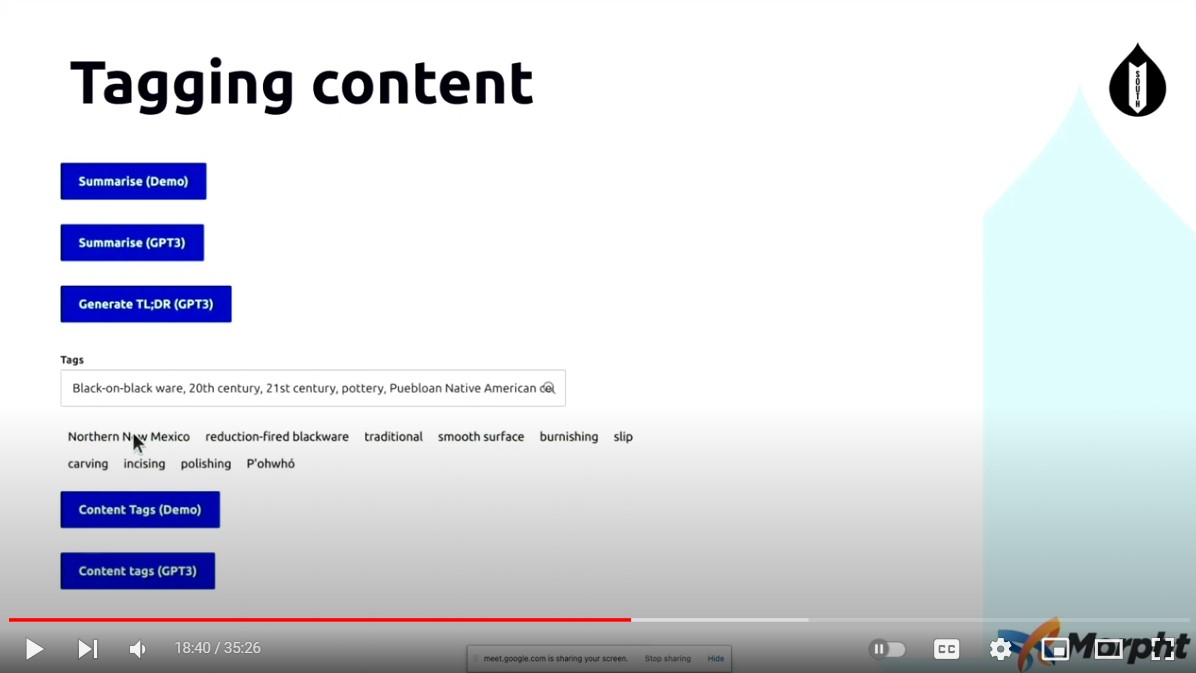
At the DrupalSouth session “AI-Powered Drupal: A new era for content creation and management,” Murray Woodman (murrayw) demonstrates multiple buttons on the content editing form for various content management tasks. Each of these buttons triggers an augmentor execution. For example, Murray shows the “Content tags'' button that generates tags as an array. A content editor can accept the ones they like by clicking on them and they’ll be added to “Tags.”
CKEditor integration
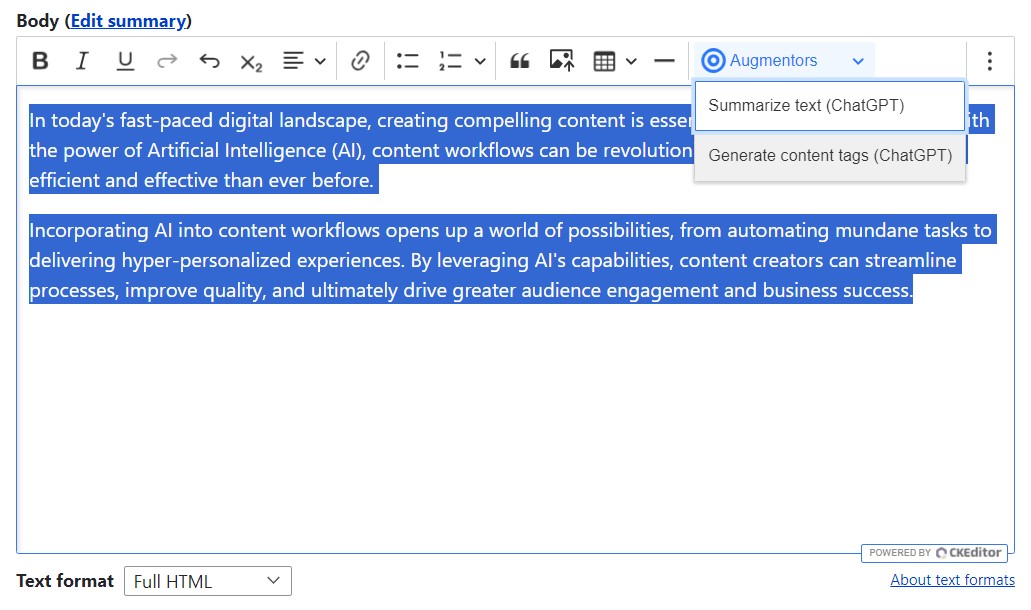
The module supports augmentor integration with CKEditor 4 and 5. Thanks to this, content creators can trigger AI actions directly in the text area. For example, they might want to summarize a piece of content they are writing, generate tags, or get tags for an image they’re inserting into an article. With the “Augmentors” button added to the CKEditor toolbar, content editors can select available augmentors from the dropdown menu.
Usage in fields with special widgets
Another possible usage of augmentors is by adding augmentor fields to the content structure. When using augmentors in fields, you can set up the rules for AI-powered tasks at the field level such as:
- from which fields the AI service should take the content and to which fields it needs to go after the returned response
- how users interact with the AI functionality (for example, via the buttons on the content management form)
To provide that, the Augmentor AI module provides the “Field Augmentor” field type. The module also comes packed with extremely customizable field widgets such as the standard widget, a widget with a select list for choosing between specific responses, a widget for generating tags, and many more. We’ll discuss more details about fields and widgets further in the “Installation and configuration” part of this article.

Built-in demo augmentor
The Augmentor AI module comes packed with the Demo Augmentor submodule. When enabled, the latter provides a blueprint for developers and site builders.
Search API integration
Great news is here for Drupal websites that use the Search API engine for advanced search interfaces. The Augmentor AI module’s main package includes the Search API Augmentor Processors submodule for augmenting search results.
Support for ECA
As mentioned by Murray Woodman in his overview article about the Augmentor AI module, great effort has been put into providing support for the ECA (Event - Condition - Action) framework. This allows for triggering automatic actions for augmentors based on certain events and conditions.
The installation and configuration of the Augmentor AI module
Installing the module(s)
The Augmentor AI module depends on another Drupal module — Key. If you use Composer for installation, it will automatically install the Key module as well:
composer require drupal/augmentor
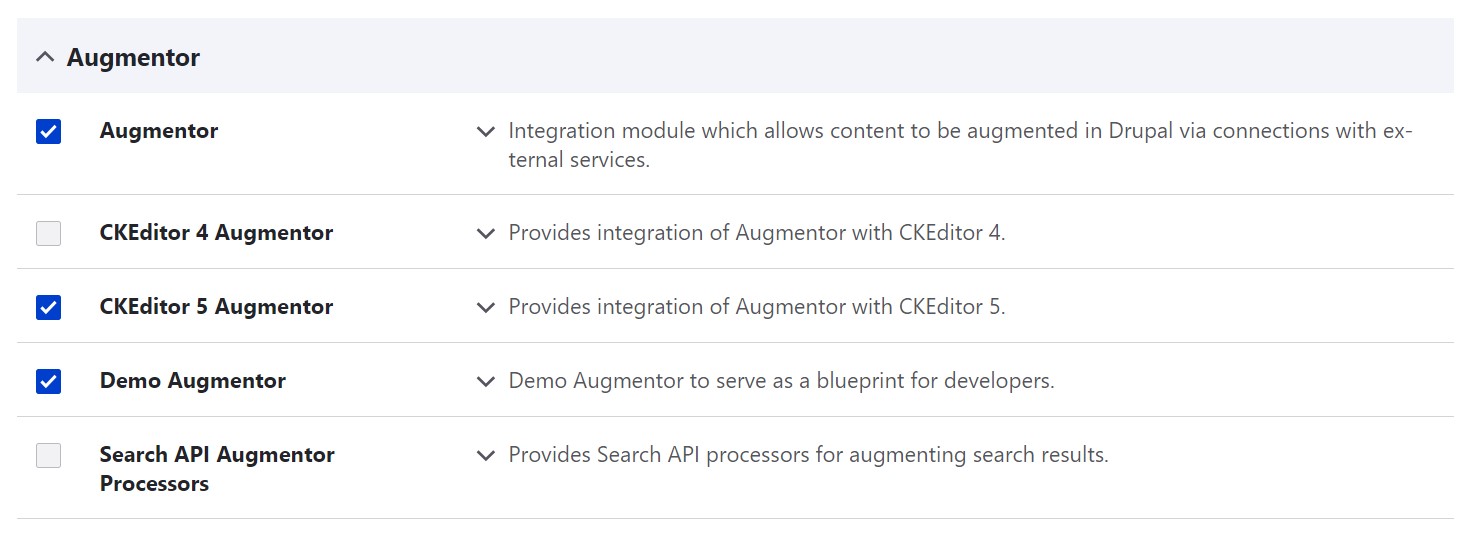
Next, enable the Augmentor module’s submodules as desired:
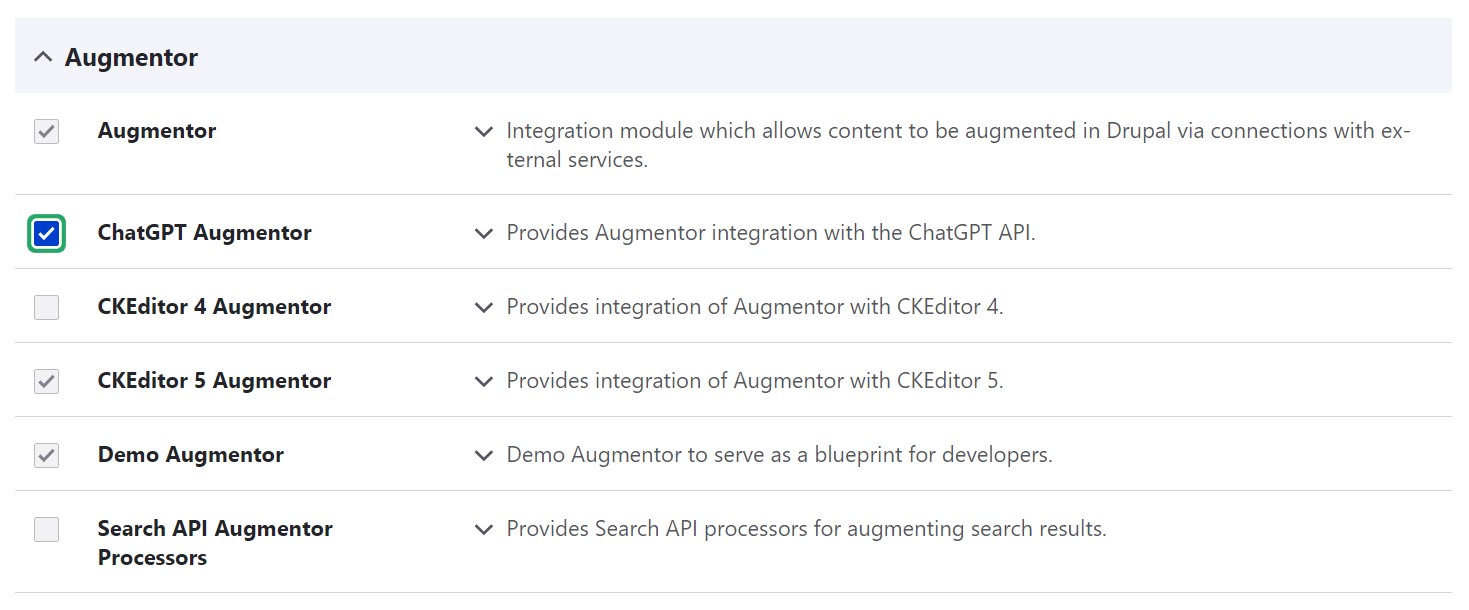
Finally, install and enable related modules for specific AI services you’d like to use.
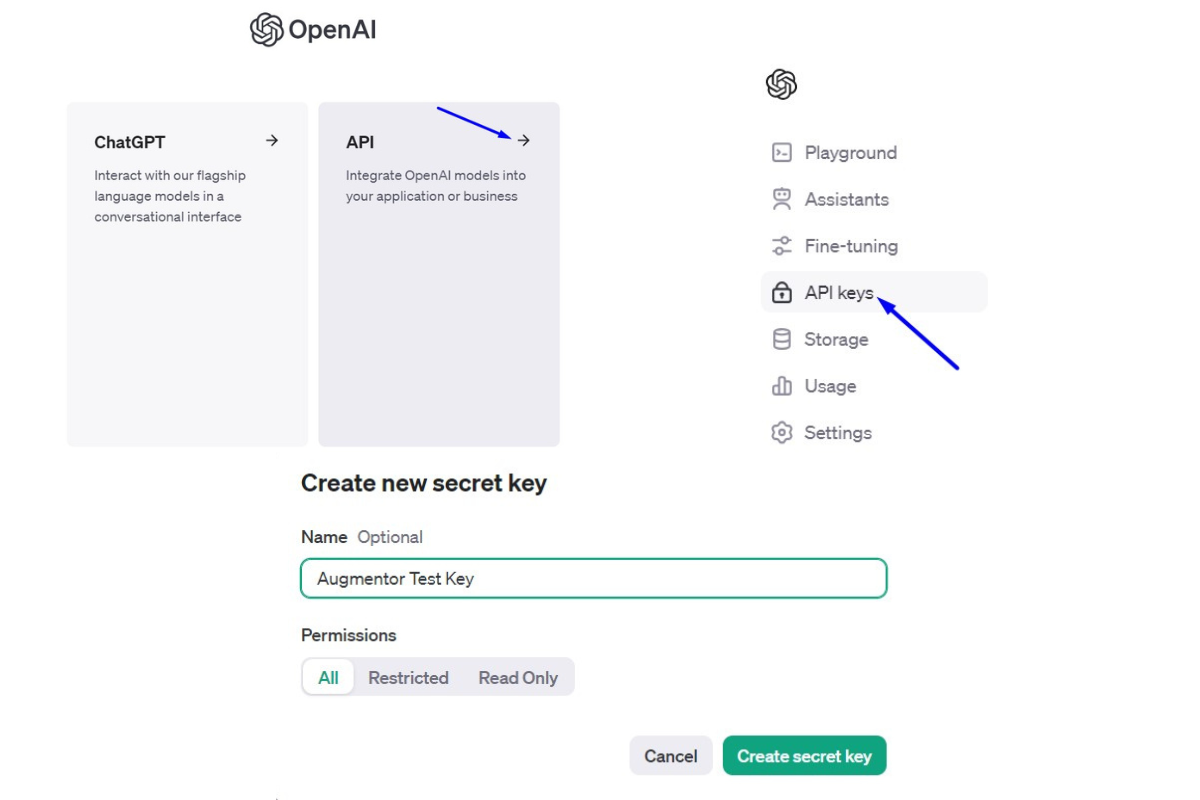
Getting an API key from an AI service
You’ll need to be logged in to your account with the specific AI service to get its API key. The instructions to get an API key vary depending on the service.
Adding the AI service API key to Drupal
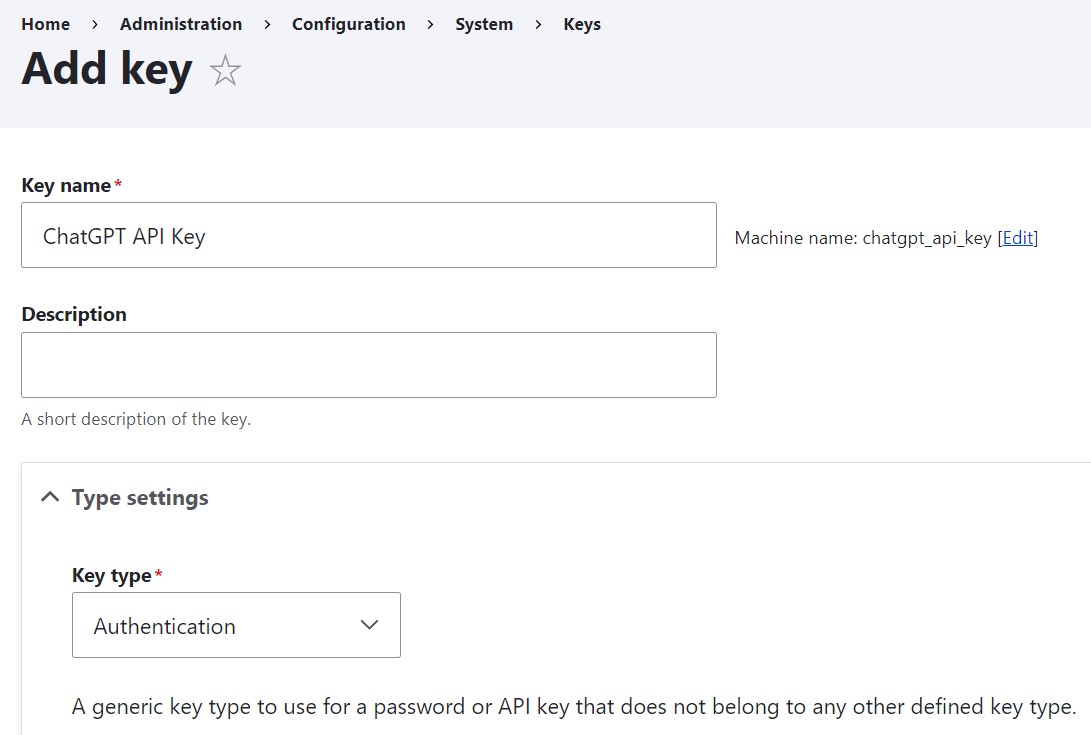
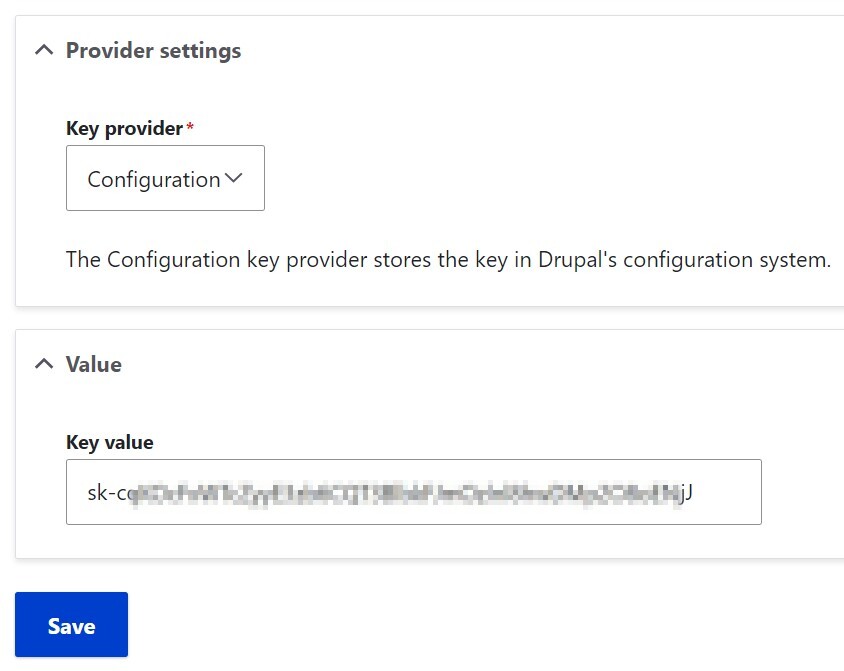
Go to Configuration > System > Keys on your Drupal website’s administrative dashboard and create a key entry with the API key for each AI service you intend to use. Martin Anderson-Clutz at the above-mentioned “Module of the Week” podcast said it’s possible to have separate keys for different augmentors as well.
Creating augmentors
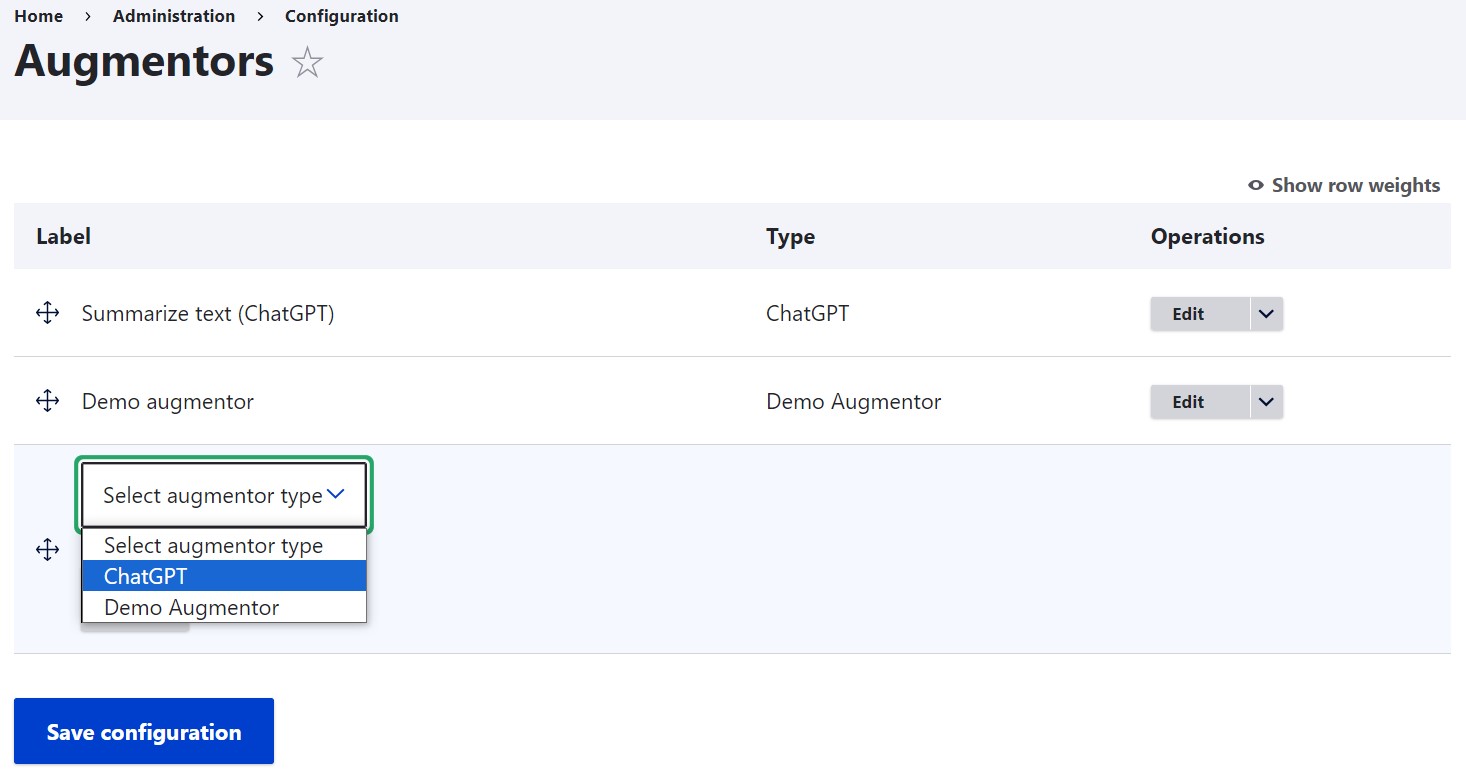
Go to Web Services > Augmentor and start by selecting your new augmentor type. This means choosing from the dropdown menu which AI service your augmentor should use, or whether you’d like to choose the Demo Augmentor, and then clicking “Add.”
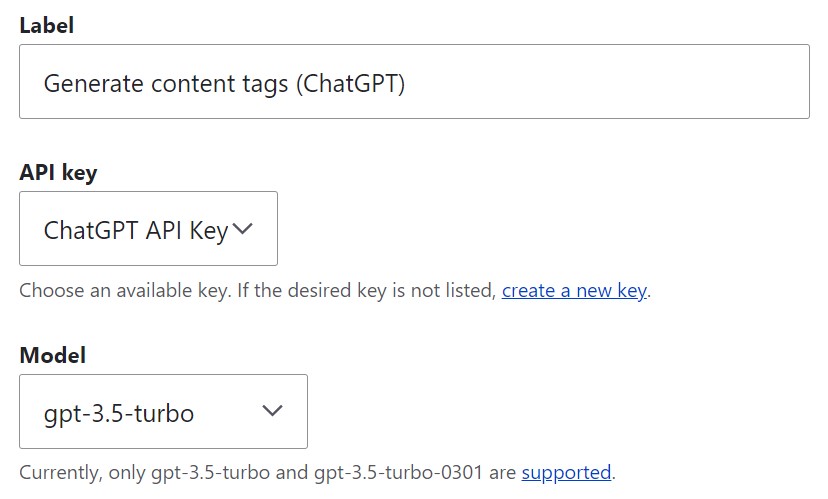
Next, on the augmentor’s settings page, give your augmentor a label explaining its mission, specify the API key, and select the AI service’s model.
Next, there is the “Content” field where you can enter the main message(s), or prompt(s) that will be sent to the AI service. Use the format described in the official documentation for the specific AI service (in the case of OpenAI, it’s here).
In this formatting example for ChatGPT, the placeholder token {input} is used. It represents the input text provided by the user. So a prompt for generating tags from content could look like this:
“Please generate tags for the following content: {input}”
where {input} will be dynamically replaced with the actual text the user provides when they interact with this augmentor.

Just above the message box, there is a dropdown with roles. Using all three of them is not required but, depending on your use case, they should be used to configure the query and the response formats and set up the prompts:
- If the role is “User,” it means the message is from the user interacting with the augmentor (like “Please summarize the following content: {input}”).
- If the role is “Assistant,” it means the message is from the AI assistant providing feedback or results (like “Sure! Please wait while I summarize the following text: {input}”)
- If the role is “System,” it could be some initial setup or high-level instructions (like “You are a helpful assistant. Explain any acronyms in the response. Use an authoritative and friendly tone.”).
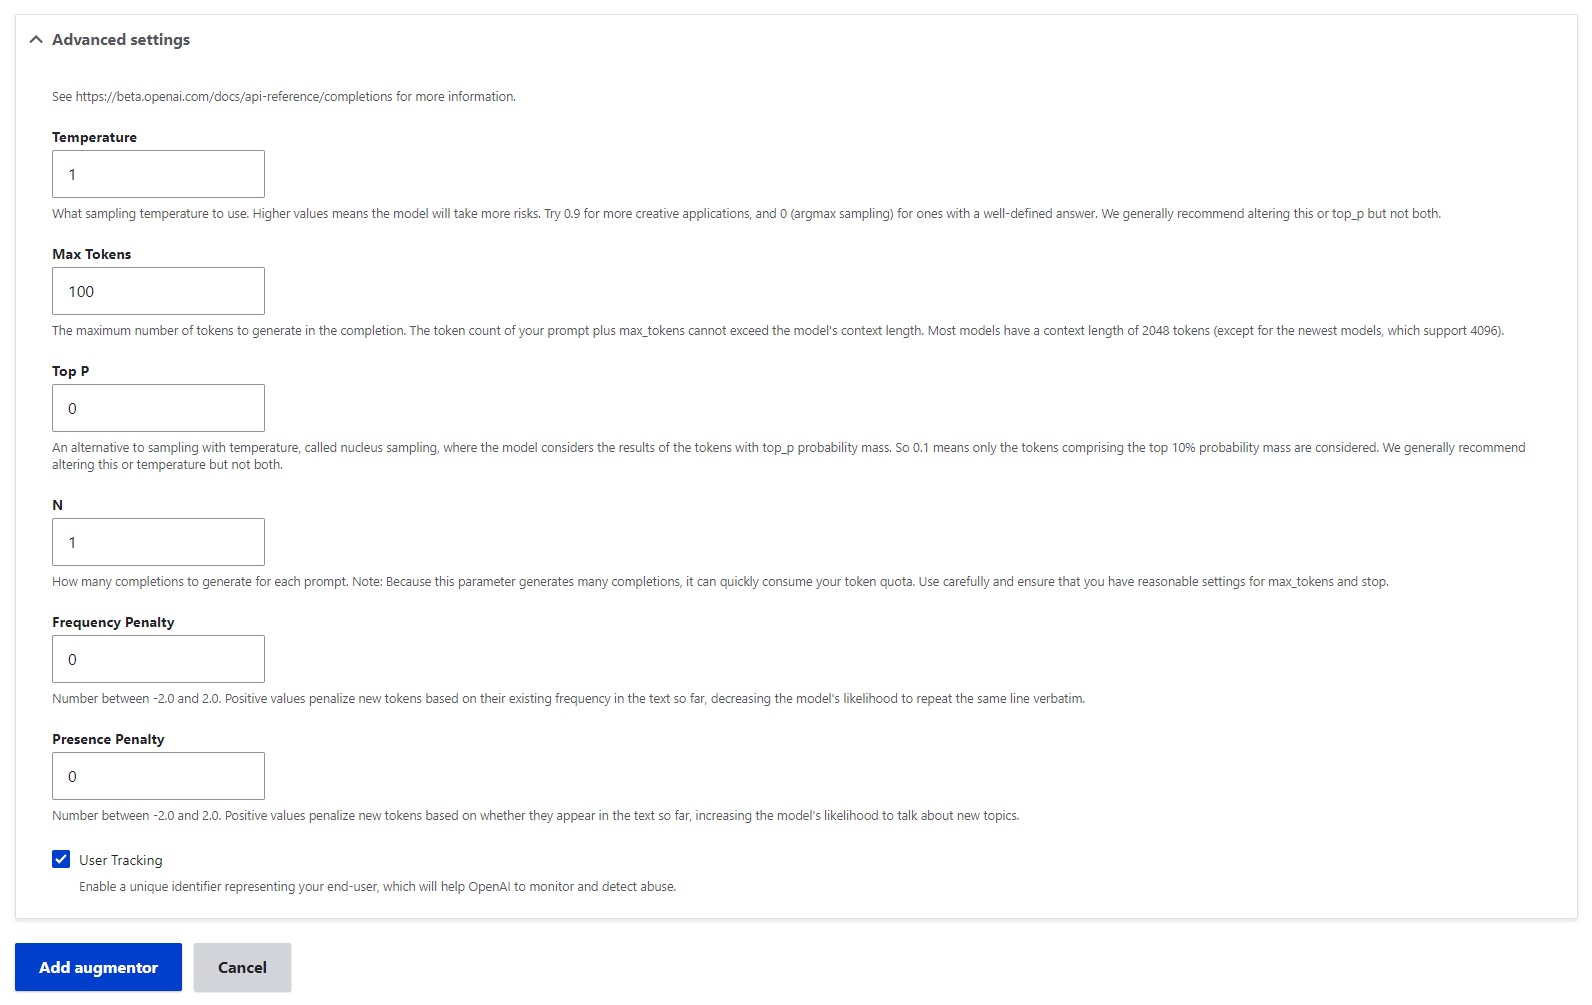
In advanced settings further down the page, you can configure the response characteristics such as randomness, maximum length, and more.
Adding the Augmentors button to the CKEditor toolbar
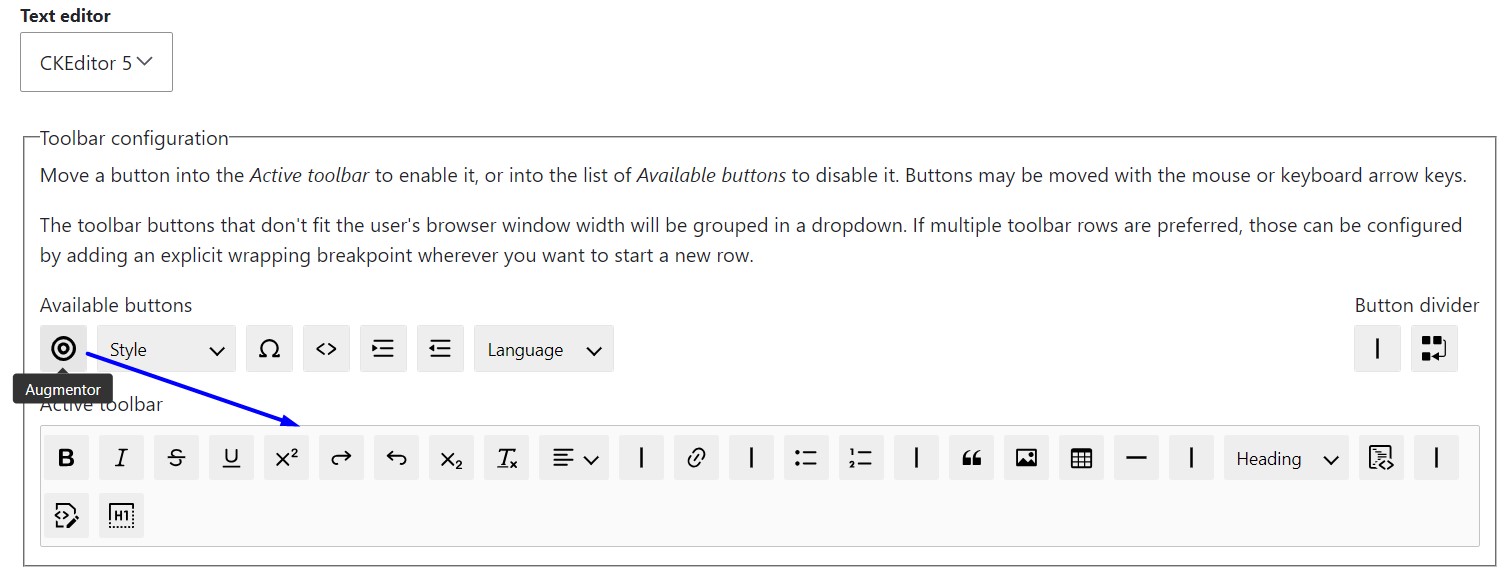
To add the Augmentors button to the CKEditor toolbar, go to Configuration > Content authoring > Text formats and editors, configure the text format, and drag the Augmentors buttons to the active toolbar. You could also check out more details about adding and configuring buttons for the CKEditor toolbar.
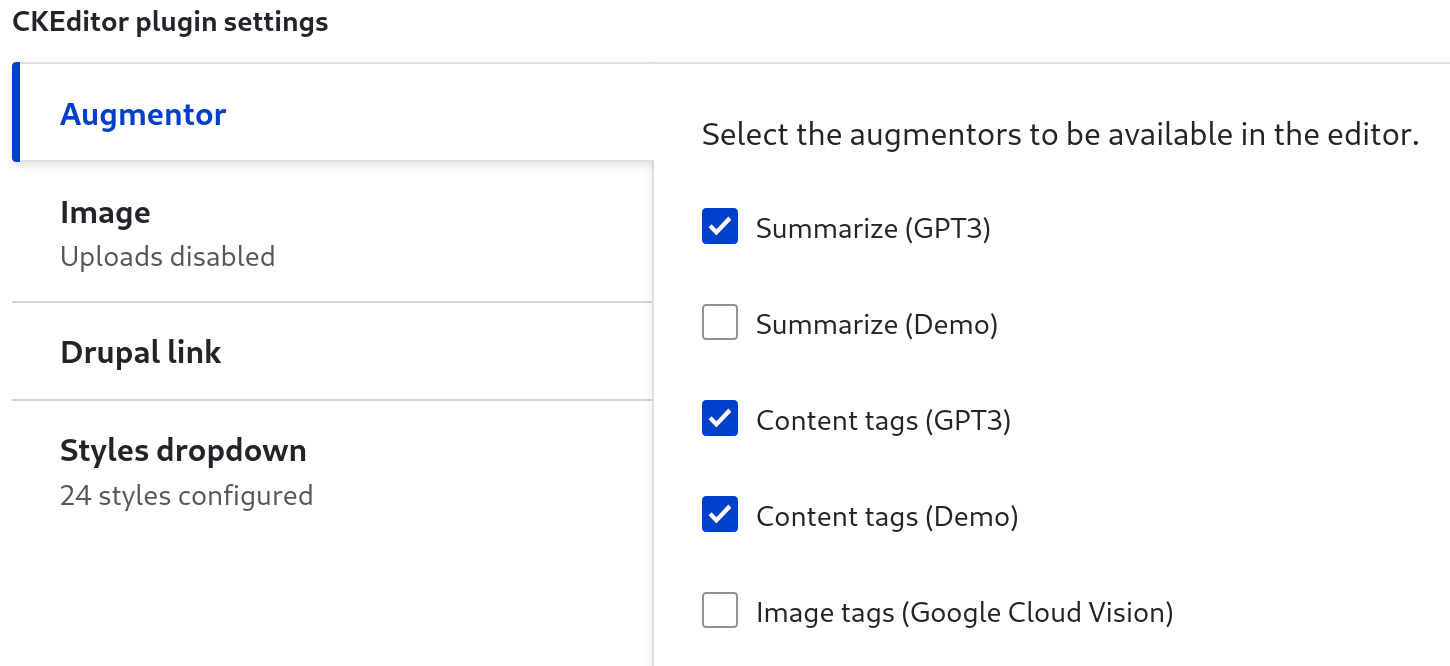
Furthermore, you can scroll down to the Augmentor plugin settings and select the audmentors that you’d like to be available in the content editing form.
Adding fields and configuring widgets
Go to Structure > Content types > [Your content type] > Manage fields and add a field of the “Field Augmentor” type.
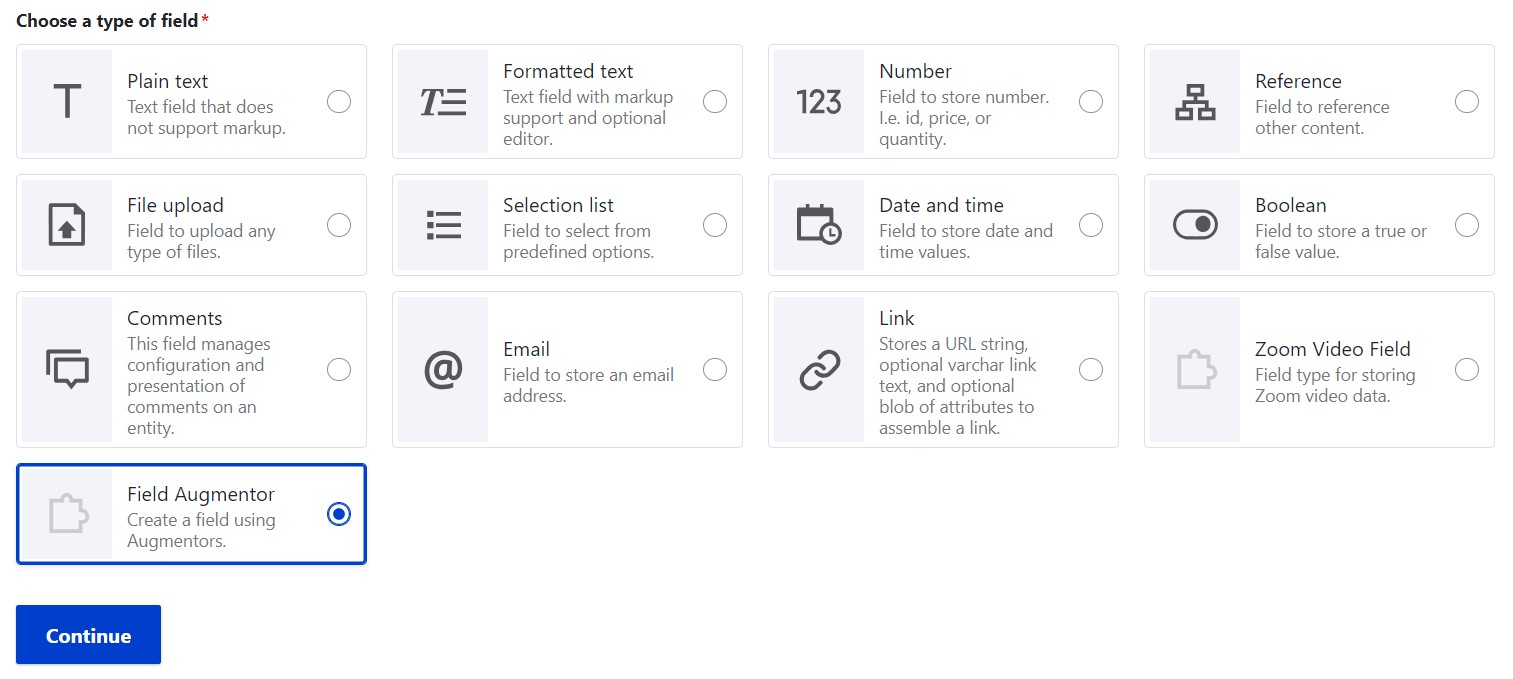
Once the field setup is complete, switch to the “Manage form display” tab. Select the widget for the newly added field. Currently, the built-in widgets include:
- Augmentor. It’s a general and versatile widget that can be used for various types of augmentors. It’s used for interacting with different types of AI services and handling various types of responses.
- Augmentor Default Widget. It’s best for simple fields that only need to manage a single value response from the AI service.
- Augmentor Select Widget. It provides a select box for choosing between multiple options for responses.
- Augmentor Tags Widget. It is used for reference fields, typically for taxonomy, which is great for AI-generated tags.
- Augmentor Select RegEx Widget. It is similar to the Select Widget but it uses a regular expression pattern.
- Augmentor Summary Widget. It takes content from the main text field and generates a summary.
- Augmentor File Widget. This widget is used when dealing with file fields, such as uploading images or documents.
After selecting the widget, click the gear icon to the right to configure the details.

In the widget settings, you’ll need to specify the source and the target fields:
- The source field is where the content for the prompt will be taken from.
- The target field is where the AI-generated content will be placed after processing.
For example, you have an “Article” content type where you want to use the “Generate content tags” augmentor. The “Body” field could be the source field and the “Tags” field could be the target field. The AI service should read the content in the “Body” field, generate tags, and return them to the “Tags” field.
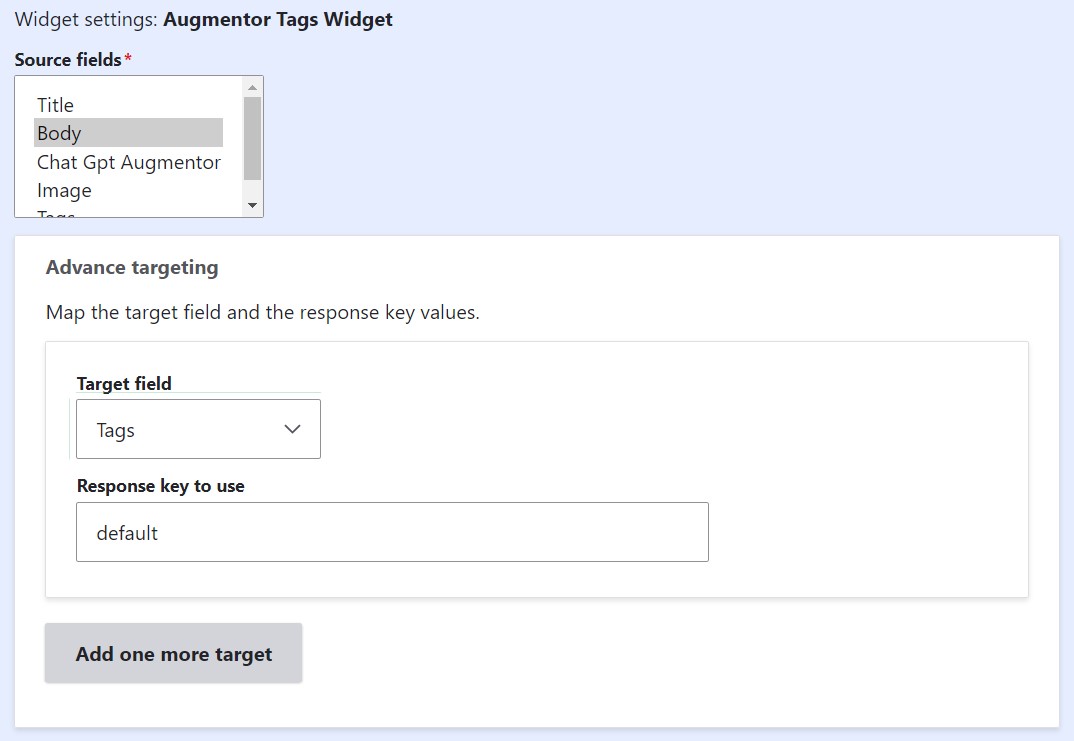
As the next thing in the widget settings, you’ll need to specify:
- which augmentor to use
- what to do with the existing content in the field (append, prepend, or replace)
- what text to show on the button that will be displayed to content editors (like “Generate tags”)
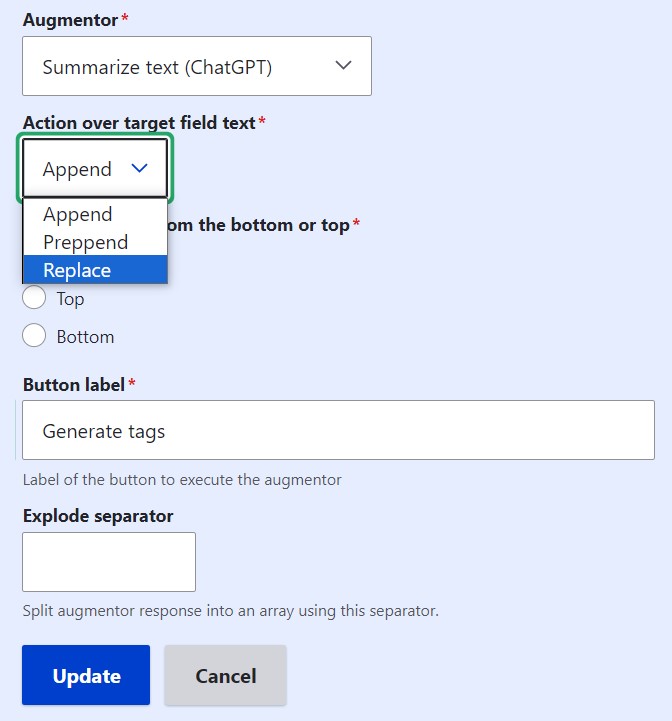
Finally, update the widget and save the entire “Manage form display” settings. You can also position the field as desired in the content editing form.
Final thoughts
Every AI module offers a different approach, and you can choose the right tool for your Drupal website based on its needs. It’s great when there are options to choose from and when it’s possible to compare them in every detail.
The earlier discussed OpenAI module is extremely user-friendly and ready to run almost immediately after you set up the OpenAI API credentials, offering nice defaults and available customizations. The Augmentor AI, on the other hand, offers much more space for a prompt engineer’s imagination but may look a bit tricky in its setup. It’s also not limited to the OpenAI products.
If you are thinking of integrating an AI service with your Drupal website, let’s discuss what will work best for you to take your content or other workflows to a new level — and seamlessly implement it!


