Save Time by Customizing Your Drupal Admin Pages with Bulk Actions

You can save valuable time on your Drupal website by replacing hundreds of clicks with just one. The secret is leveraging smart tools that turn tedious tasks into seamless, efficient, and even enjoyable workflows.
Previously, we introduced a fantastic module crafted by our developer that allows you to bulk-update your content elements across your entire website. Now, let’s explore the possibilities of using multiple bulk actions on your administration pages and customizing their appearance and functionality to meet your needs.
We’ll explore Drupal Views' built-in bulk action capabilities, dive into the powerful Views Bulk Operations module, and, as the icing on the cake, create a simple admin page with a custom bulk action from scratch.
Admin pages with bulk actions in Drupal Views
A glimpse of Drupal Views
Admin pages for managing various listings of content, users, comments, or other Drupal entities are typically built with Drupal Views. It is a renowned tool for creating listings in various formats. Views have been part of Drupal core since Drupal 8.0 and requires no installation. Previously, we made a tour of Drupal Views showing its key capabilities and explaining why it’s one of the top 10 most popular Drupal modules of all time.
Bulk actions in Views
You can perform bulk actions by selecting the boxes for multiple items and applying the same action to them in one go. For example, you can publish 100 unpublished blog posts or delete 50 outdated user accounts instantly.
Here are examples of bulk actions you can perform on pages built with Views.
With content:
publishing or unpublishing content
- saving content
- deleting content
- promoting or removing content from the front page
- making content sticky or unsticky on top of the page
With users:
- granting roles or removing roles from users
- blocking or unblocking users
- canceling user accounts
With comments:
publishing or unpublishing comments
- saving comments
- deleting comments
Examples of built-in Drupal admin pages with bulk actions
- The content administration page
Most Drupal users might have seen — and even regularly used — the Content administration page. This page features a dropdown with bulk actions that can be applied to multiple content items.
It has undergone multiple improvements and now looks as user-friendly as possible. Starting with Drupal 10.1, this toolbar is placed below the content list. The “Delete content” action is no longer the default one. The action bar dynamically displays how many content items are currently selected.
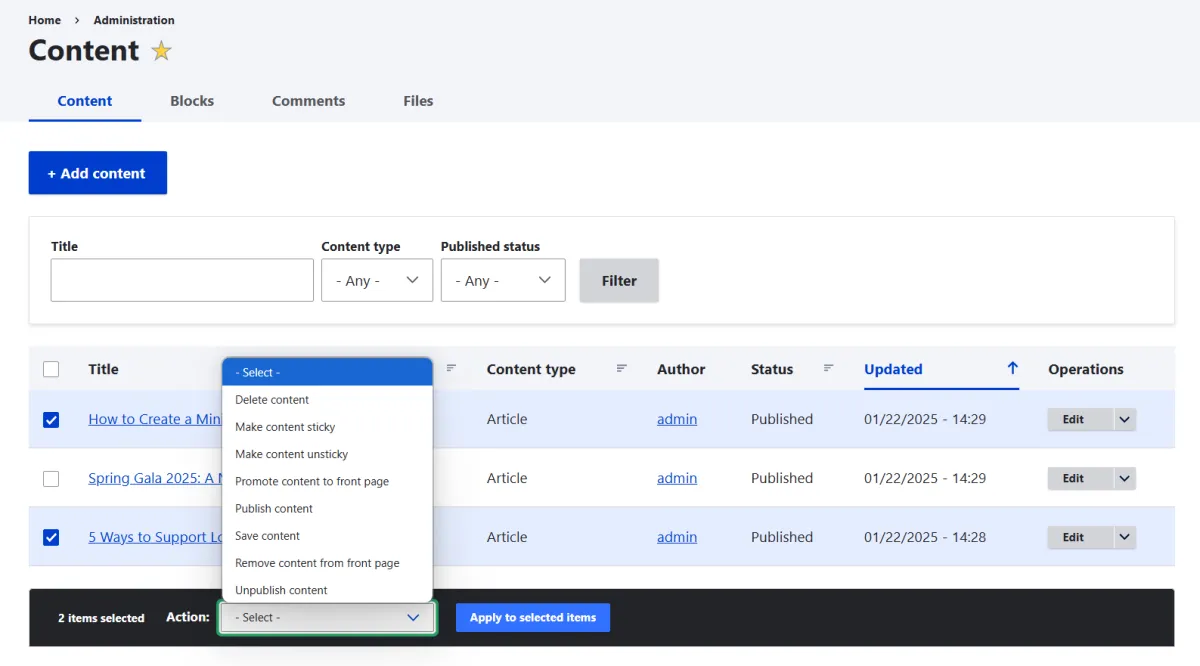
Bulk actions on the Drupal content management page
- The people management page
The page for managing users looks similar and enables you to select multiple users and apply the specified actions to them.
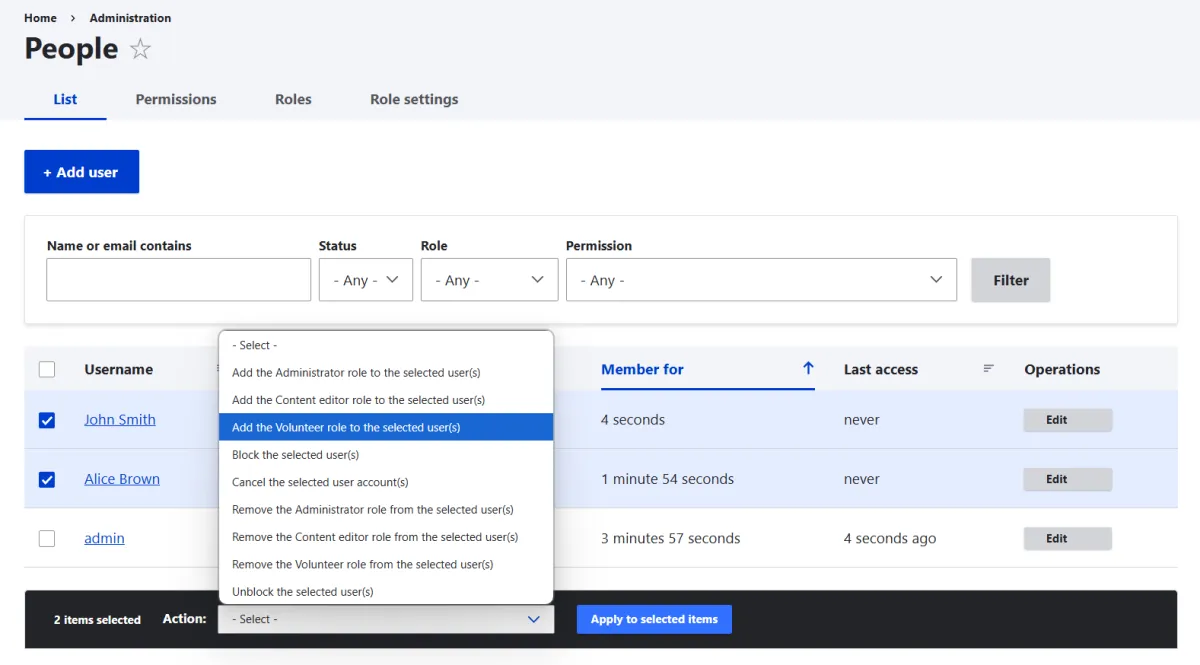
Bulk actions on the Drupal user management page
- The Media Library
Another example is the bulk operations menu for multimedia items which looks a little less rich in options. You can see it on websites where the Media and Media Library modules are enabled.
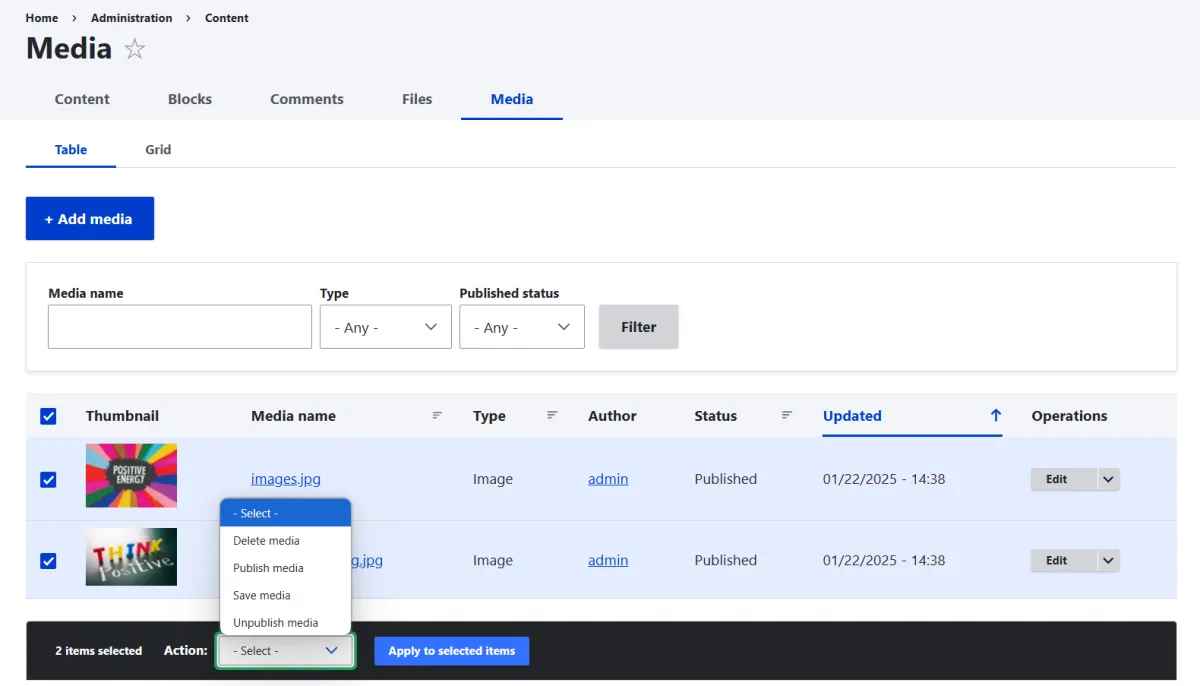
Bulk actions on the Drupal media management page
The great thing is you don’t have to limit yourself with the default bulk actions on admin pages but customize them to meet your website’s goals. You can select the specific actions that will be available in the admin form or create your own admin forms. No coding skills are necessary — just an understanding of Drupal Views — is required to configure this through the admin interface.
How to customize bulk actions for your admin pages in Views
1. Creating or editing a view
If you’d like to customize an existing view, you can go to Structure > Views and click “Edit” next to your view on the list. Then skip the next few steps and proceed to the area with the field for bulk actions.
We’ll create an admin page for managing events. To create a view from scratch, follow these steps:
- In Structure > Views, click “Add view”
- Give your view a name (like “Events”)
- Under “View settings,” configure the view to display the content of type “Events”
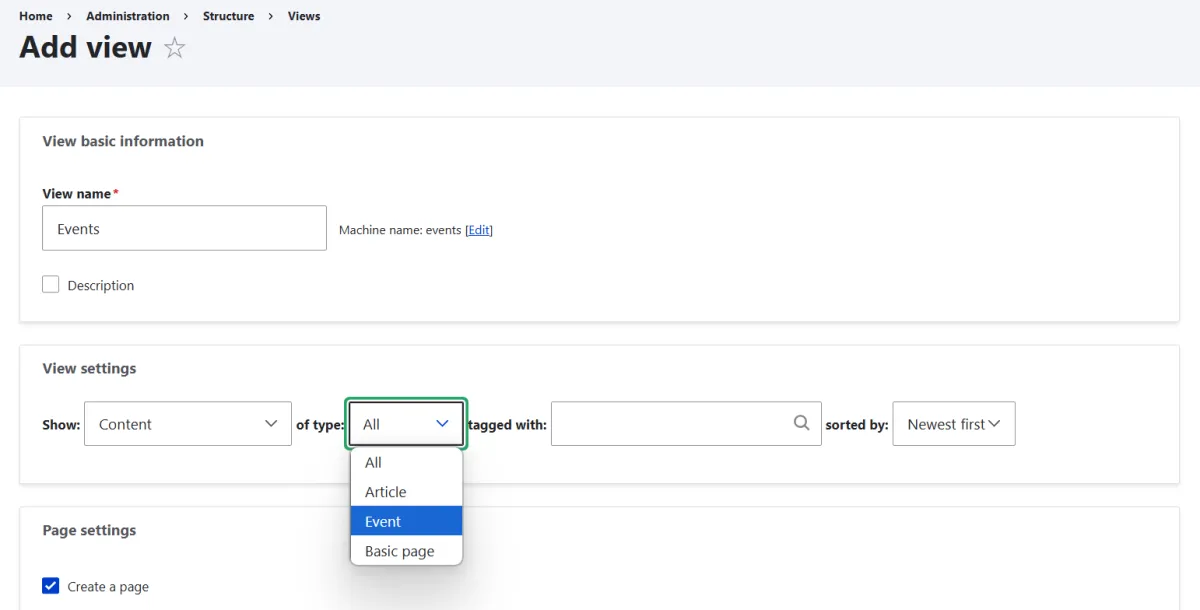
Creating a Drupal view that shows events
- Under “Page settings,” select “Create a page.”
- Under “Page display settings,” select “Table.”
- Choose how many items per page you want to display.
- Click “Save and edit.”
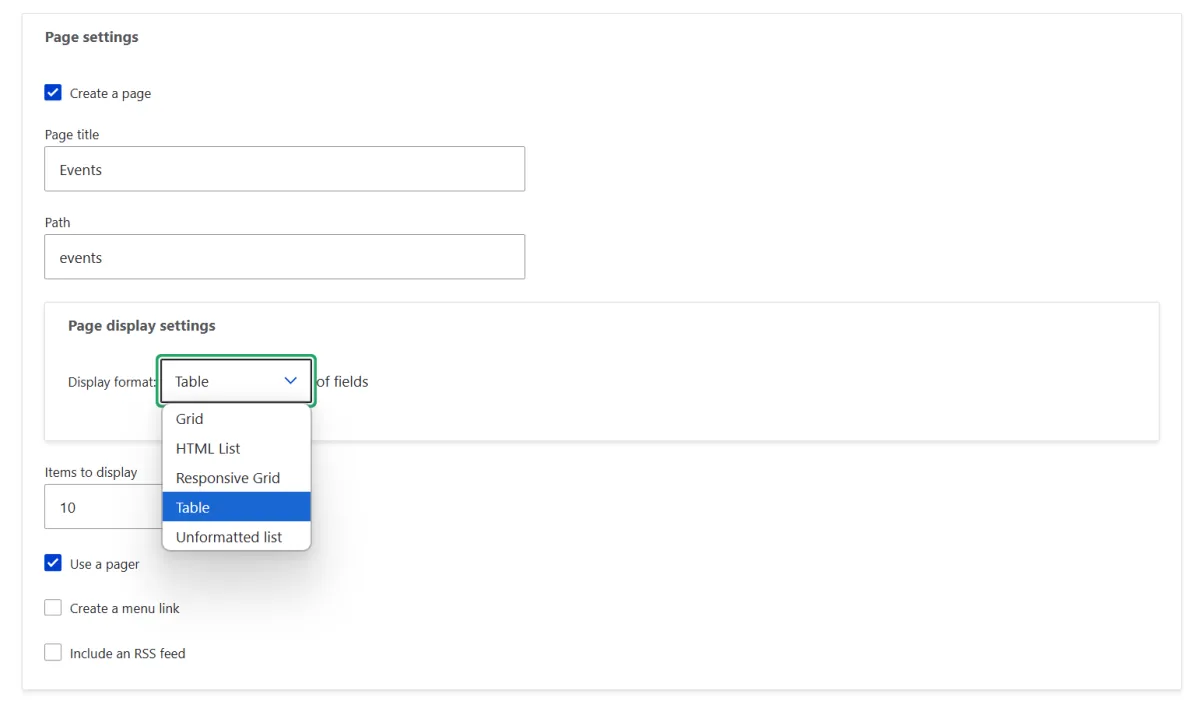
Specifying the Drupal view’s format as “table”
Configuring the view
The newly created view shows the titles of all published events. Your future admin view will need to display both published and unpublished items, so let’s go to the “Filters” section and remove the “Published” filter.
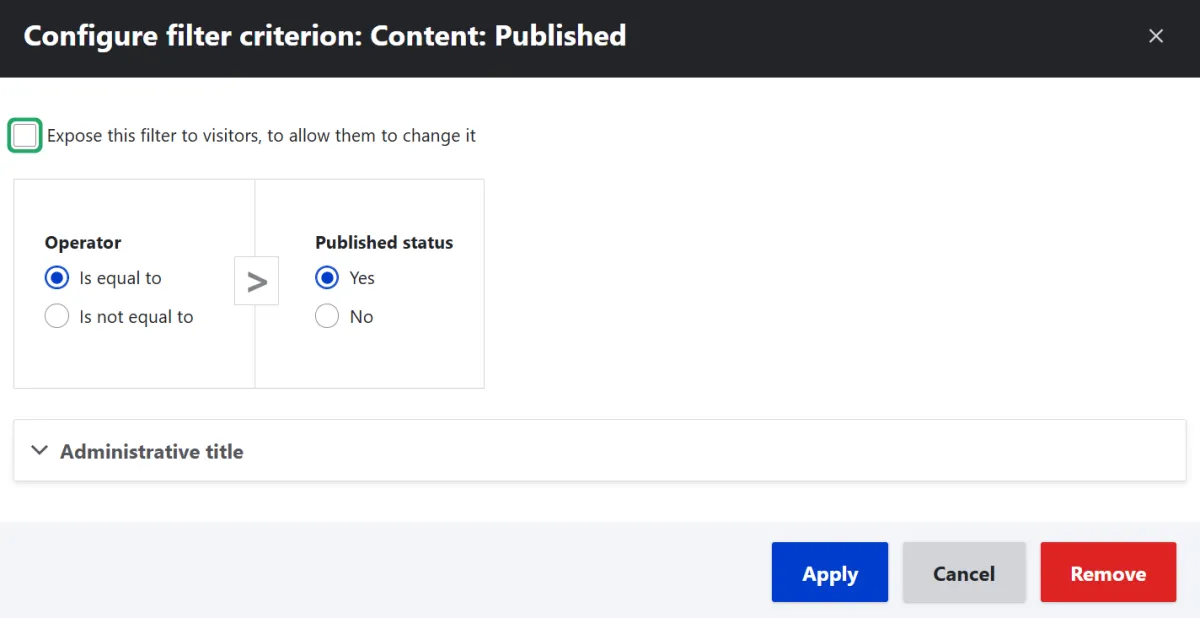
The “Published” filter in a Drupal view
Under “Fields,” you can use the search feature to find some useful fields for your admin page:
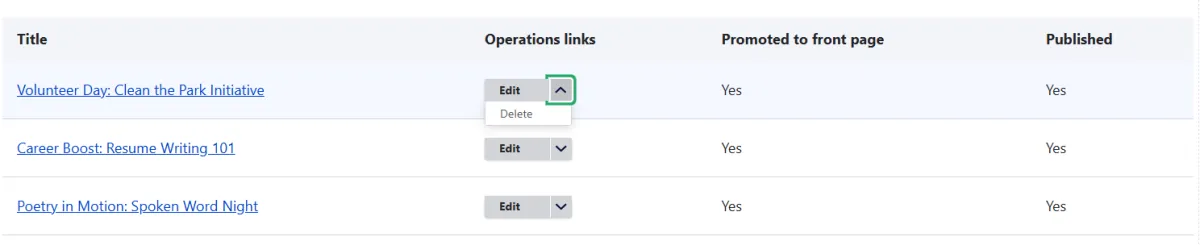
- Operations links. This will add a dropdown menu next to each event with the “Edit” and “Delete” options.
- Published. This will show the publication status of the content item.
- Promoted to front page. This will show the promotion status of the content item.
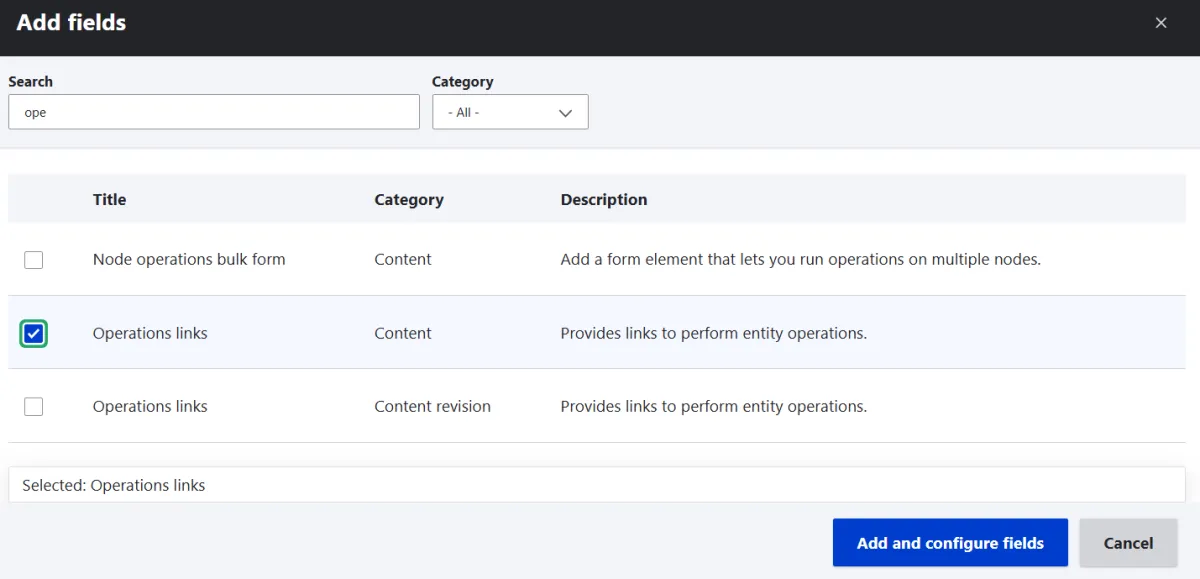
Adding the “Operations links” field to a Drupal view
Once you’ve selected all the needed fields, click “Add and configure fields.” When configuring the “Published” and “Promoted to front page” fields, choose the operators that are most convenient for your team: Yes/No, On/Off, etc.
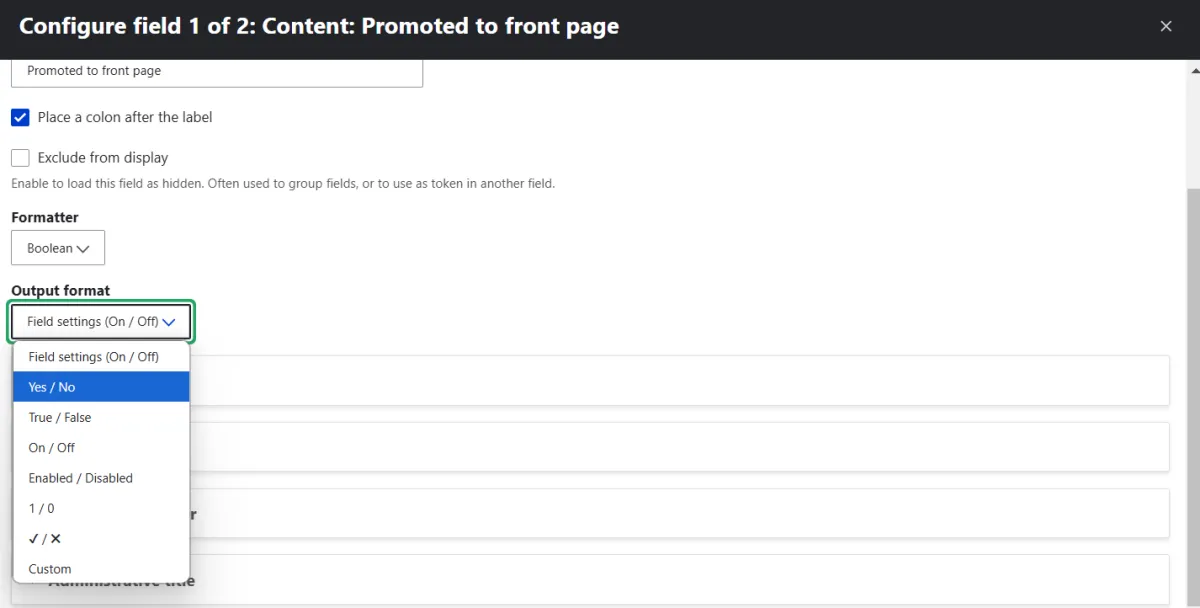
Choosing the “yes/no” operator
When all the above-mentioned fields are added, the admin page looks like this:
An admin page with several fields created via Drupal Views
Make the page part of your admin menu
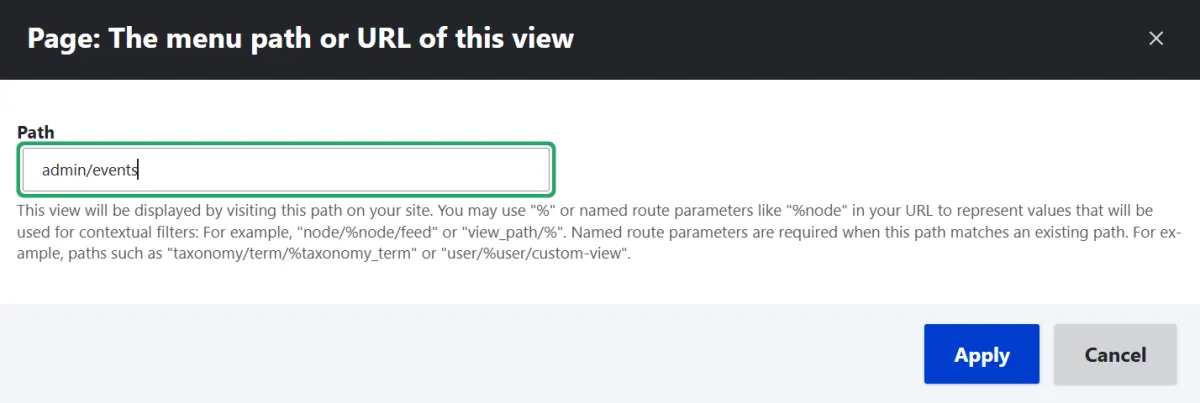
The newly created page needs to become one of your administration pages. First, go to Page Settings > Path in the same interface for configuring your view. Change the path to admin/events.
Changing the path of a view so it becomes part of the administrative interface
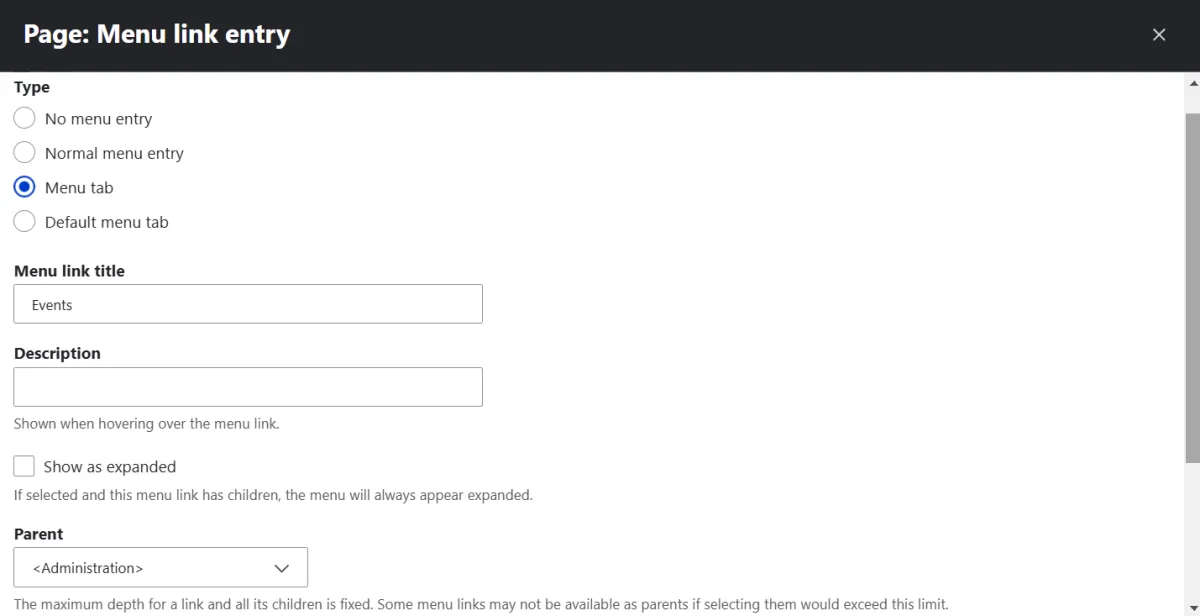
Then give your page the proper place in your admin menu. At Page Settings > Menu, select “Menu tab,” add a link title for your page (like “Events”), scroll to “Parent” and select “Administration.” Click “Apply.”
Adding a view page to the website’s admin menu
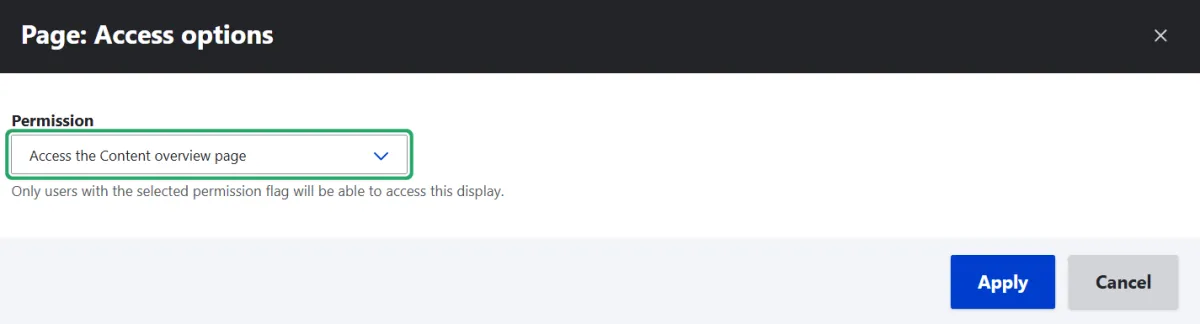
Let’s also make sure only admins can see it. At Page Settings > Access, change the permission to “Access the content overview page.” Otherwise, it would be available by default to all users.
Making the view page available to admins only
Adding a field for bulk actions
Now, let’s move on to the part with configuring the bulk actions. Still in the same interface for configuring your view, go to the “Fields” section. Find and select the bulk actions field. There are different fields available depending on which entity type your view is based on:
- For a content-based view, the field is “Content: Node operations bulk form.”
- For a user-based view, the field is “User: Bulk update.”
- For a comment-based view, the field is “Comments: Comment operations bulk form.”
- For a taxonomy-based view, the field is “Taxonomy term: bulk update.”
- For a media-based view, the field is “Media: bulk update.”
In this example, it will be “Content: Node operations bulk form.” Click “add and configure fields.”
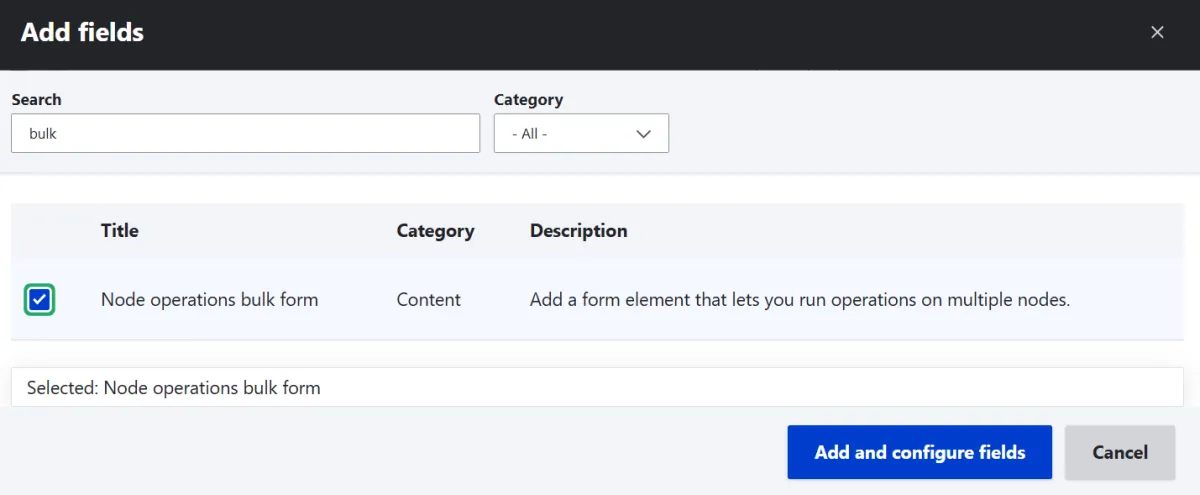
Adding the bulk actions field to a view
When configuring the field, specify the bulk actions you want admins to be able to perform. There are two options:
- All actions, except selected (default). All actions will be available in the admin form except those you select. If you want all the actions to be displayed, you can leave it as is.
- Only selected actions. If you switch to this setting, only actions that you select will be available in the admin form.
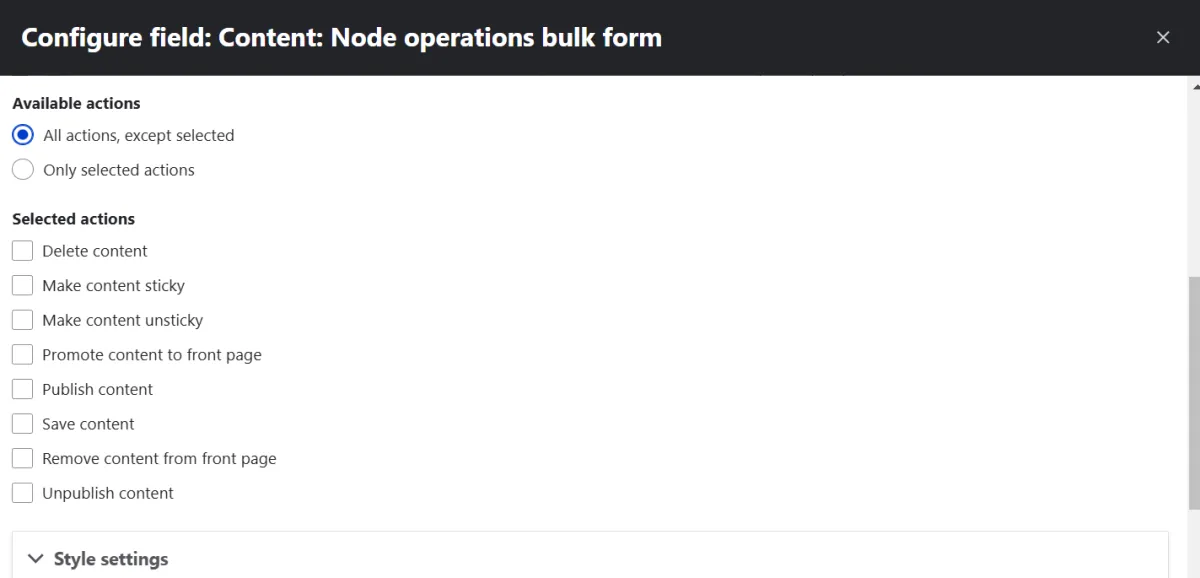
Selecting the actions that will be available in the admin form
Reordering the fields
You then decide what should come first:
- the event titles
- the operations links (“Edit,” “Delete”)
- the “Promoted to front page” status
- the “Published” status
- the checkboxes for bulk actions
Select “Rearrange” under “Fields” and drag and drop them in the order you like.
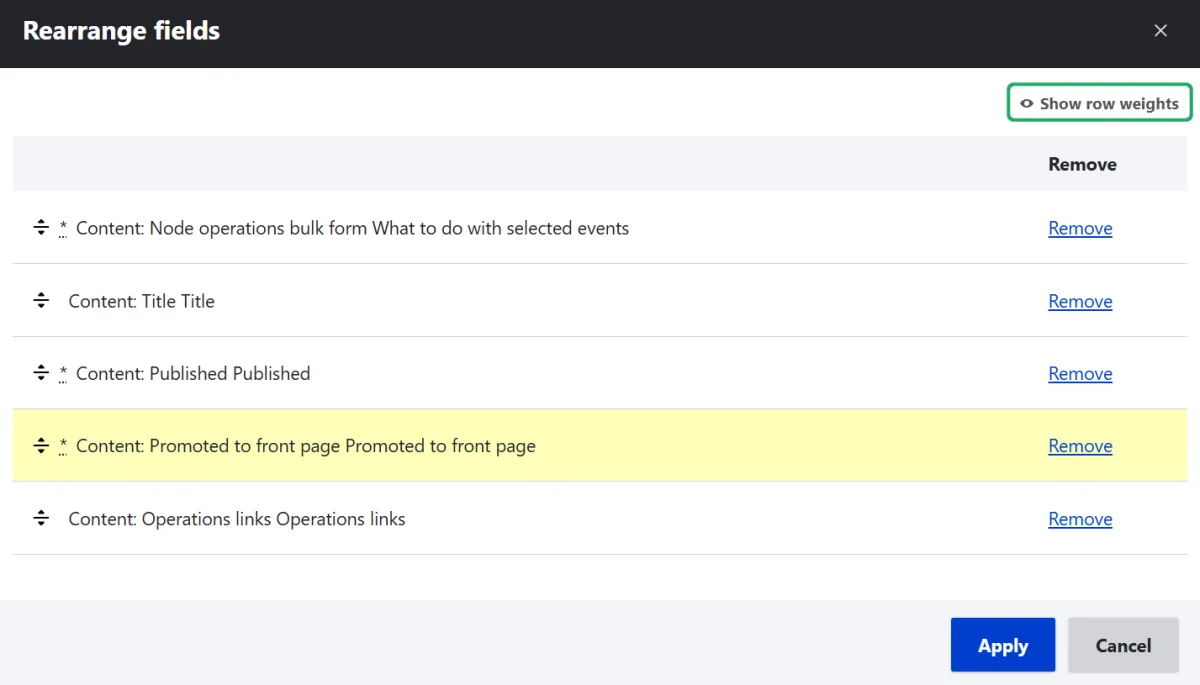
Rearranging the fields in a view
The result
Visit the administration page and you’ll see a new “Events” tab on it with all the functionality for managing events in bulk.
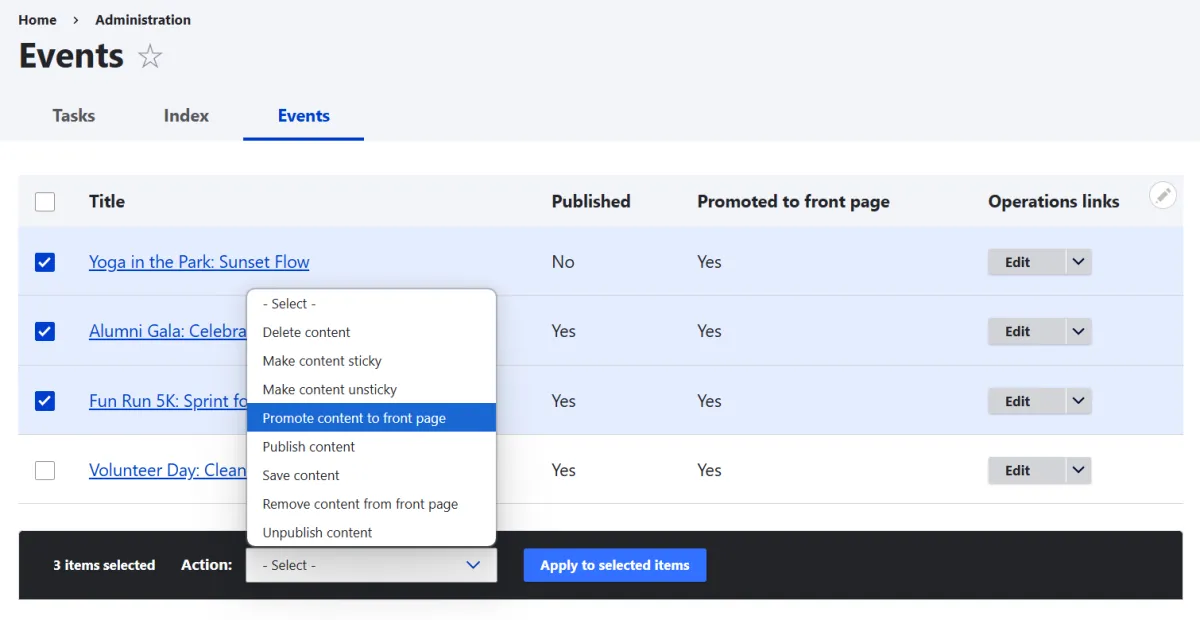
The ready admin view with bulk actions
How the Views Bulk Operations module can additionally help
The Views Bulk Operations (VBO) has been around since Drupal 5 and was originally the only tool offering bulk action functionality. Later, many of its features became available in Drupal Views. While the bulk actions in both systems appear similar, with slight differences in styling and wording, VBO offers more advanced capabilities. Here are some of the features that make VBO great:
- Custom bulk actions
One of the most prominent advantages of the VBO module is the possibility to create custom actions. Developers can use the module’s built-in API to define complex or specialized actions, integrate it with other modules, and trigger custom workflows. This opens unlimited possibilities to customize bulk actions in admin pages to meet your needs.
- More customization tweaks
With VBO, you can assign custom labels to actions and create confirmation messages that admins will see when they are going to perform the actions. This is available in the administrative interface with no coding.
- Fine-grained permission control
VBO comes packed with the Actions Permissions submodule. It allows you to control the details of who can perform which bulk action. This functionality builds on Drupal’s system of roles and permissions — a cornerstone of Drupal security practices.
- Active development and fresh updates
The Views Bulk Actions module’s maintainers regularly update it. They release new versions of the module, enhancing it with the latest features, including compatibility with the latest major Drupal core version — Drupal 11.
- Modules to extend VBO
There is an ecosystem of modules that expand VBO’s capabilities. Here are some of the most popular ones that are also compatible with Drupal 10 and 11:
- The Views Bulk Edit module provides an action to edit selected items.
- The VBO export adds two actions: export to Excel and export to CSV.
How to configure bulk actions in Drupal Views with VBO
1. Installation
Install the Views Bulk Operations module on your website per normal. The recommended way is to use Composer:
composer require drupal/views_bulk_operations
Enable the module either by checking its checkbox on the Extend page or using the Drush command-line tool:
drush en views_bulk_operations
If you’d like to fine-tune the permissions for VBO actions, you’ll want to also enable the Actions Permissions submodule via the Extend page or Drush:
drush en actions_permissions
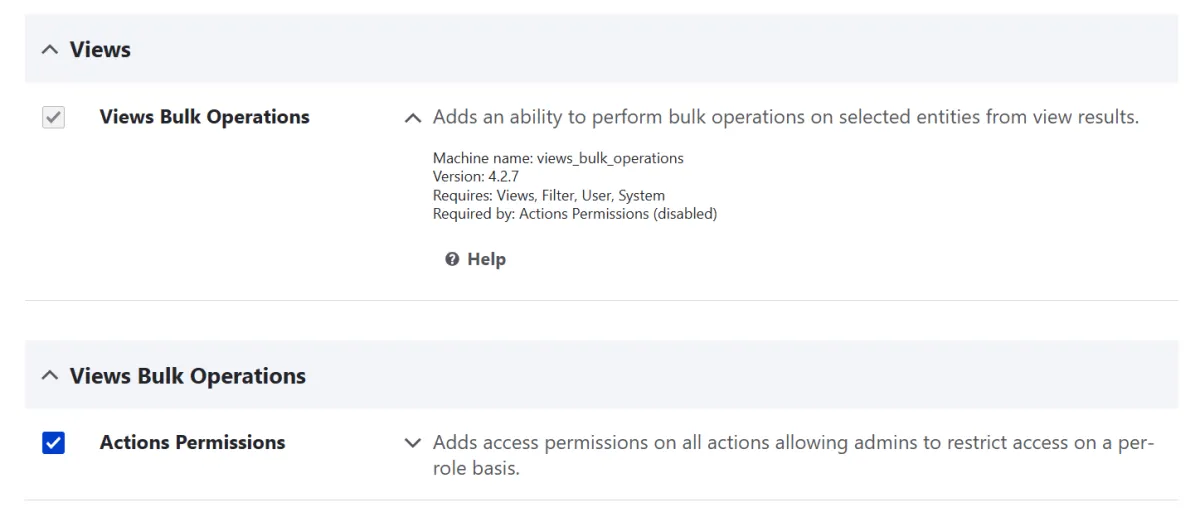
The Actions Permissions submodule
If you are not familiar with the command line, you could alternatively download the Views Bulk Operations from drupal.org and then proceed to enable it on the Extend page. However, this option was removed in Drupal 11.1 following the best practices. Soon, Project Browser is going to provide an easy module installation process with Composer under the hood.
Adding the Views Bulk Actions field
Once you enable the module, you’ll find a new field named “Global: Views bulk operations” available in every view settings under “Fields.” If your view already uses one of the default bulk operations fields (like “Node operations bulk form” for content and comments or “Bulk update” for users), it needs to be removed for VBO to work properly.
The field configuration is similar to that for the default views field. However, with VBO, there is no option to leave everything as is — you’ll need to deliberately select specific actions you want to be displayed in the admin form. In VBO’s settings, you can also select or deselect all actions in bulk.
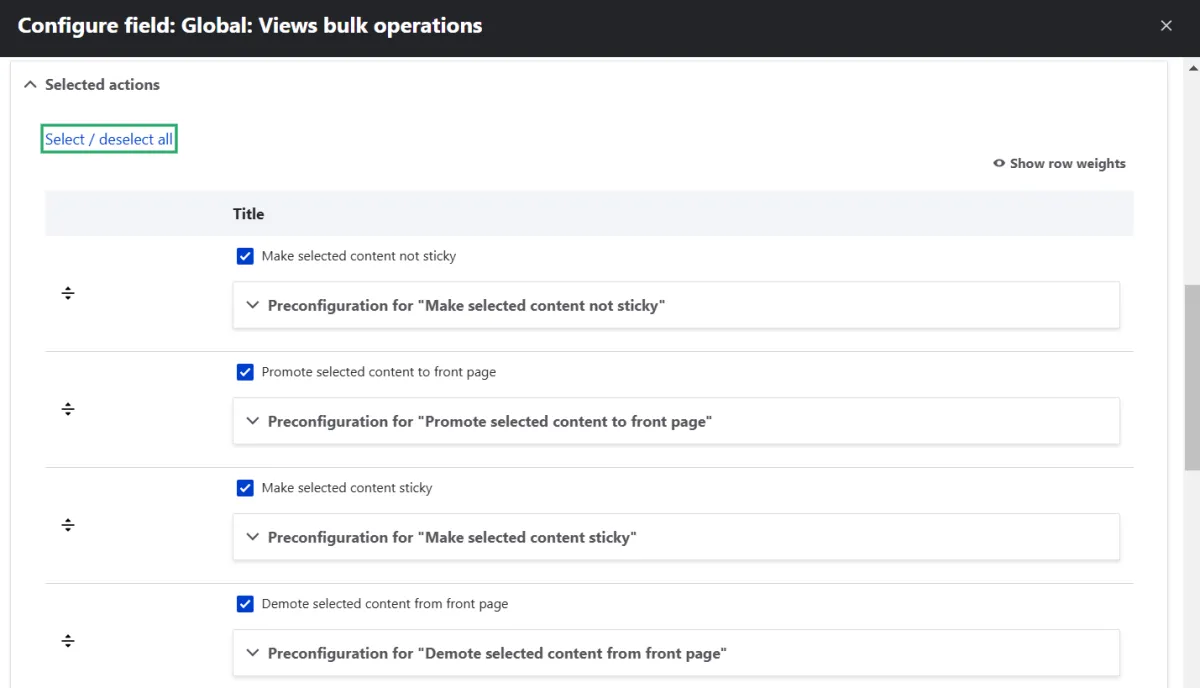
Configuring the selected actions with the VBO module
Click “Preconfiguration” for a specific field to customize its label if needed. You can also select the “Add confirmation step” checkbox if you’d like admins to be asked to confirm their actions.
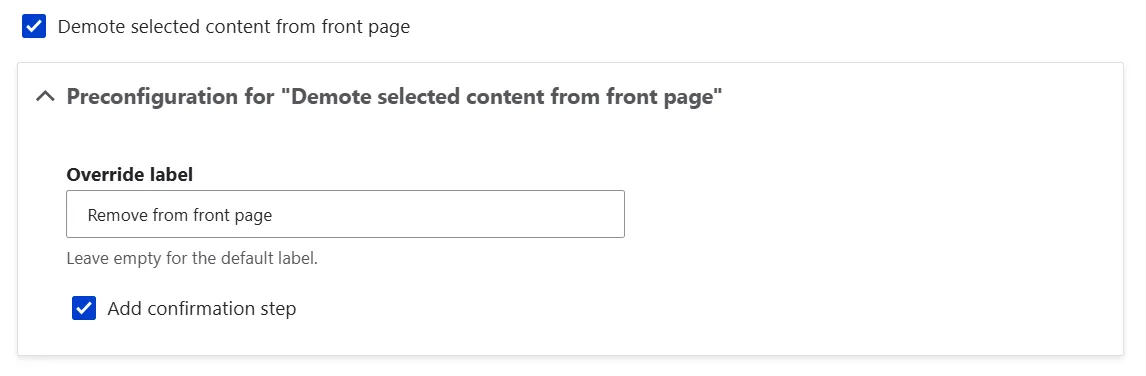
Customizing the label for a bulk action with the VBO module
Assigning VBO permissions
With the Actions Permissions submodule enabled, you can go to People > Permissions and specify exactly which roles can manage specific VBO actions. There is a long list that includes all possible actions. The screenshot below is only a snapshot of the entire list.
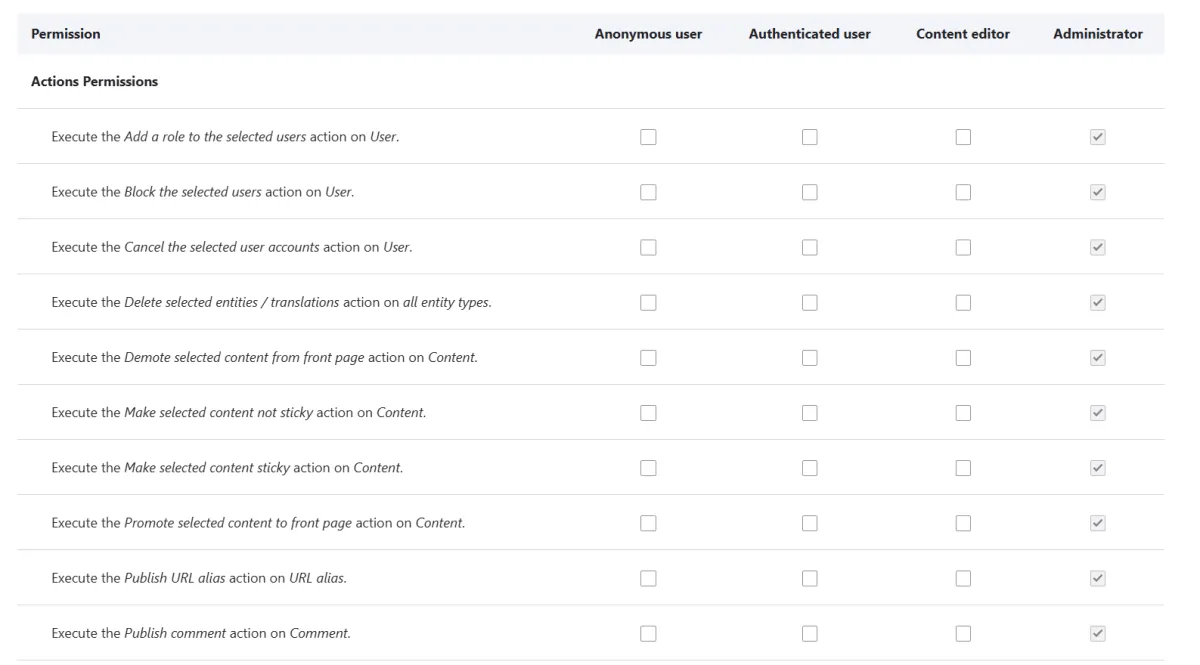
Specifying the per-action permissions with the Actions Permissions submodule
Final thoughts
By leveraging both built-in tools and the added power of modules like Views Bulk Actions, you can tailor your site management to suit your unique needs. This will make it easier to save time and focus on what truly matters — delivering value to your users. Let’s chat to discover ways to unlock the full potential of customized admin pages with bulk actions!